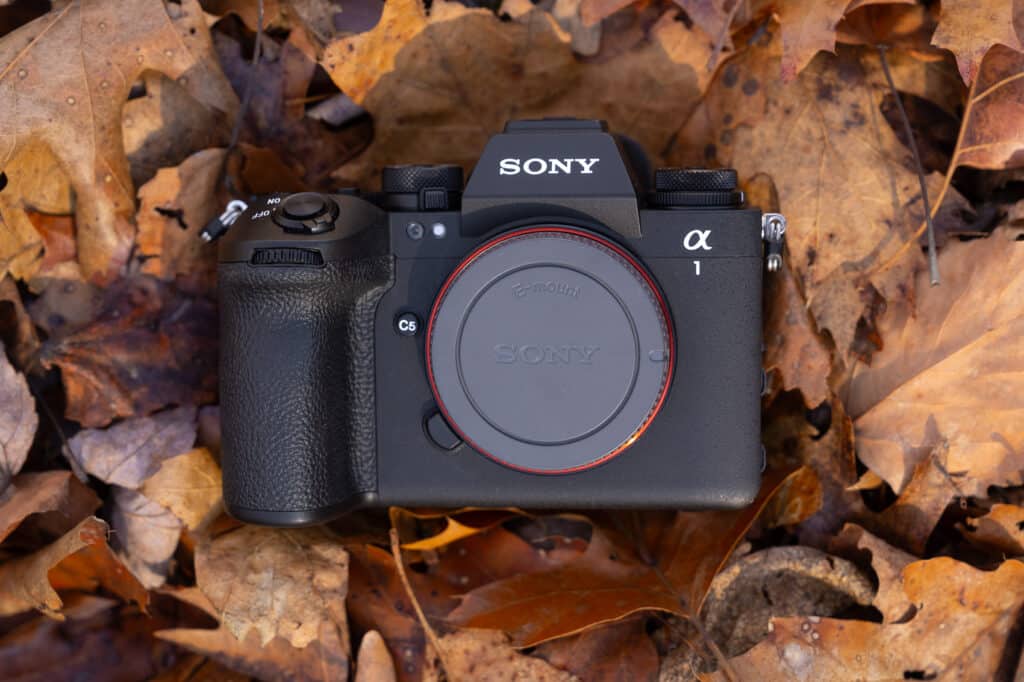
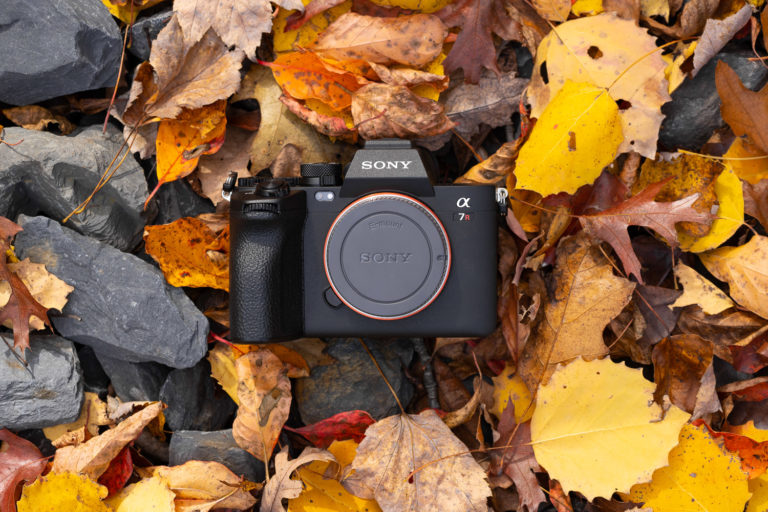
With the Sony a1 II release, Sony upgraded one of the most powerful and popular mirrorless cameras to date. The a1 (Original A1 Setup Guide) was the first to offer a 50mp sensor and the ability to shoot at 30fps. To top things off, it had one of the best AF systems of any mirrorless camera at the time. With the a1 II, Sony has taken everything we loved about the original and added many highly requested features, such as a dedicated AI-based AF processor, RAW pre-capture, Eye AF tracking in video mode, and much more. In addition, it has a fully articulating rear LCD screen, a new, more ergonomic body, and the latest Sony camera menu system.
So, no matter if this is your first Sony camera or if you have been shooting with the Sony mirrorless system for as long as I have, there are plenty of new features, settings, and menus to learn. This is why I have created The Complete Setup Guide to the Sony A1 II. I will help you walk through each menu setting from the moment you first turn on your camera. If you’d like to learn how I choose to customize my a1 II, you can check out my separate blog post, Customizing Your Sony a1 II. There, you can see how I set up my a1 II and even download my settings file so that you can quickly get your camera set up exactly like mine. Either way, I hope you enjoy these guides, and if you have any questions, please leave them in the comments below, and I will do my best to answer them!
*All new features to the Sony a1 II for those coming from the original a1 will be marked with “*New” to help you quickly identify them.
Starting Up Your Camera For the First Time
Now that you have opened the box that your Sony a1 II came in and charged the battery, it is time to turn it on for the first time.
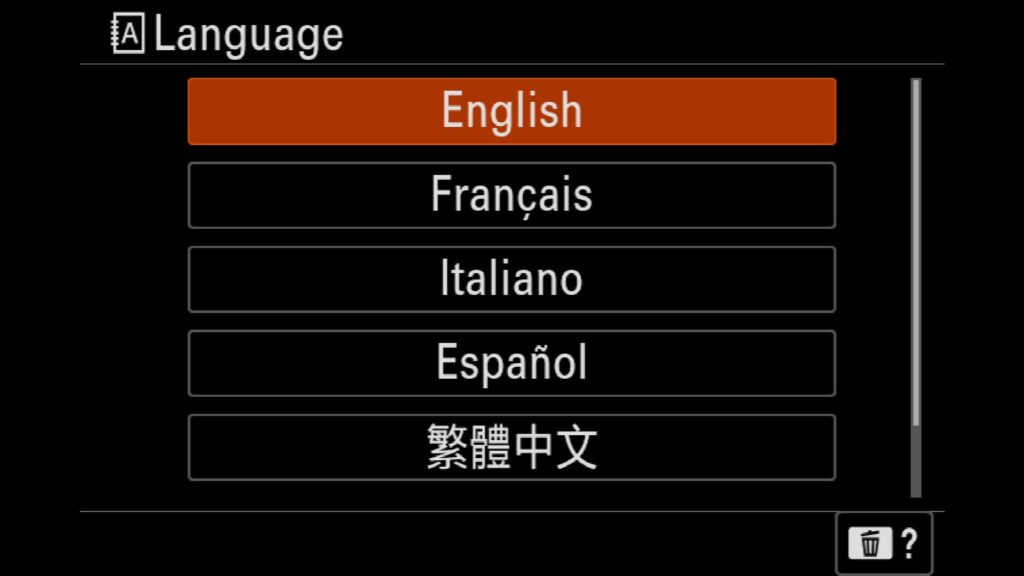
Setting the Language
Just like with every other digital camera, the first thing you need to do is choose the language in which you want the a1 II to operate. You have six options including: English, French, Italian, Spanish, Traditional Chinese & Simplified Chinese.
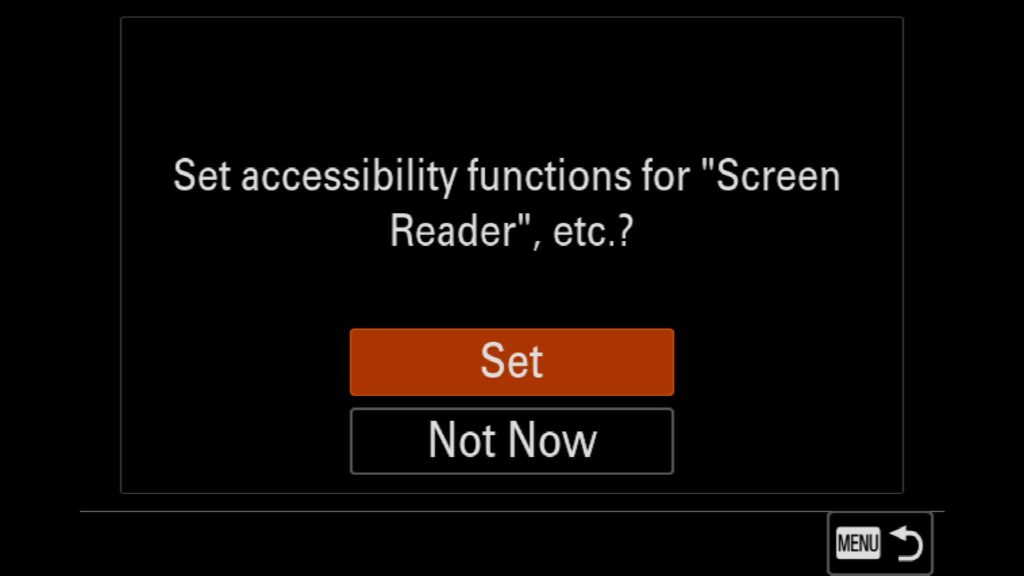
Setting the Accessibility Functions
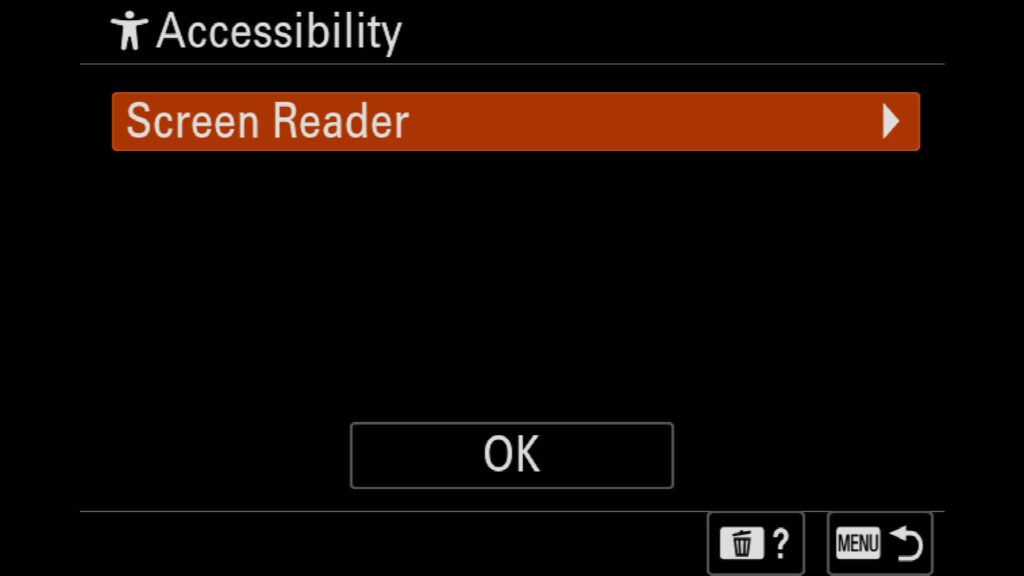
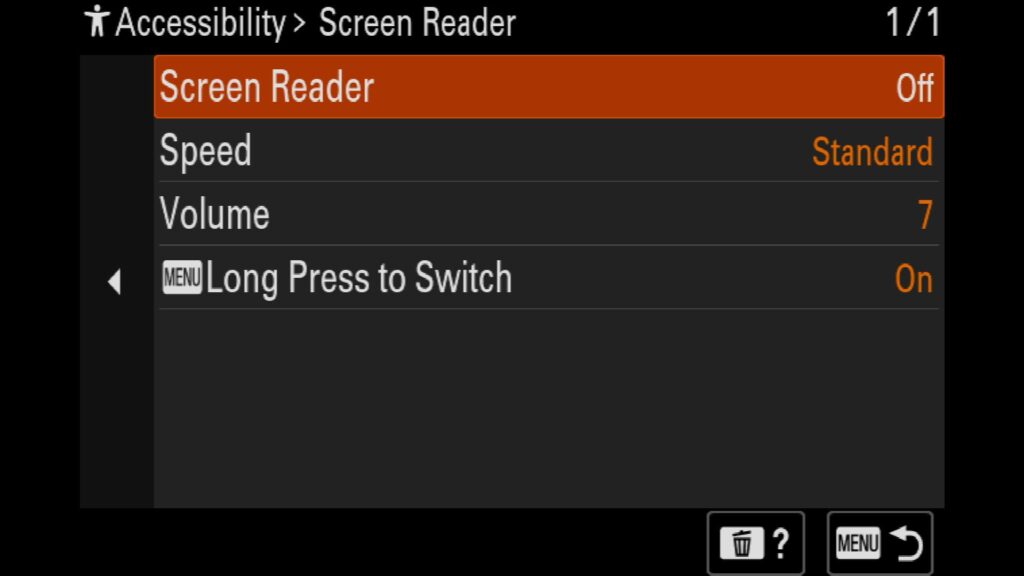
The following window that pops up automatically is a question asking you if you wish to adjust the Accessibility functions of the camera. Selecting “Set” will take you to a second screen where you can adjust the Screen Reader settings to help you if you have issues with blindness/eyesight. In this case, you can turn on the “Screen Reader” option so that the text on the screen always reads aloud (in the initially selected language). If you select “Not Now”, it will skip all of this entirely.
Connecting to the Creators App
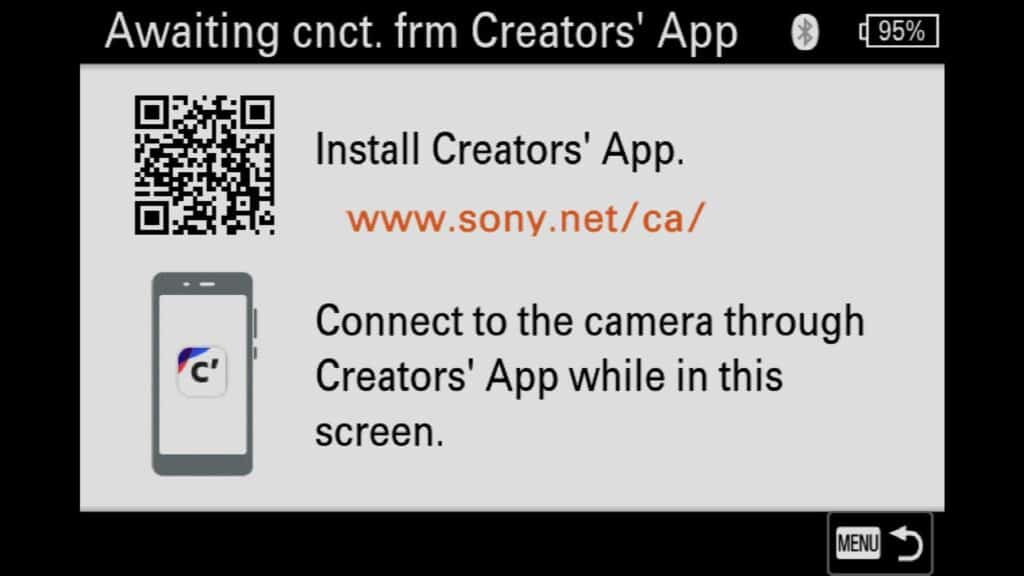
The following window will help you connect your Sony a1 II to the new (and vastly improved) Creators App. If you have used the “Imaging Edge” app in the past and you didn’t enjoy the experience, the Creators App is better in every way possible. It is easier to connect to your Sony cameras, more stable, and easier to use, and you can even easily update the firmware of your cameras and lenses via the app. I highly recommend you connect your smartphone to the app as it will help you easily set up a few settings via your phone. *All of the screenshots below of a phone were taken on an Android Pixel 9 Pro XL. Your experience might differ slightly if you are using an iPhone.
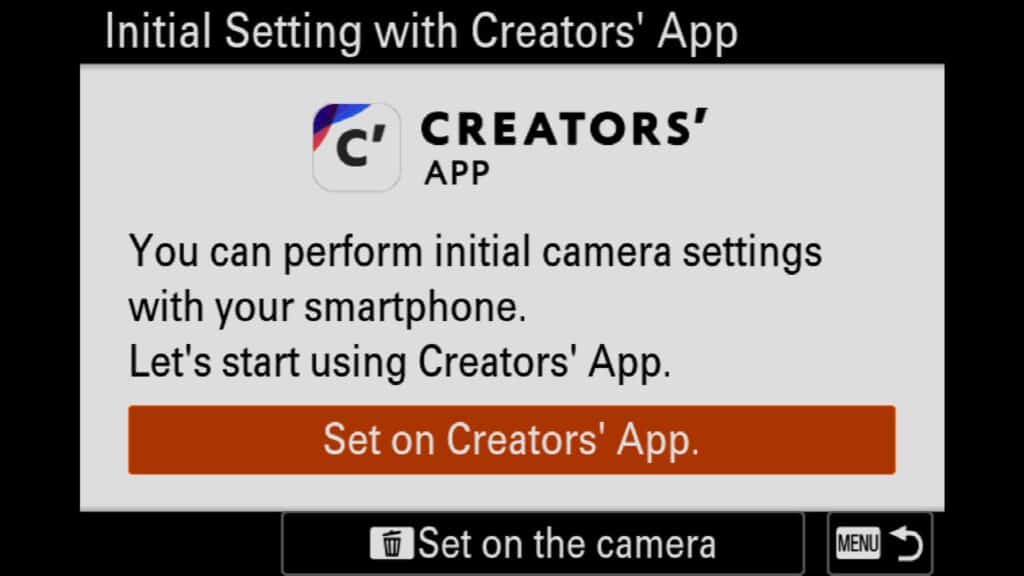
The first window will ask you if you want to perform the initial camera settings via your smartphone. Click on the “Set on Creators’ App” button to continue. From there, you will see a screen with a QR code that will link you to the Creators App on either an Android or Apple phone.
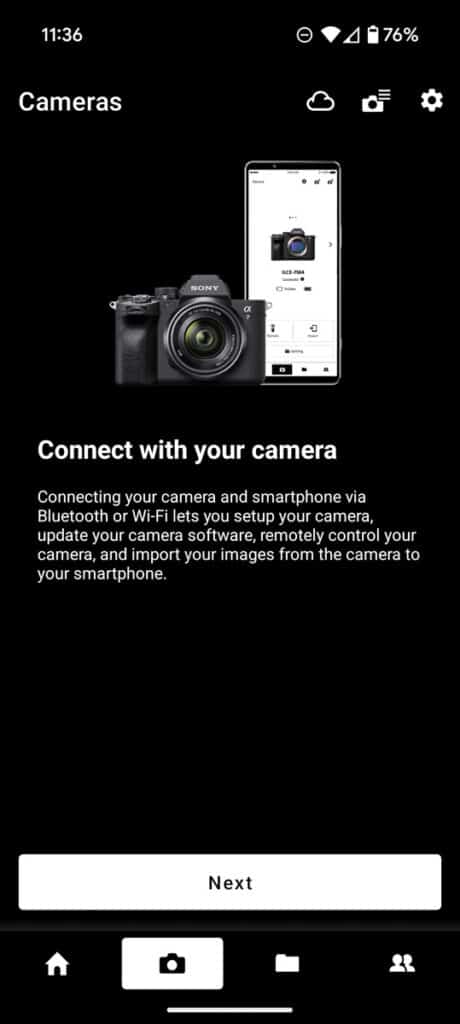
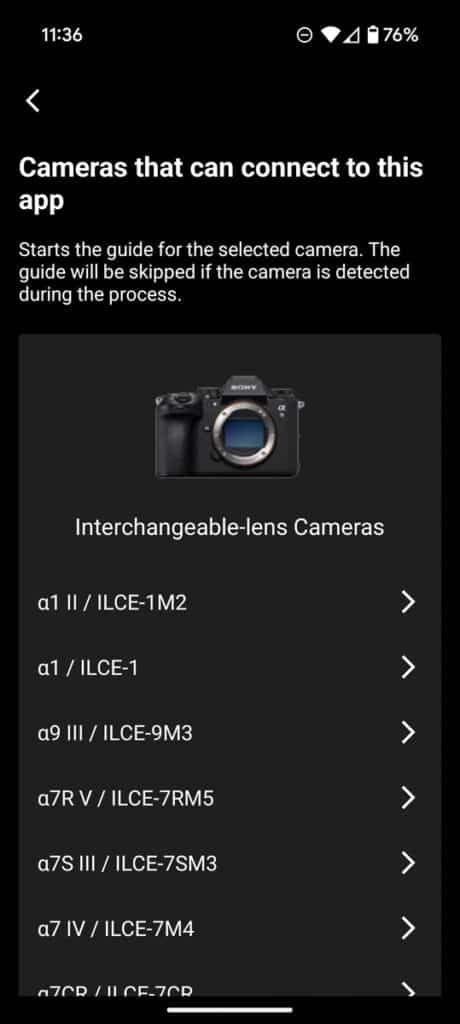
Once you have downloaded the app onto your phone, open it up for the first time, and you either have to register for a new account or login to your current account if you have one already. From there, you are asked to “Connect with your camera.” On this screen, hit “Next” at the bottom of the window to be taken to the next screen, where you need to select the “a1 II / ILCE-1M2”. On the next screen, you need to once again select “ILCE-1m2 – Pairing” to begin the pairing process with your camera.

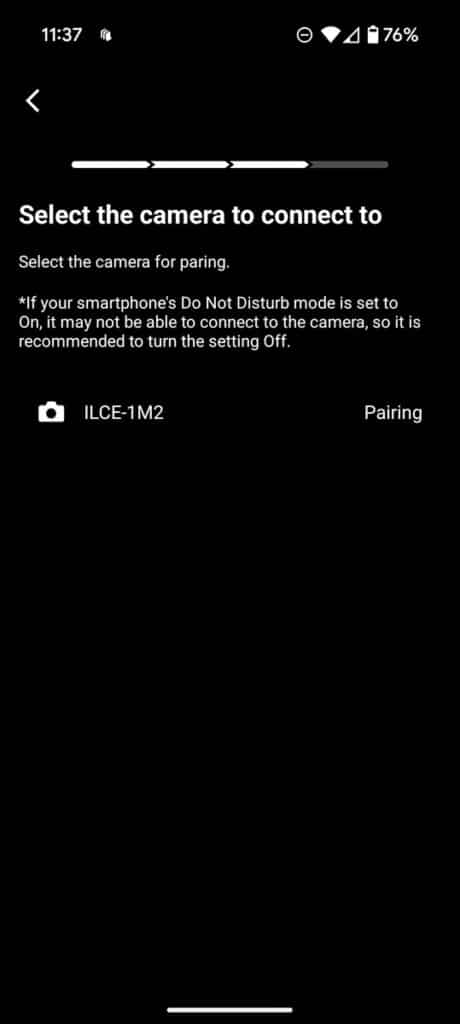
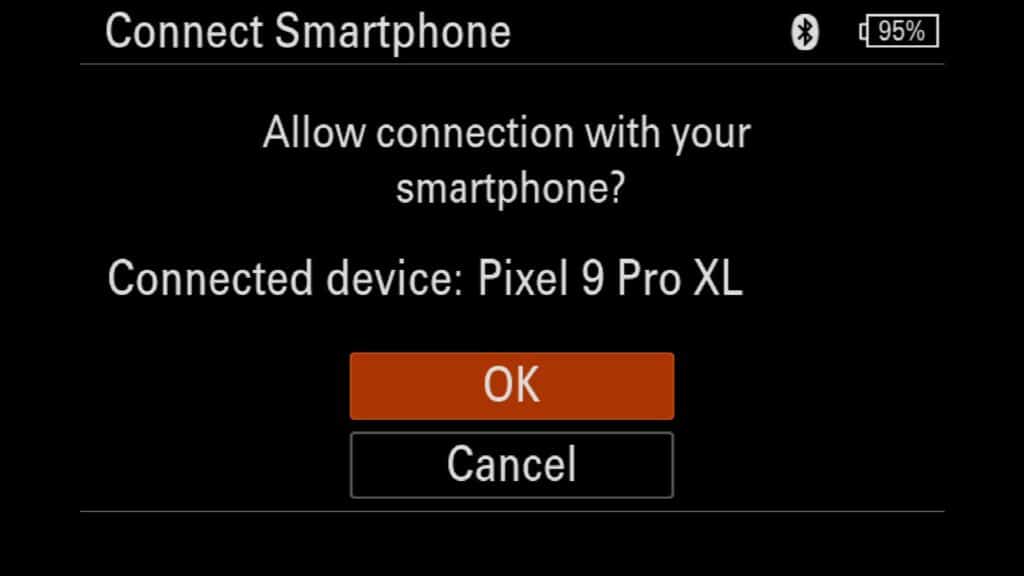
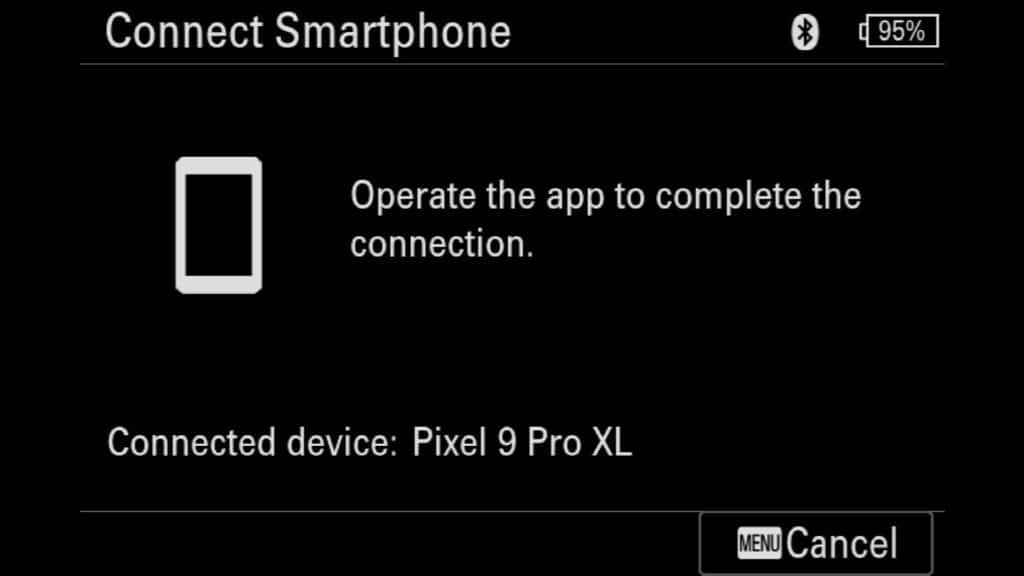
Now you will need to allow the Sony a1 II to connect to your phone, in this case it was my Pixel 9 Pro XL. Hit the “OK” button to accept and continue pairing. From there, you will head back to the Creators App and choose if you want to connect to the camera at 2.4 GHz or 5 GHz connection. Without getting too technical, 2.4 GHz will be slower but will work at longer distances, whereas a 5 GHz connection will have a faster/stronger connection but will require your phone to be closer to the a1 II. Once you have chosen the option that works best for you, click on the “Go to the initial camera settings” button at the bottom of that screen.
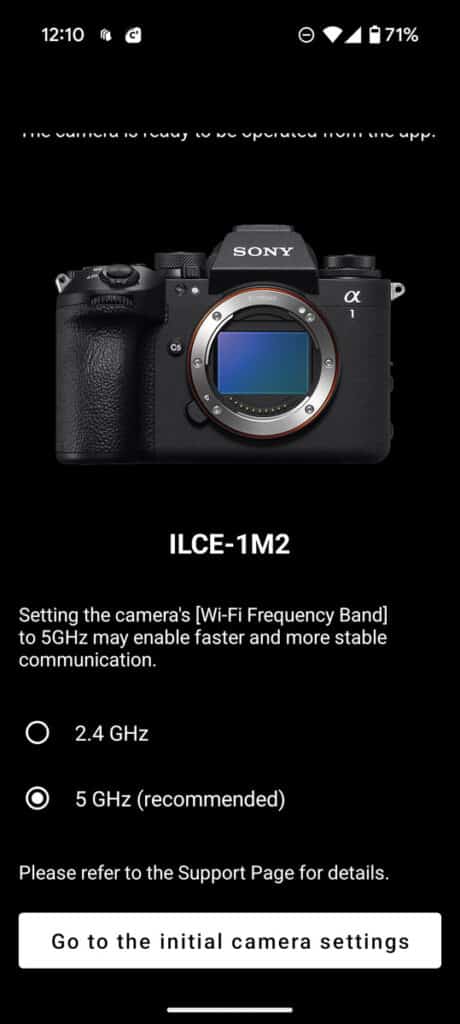
Now you can quickly adjust the three “Initial camera settings” for your Sony a1 II via the Creators App.
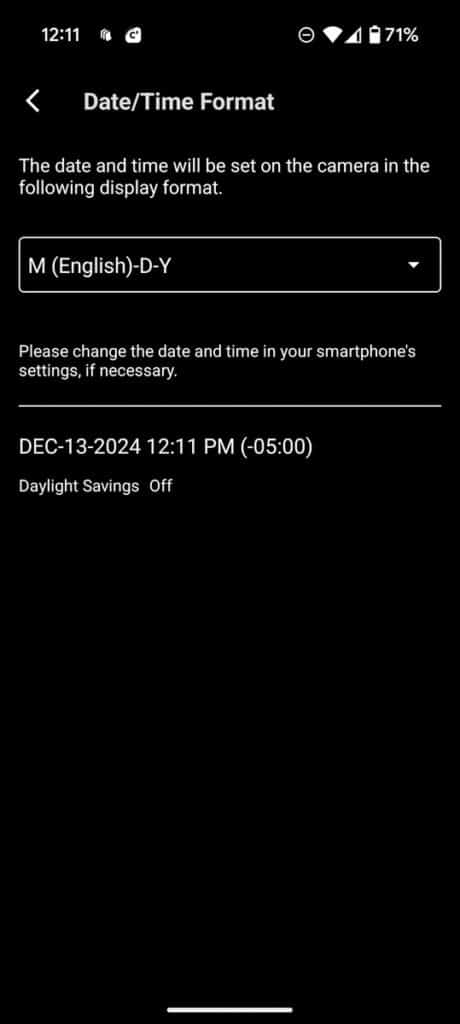
Date/Time Format – The camera will automatically pull in the correct date, time, and time zone from your phone and apply those settings to your a1 II. You can choose if you want to adjust the date format.
Device Name – By default, this will be set at “ILCE-1M2,” but if you have more than one a1 II, you will want to give it a unique name to be able to identify them from one another from within the Creators App.
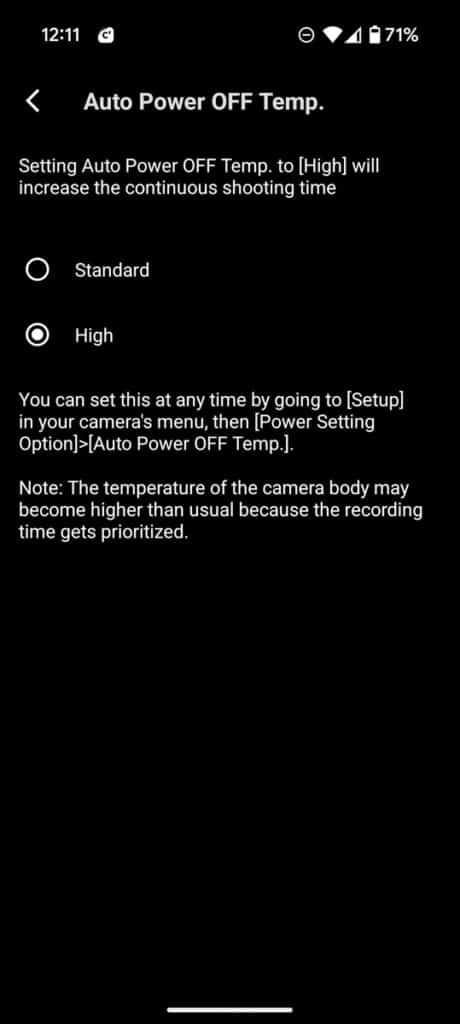
Auto Power OFF Temp. – By default Sony has the heat warning and shutdown temperature set pretty conservatively. If you change this from “Standard” to “High,” you can shoot for longer periods in environments where your camera is producing or experiencing prolonged heating. I set all of my Sony cameras to “high” so that I could shoot longer-form videos of my wildlife subjects.
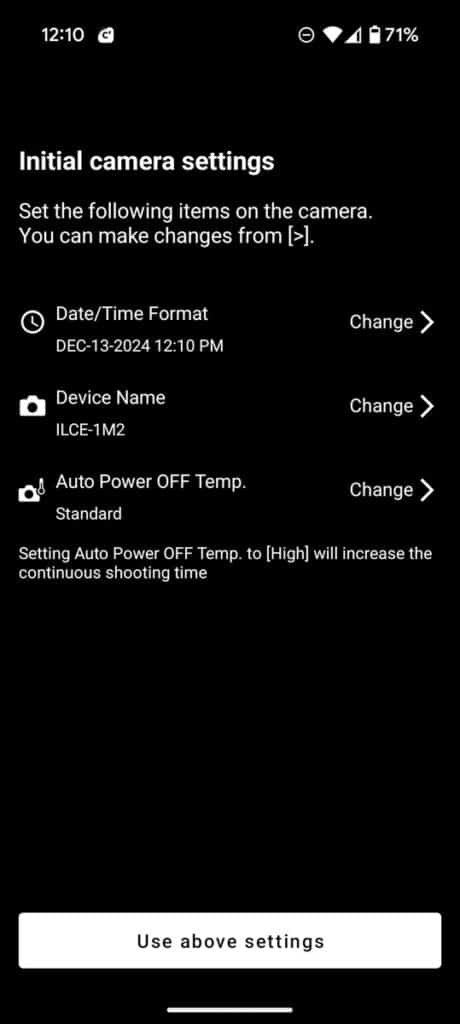

Once you have set these initial settings to your liking, you can click the “Use above settings” button, and your a1 II will be ready for use for the first time. That said, we have just begun to set up your Sony a1 II. We have many more settings to adjust, configure, and learn about!
General Settings Worth Changing
Now that you are done with your initial setup with the Creators App let’s talk about some general settings you should adjust before you do any serious shooting.
JPEG VS HEIF
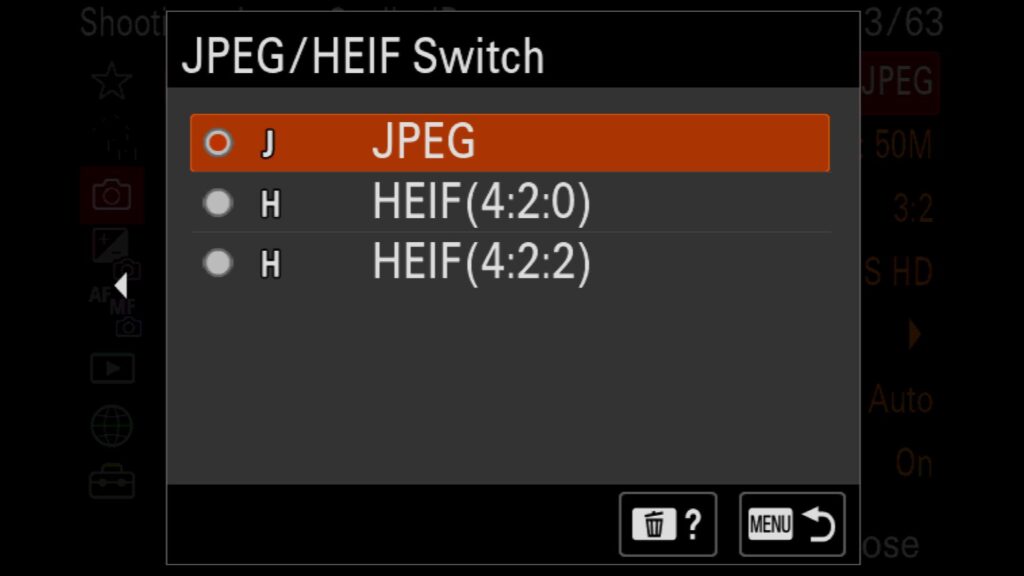
One of the first settings you can change has to do with selecting JPEG or HEIF for your compressed image file format. While many photographers will skip this step because they shoot in RAW, I know other photographers that shoot in RAW + JPEG. HEIF is very similar to JPEG, but it takes up less space. Time will tell if HEIF gets adopted as readily as JPEG, but it is a solid option to consider.
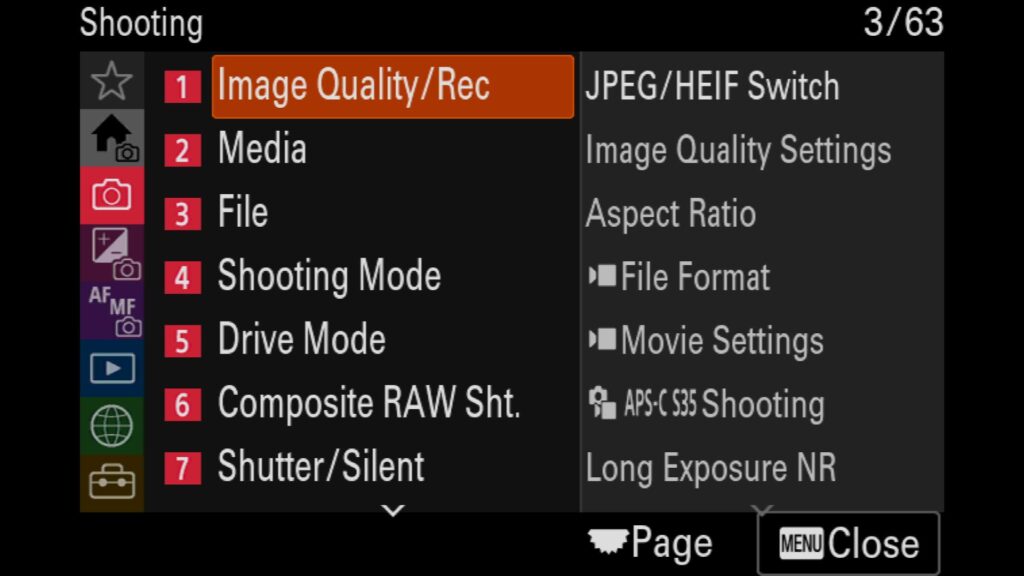
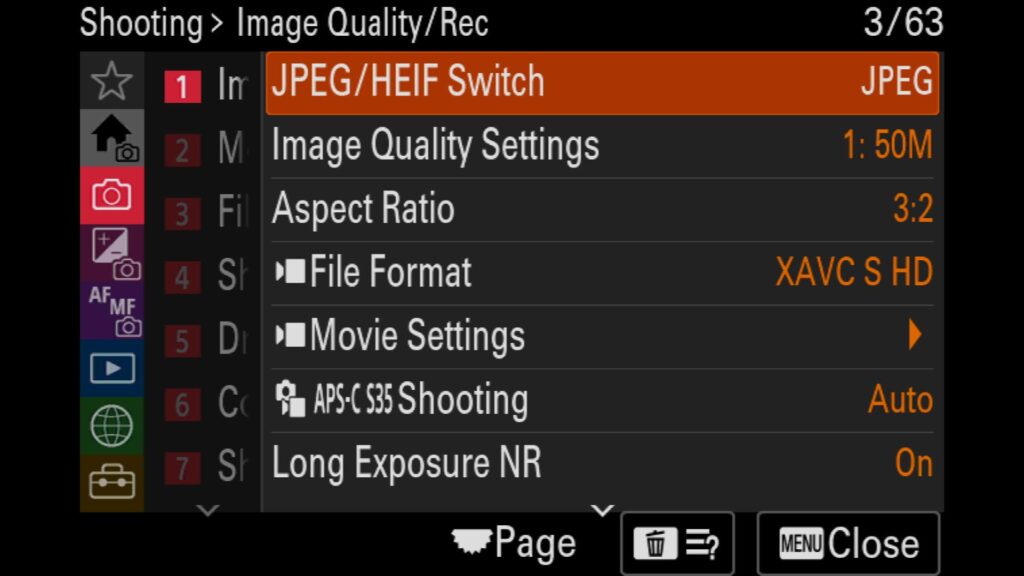
These settings are found in the “Shooting” menu under “1: Image Quality” and “JPEG/HEIF Switch”. Here, you can choose JPEG, HEIF (4:2:0), or HEIF (4:2:2), with the last option offering a higher degree of color sampling and quality.
Adjusting Image Quality Settings (for JPEG & RAW)
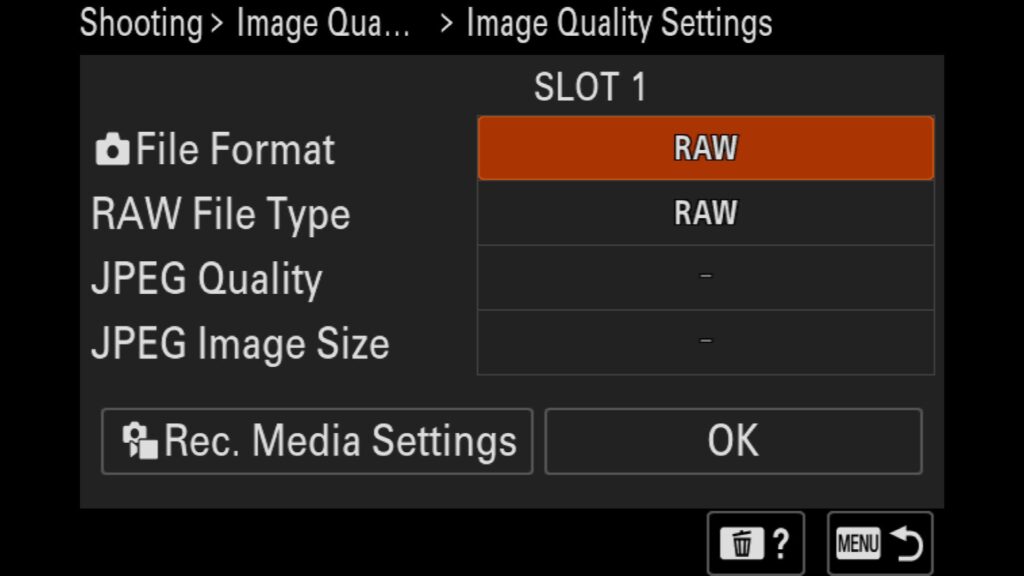
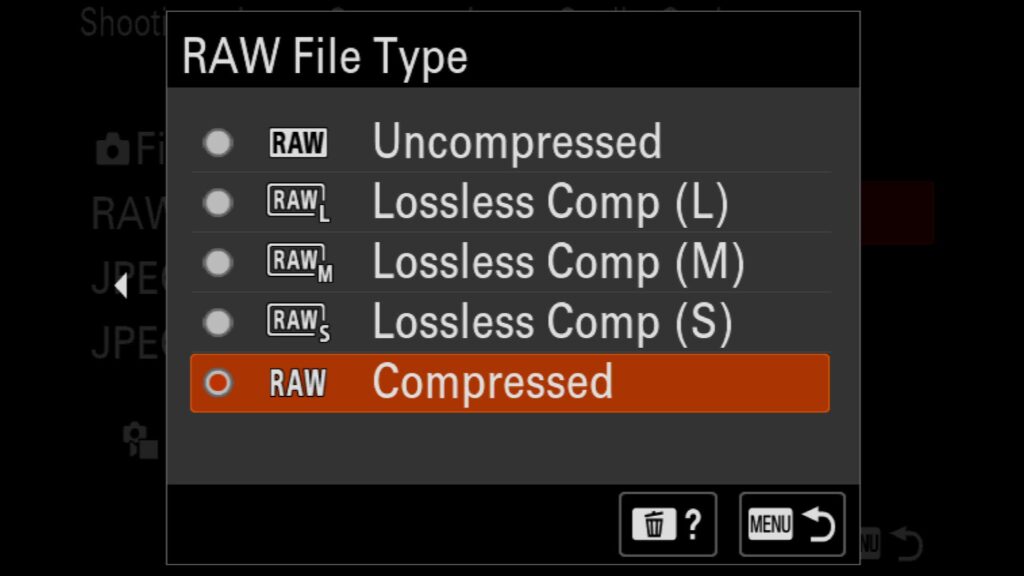
Next you will want to adjust the Image Quality Settings to fine-tune your choice of RAW or JPEG quality levels. It is here that you can choose to shoot in JPEG, RAW or RAW + JPEG as well as adjust the kind of RAW file you wish to shoot with. The Sony a1 II offers 5 different RAW file types:
- Uncompressed – Offers a clean, untouched RAW file, but it has the largest file size of all the options.
- Lossless Compressed (L) – Utilizes Sony compression techniques without losing RAW image data while maintaining a 50mp image size.
- Lossless Compressed (M) – Utilizes Sony compression techniques without losing RAW image data while maintaining a 21mp image size.
- Lossless Compressed (S) – Utilizes Sony compression techniques without losing RAW image data while maintaining a 12mp image size.
- Compressed – Utilizes Sony compressed RAW file format to offer a full 50mp RAW image with a drastically smaller file size. In some rare situations, this compressed format can result in banding in your RAW images, such as when shooting highly contrasted scenes, such as the Aurora in the night sky. But for most situations, you won’t be able to tell the difference when looking at or processing these images.
These settings can be found under the “Shooting” menu, under “1: Image Quality” and “Image Quality Settings”.
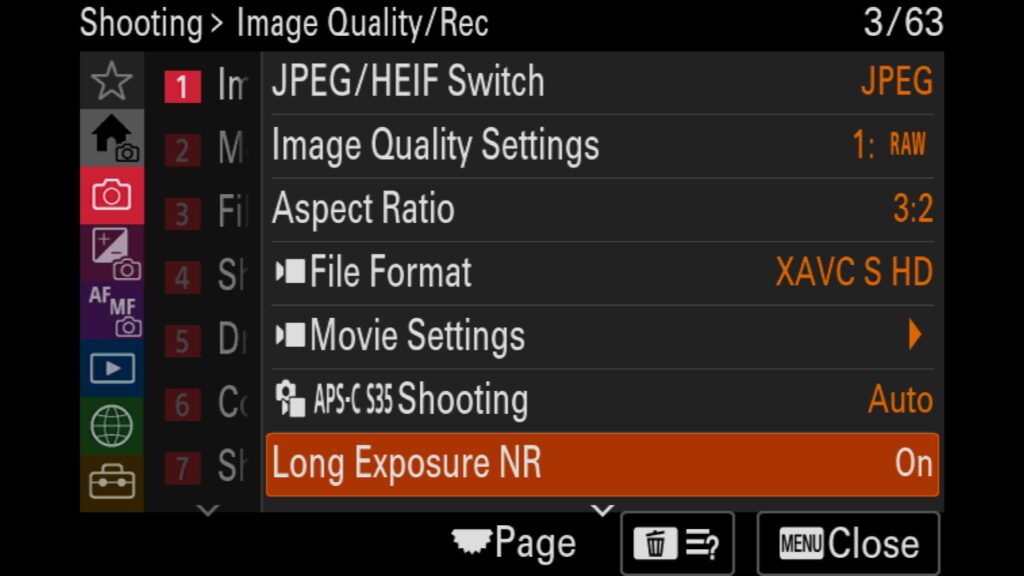
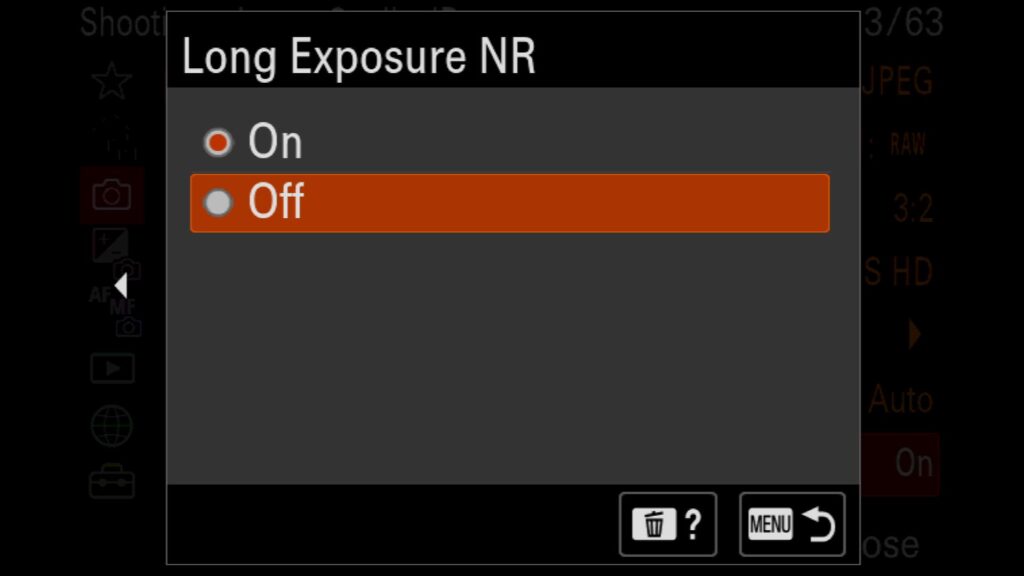
Turning Off Long Exposure Noise Reduction
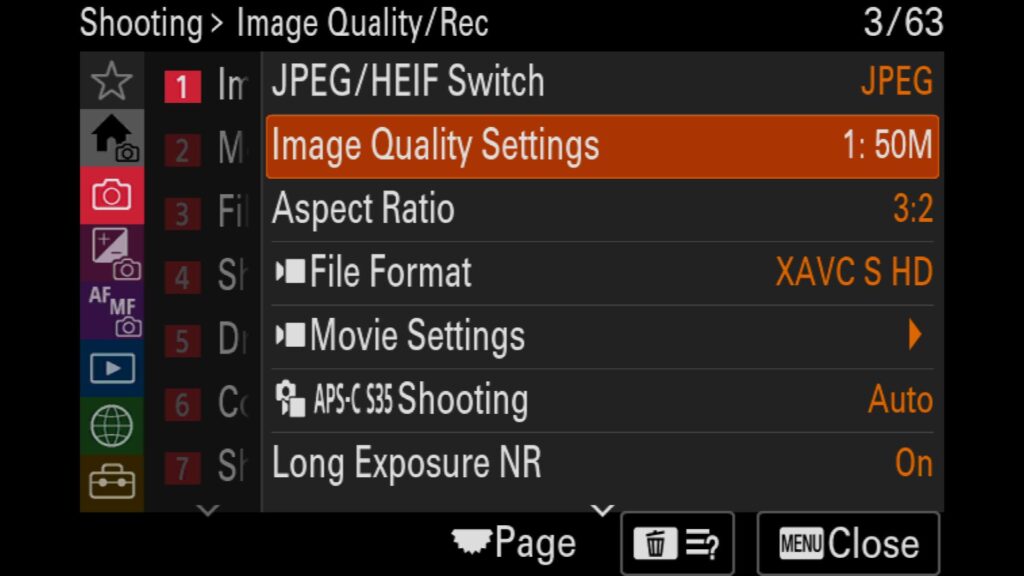
One of the first settings I personally like to turn off is the “Long Exposure Noise Reduction”. I do this for a few reasons:
- With this setting on, every long exposure image will be followed immediately by a similar photo taken with the shutter closed, doubling the time before you can shoot again. So a 10-second exposed image will take 20 seconds to complete fully. The camera finds noise within your image by comparing it against a completely dark image.
- I prefer to have full control over how and where I choose to remove noise from my images rather than let the camera decide what is best.
If you are new to post-processing, you might want to leave this setting on, but I recommend you turn it off for almost everyone else.
These settings can be found under the “Shooting” menu, under “1: Image Quality” and “Long Exposure NR”.
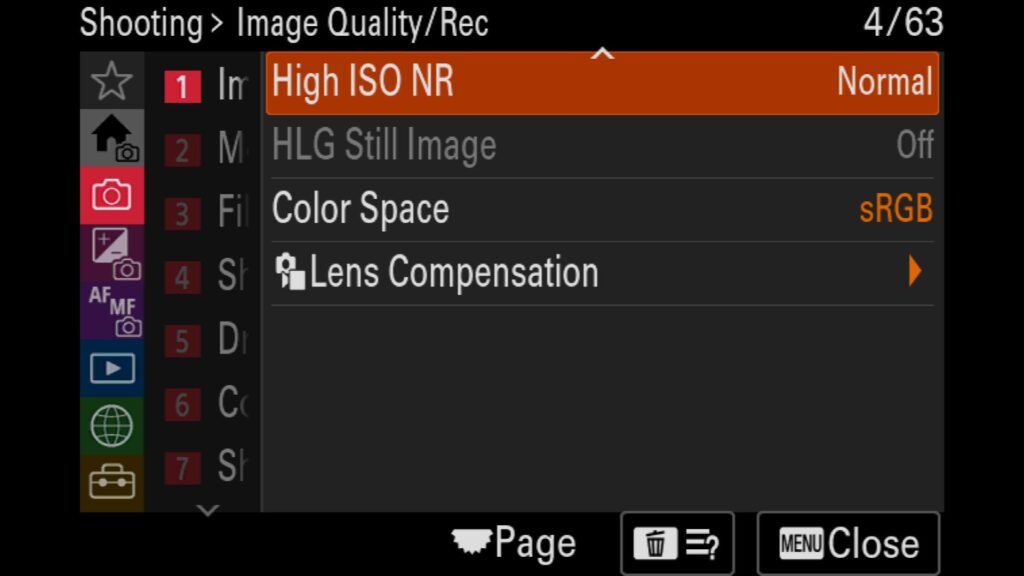
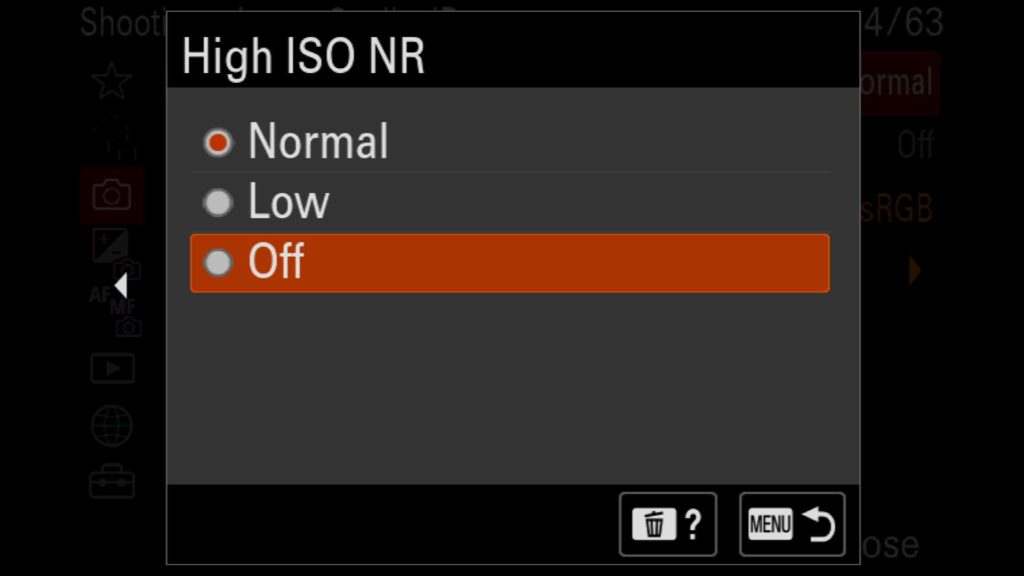
Turning Off High ISO Noise Reduction
Next up to turn off is the High ISO Noise Reduction setting for the same reasons mentioned above under the “Long Exposure Noise Reduction” setting. If you are new to post-processing with your photographer, you might want to keep this setting on until you feel confident processing your images with noise.
These settings can be found under the “Shooting” menu, under “1: Image Quality,” and on the second page (scroll down) under “High ISO NR.”
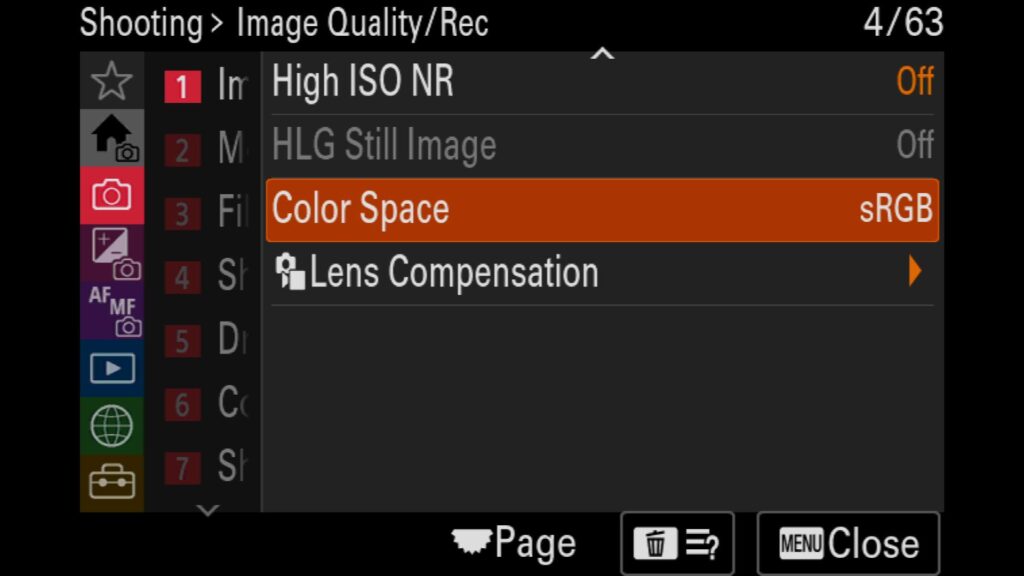
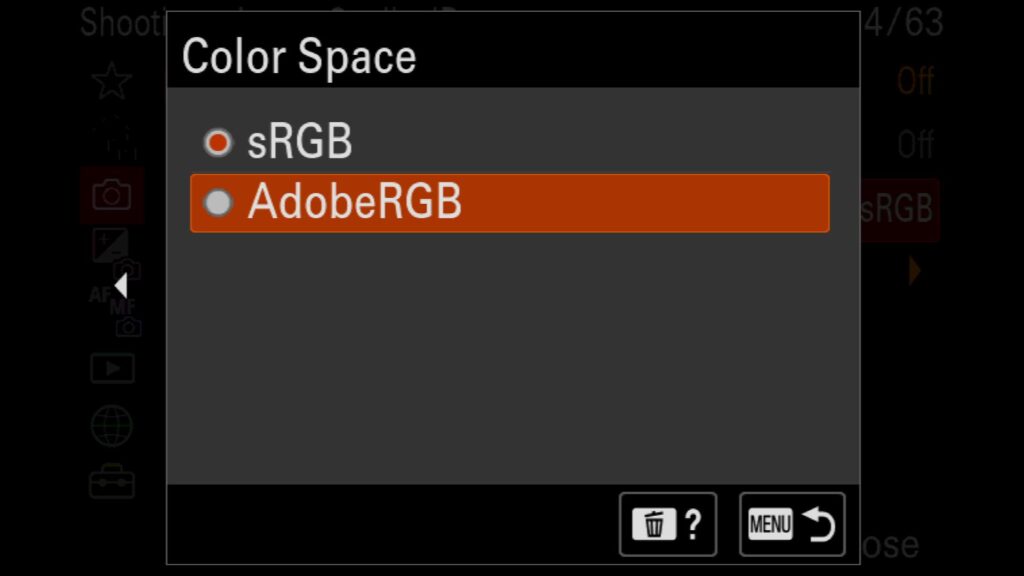
Changing the Color Space of your Sony a1 II
Now, if you are shooting purely in RAW, this setting doesn’t matter much, but I always make it a point to change it regardless. By default, the Sony a1 II is set on sRGB, the smallest but most universally accepted Color Space to work in. Alternatively, you can change it to Adobe 1998, which has a much larger color space from within the camera. This can be done when post-processing if you are shooting in RAW, but doing it in camera means one less thing to worry about.
These settings can be found under the “Shooting” menu, under “1: Image Quality,” and on the second page (scroll down) under “Color Space.”
Choosing How Images & Video Are Recorded On Your Memory Cards
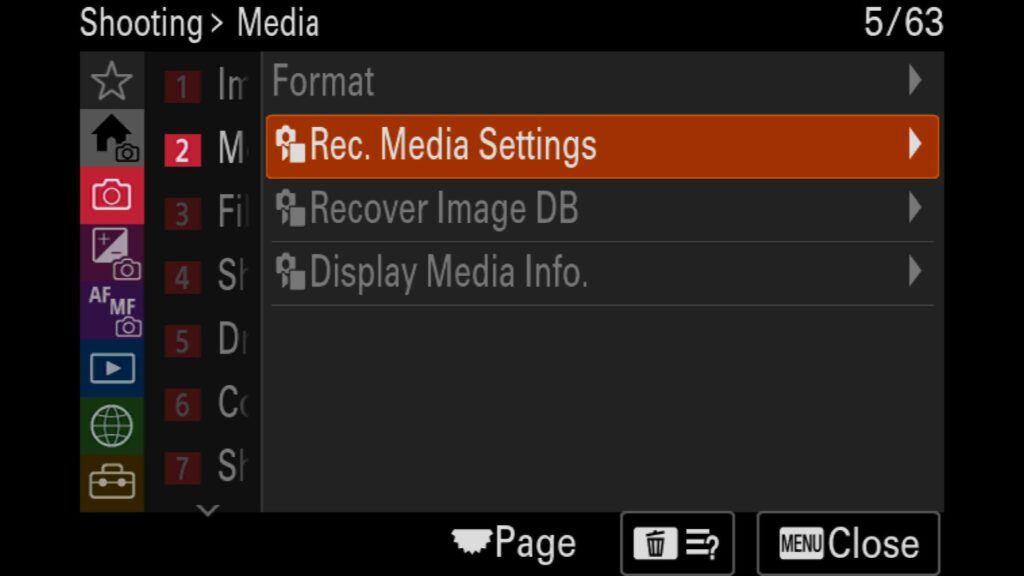
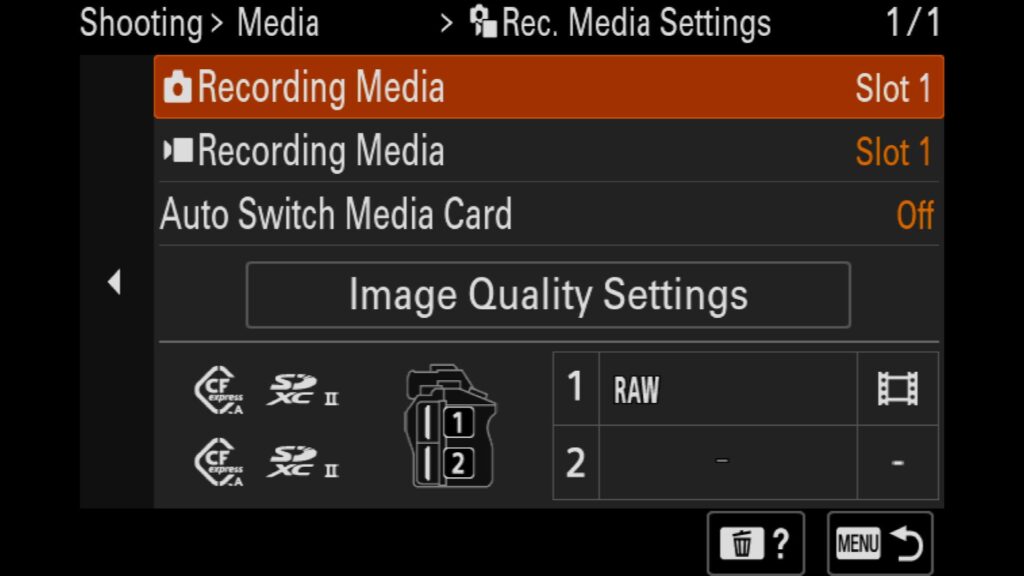
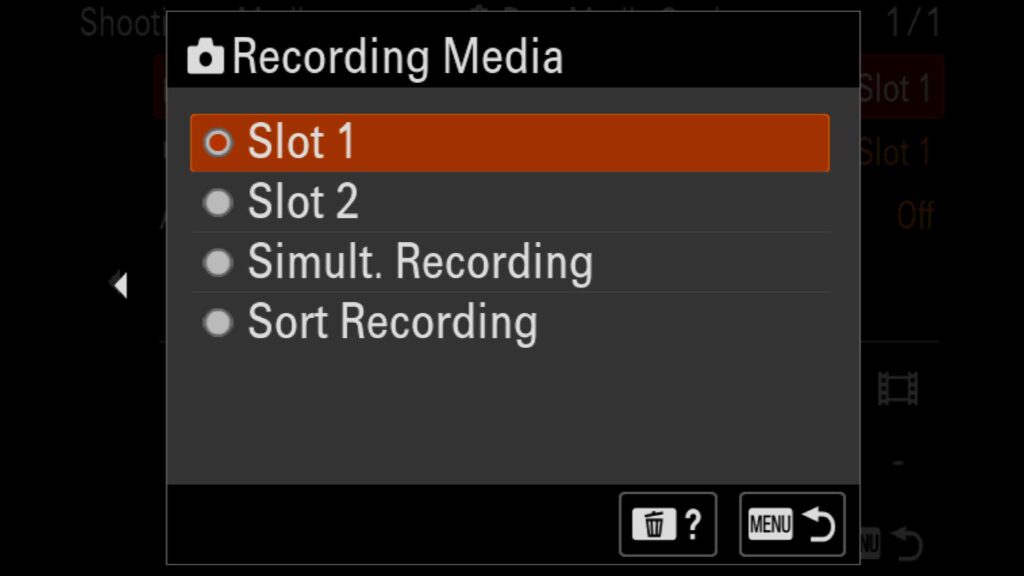
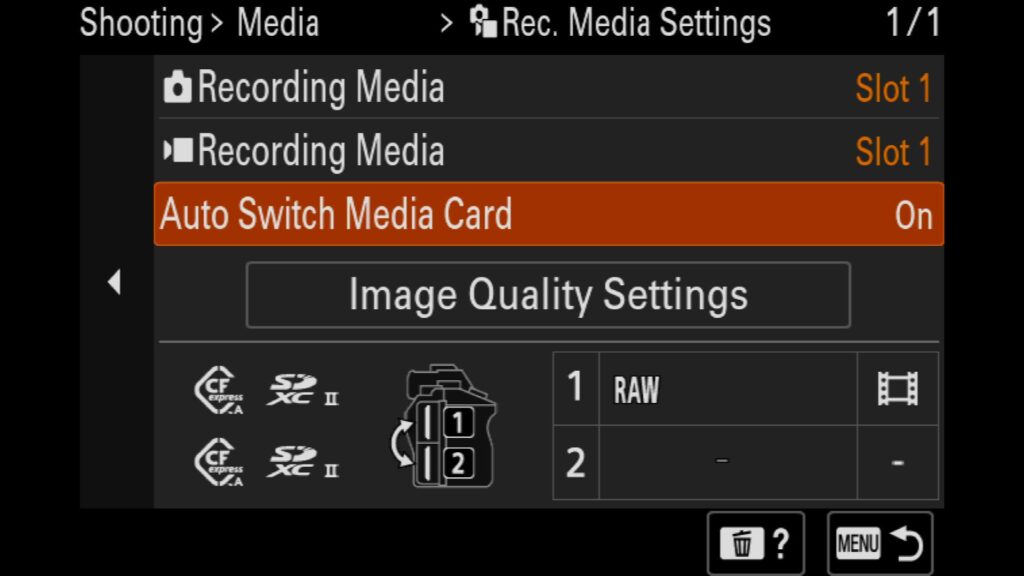
Another critical setting worth changing is how images and photos are recorded onto your memory cards. Here, you can choose which memory card to write to, which allows you to write to both memory card slots simultaneously (creating a backup in real-time), or even select for your images to be written to one card and your videos to be recorded to the other. All in all, you have a lot of options.
One thing you want to make sure to change is the “Auto Switch Media Card” setting. Turning this on will allow the a1 II to instantly start recording to the 2nd card in the camera once the first is full, providing fewer opportunities to miss the shot because you had to change cards in the moment.
These settings can be found under the “Shooting” menu, under “2: Media,” and under “Rec. Media Settings.”
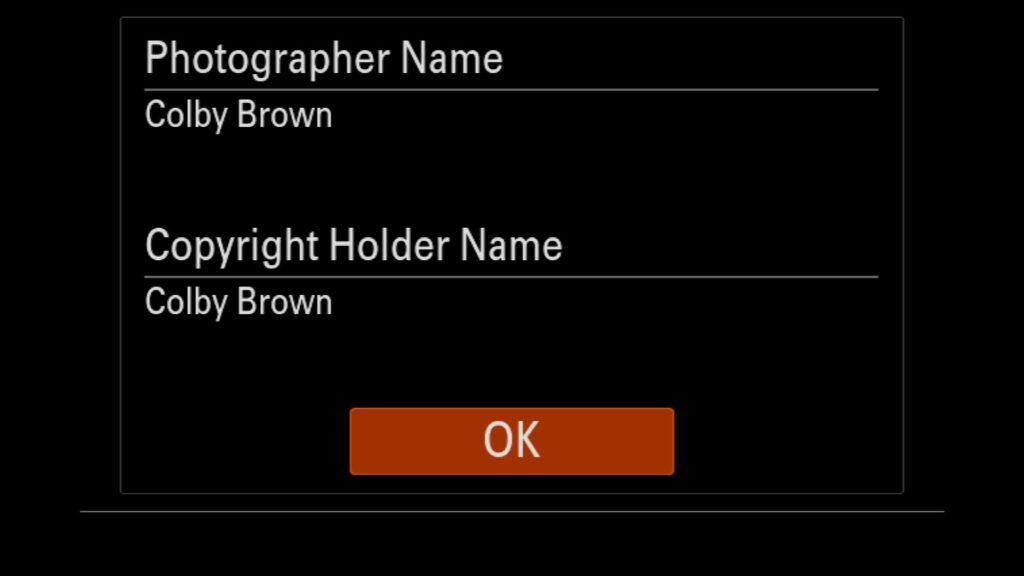
Setting Copyright Information
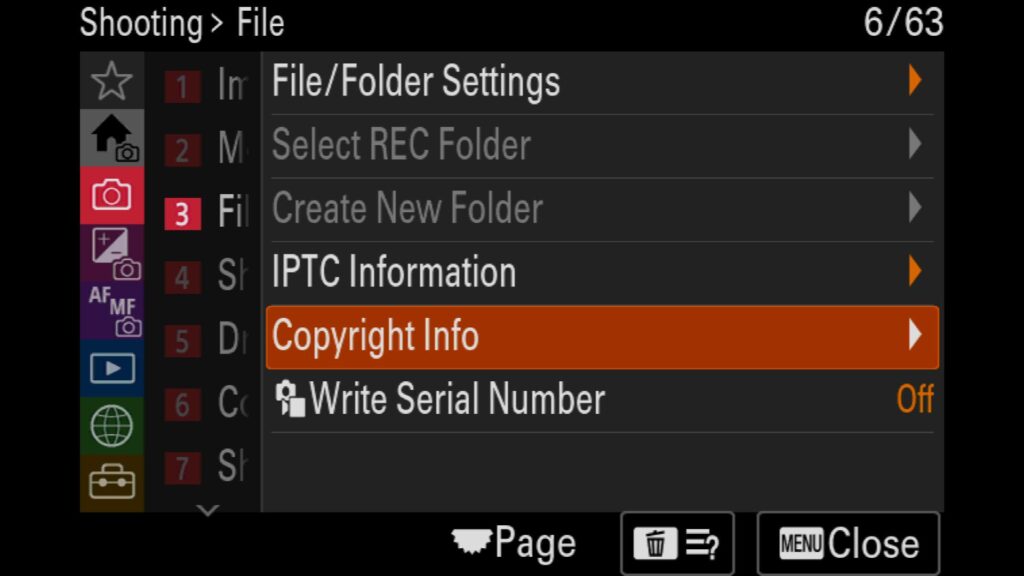
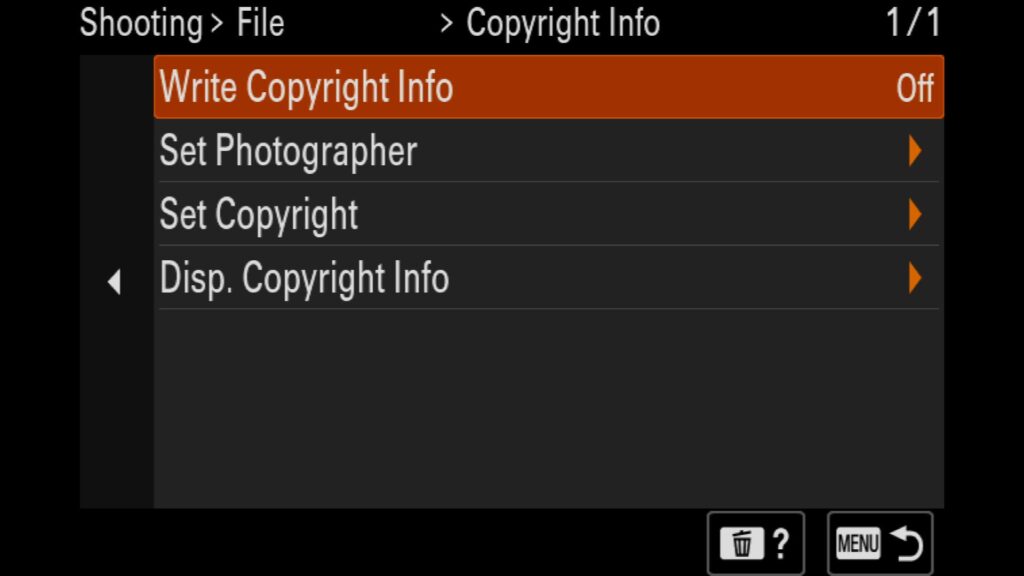
You are in the right place if you want to have your copyright information embedded into your images. You can add the Photographer and Copyright holder to any images you create here. The whole process is pretty straightforward.
These settings can be found under the “Shooting” menu, under “3: File,” and under “Copyright Info”.
How To Embed Your A1 II's Serial Number Onto Every Image & Video
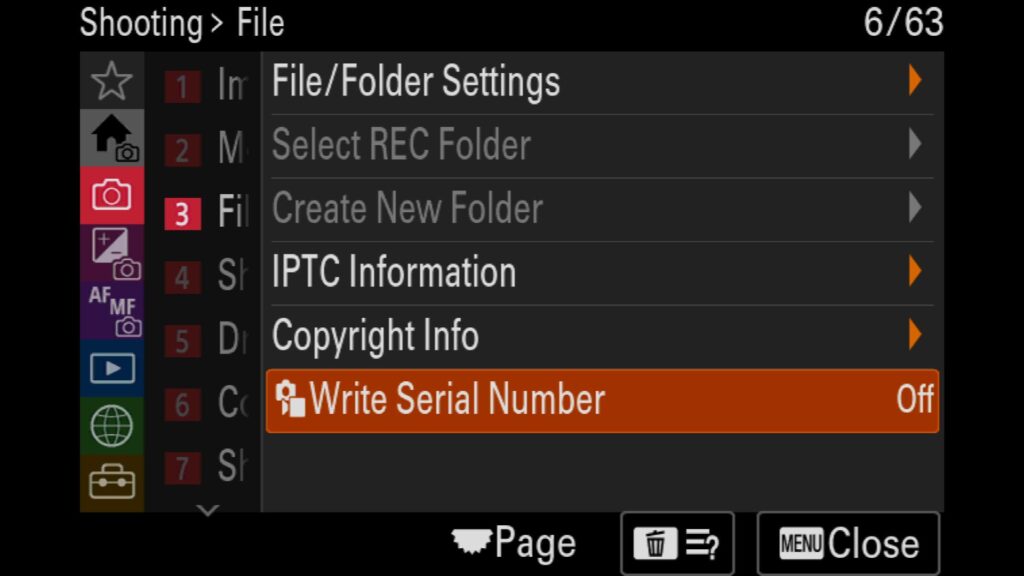
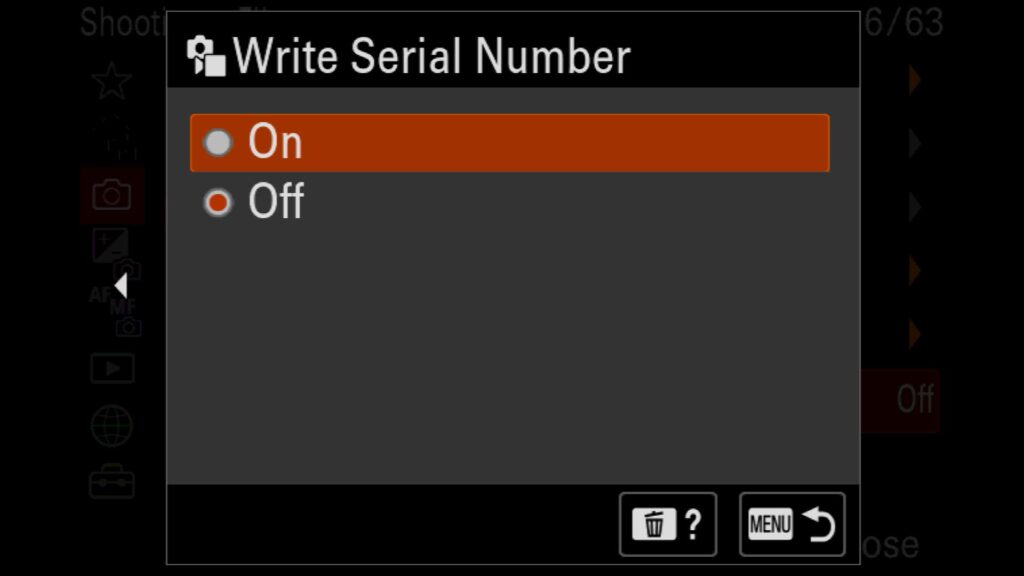
One way to help protect your camera from theft (or, at the very least, help you track it down if it was stolen) is to embed your Sony a1 II’s serial number into every photo and video it creates.
To do this, you can change the settings found in the “Shooting” menu under “3: File” and under “Write Serial Number.”
Saving Camera Settings For Specific Situations
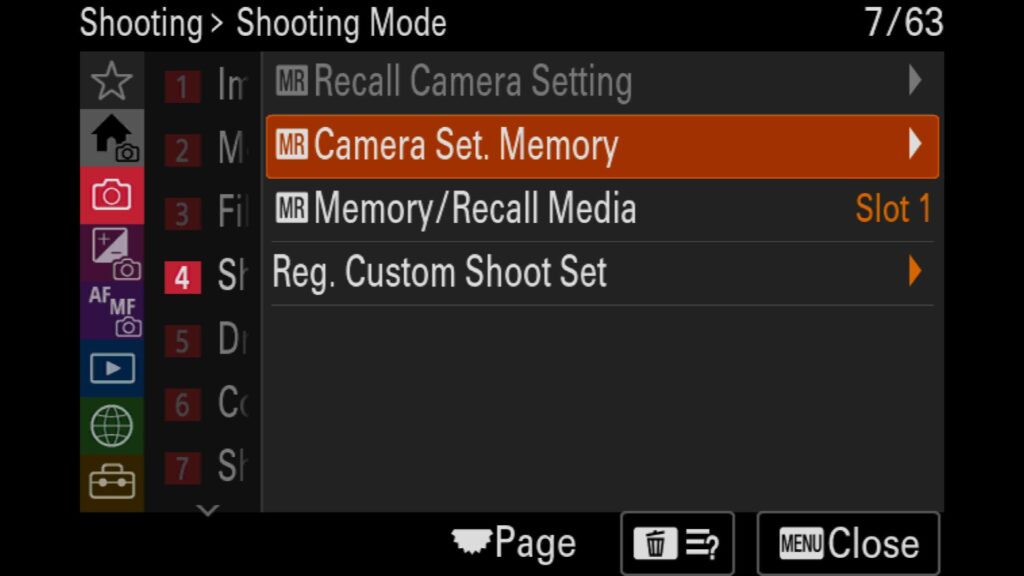
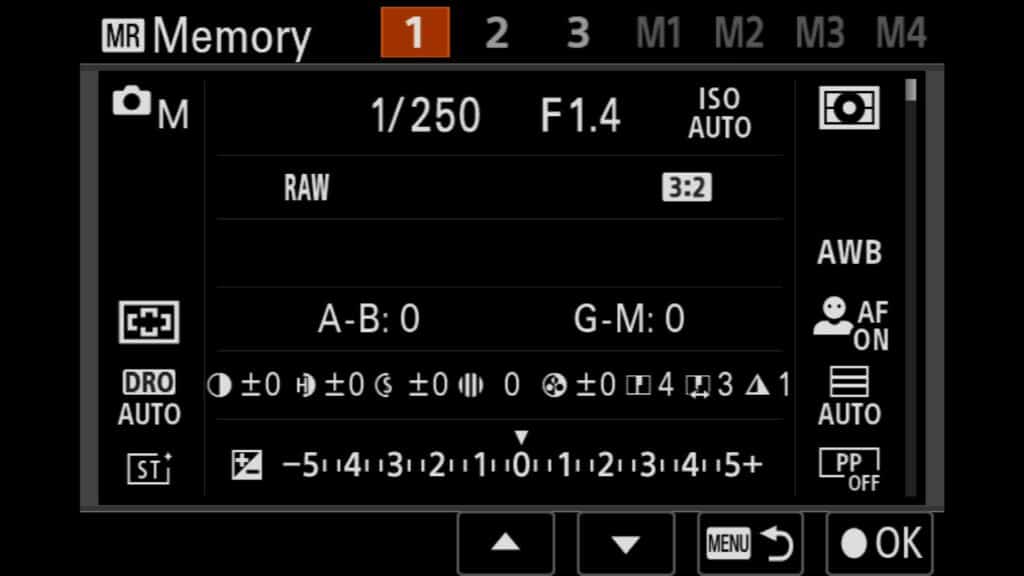
An often overlooked setting within the Sony a1 II is the ability to save all my camera settings to recall at any given point. This can be very handy when you are switching between shooting landscape and wildlife photography or when you are switching between shooting still images and videos. In these situations, you will often be using very different settings within the camera, not just a change of your ISO, Shutter Speed, and Aperture. With the Camera Memory Recall, you can customize the 1, 2, and 3 modes on your top camera dial or save up to 4 groups of settings (M1, M2, M3, or M4) to the memory card currently in the camera. I will often use this feature to save different settings in situations where I photograph wildlife that is both still (like a posing Jaguar) and birds in flight close to each other. In these situations, I will apply different shutter speeds and ISOs, select different AF areas, FPS, and use animal Eye AF settings for example.
To do this, you can change the settings found in the “Shooting” menu under “4: Shooting Mode” and look for “Camera Set. Memory”.

How To Change The Self-Timer Settings
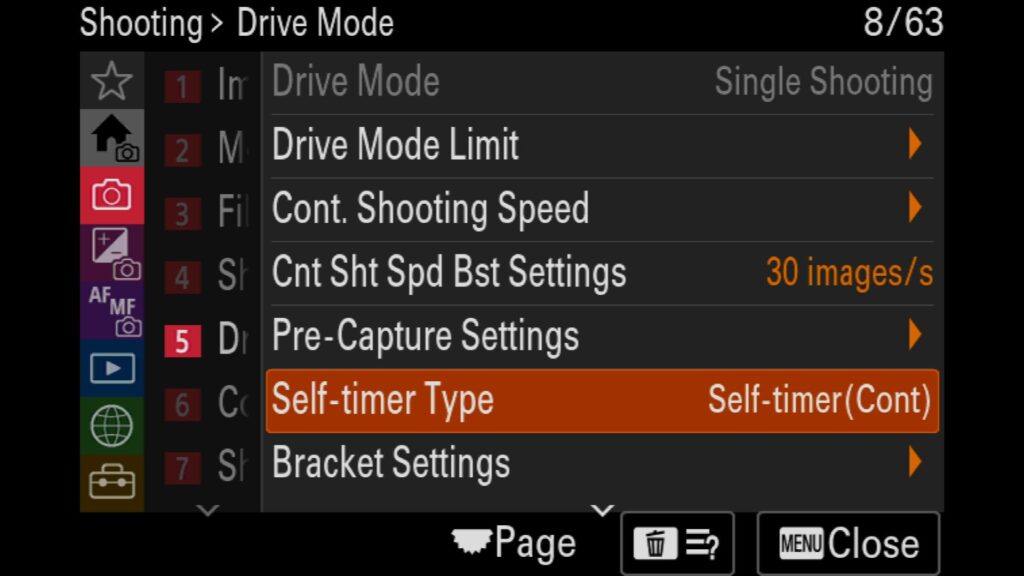
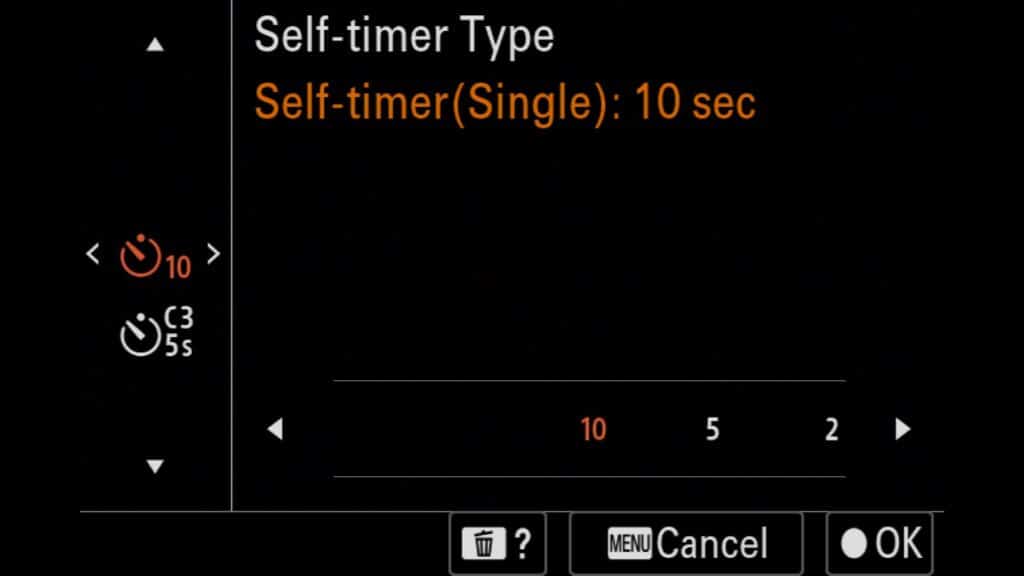
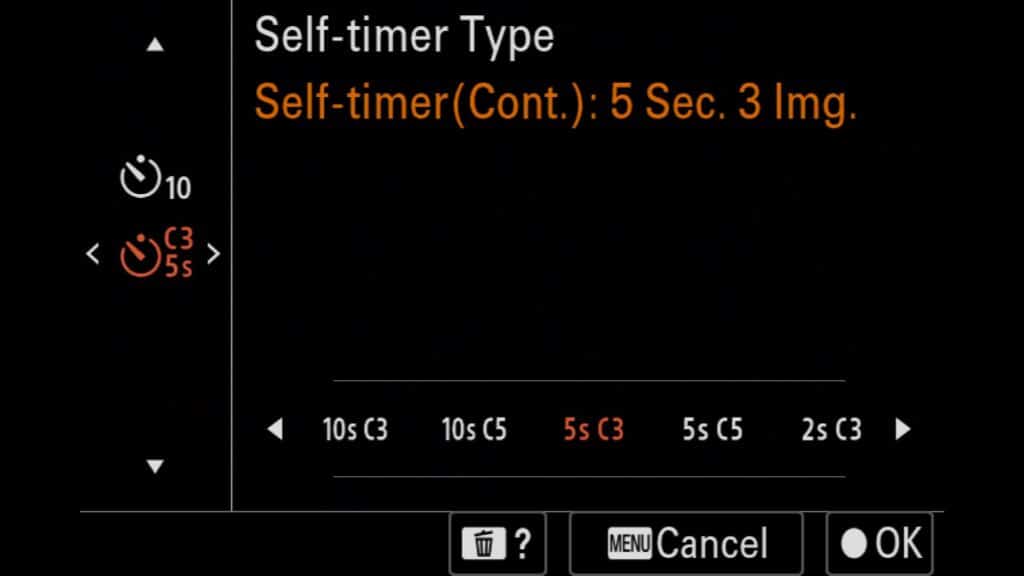
If you find yourself wanting to use the “Self-Timer” mode on the a1 II to give yourself time to get into the frame, this section is for you. You can choose between a 2, 5, or 10-second delay before taking your image. Additionally, you can ask the camera to take a series of images after a small delay. You have the following options:
- 10-second delay with either a 3 or 5-image set
- 5-second delay with either a 3 or 5-image set
- 2-second delay with either a 3 or 5-image set
You can find this setting in the “Shooting” menu under “5: Drive Mode.” Look for “Self-timer Type.”
How To Add A Shutter Delay When Shooting a Bracket Of Any Kind
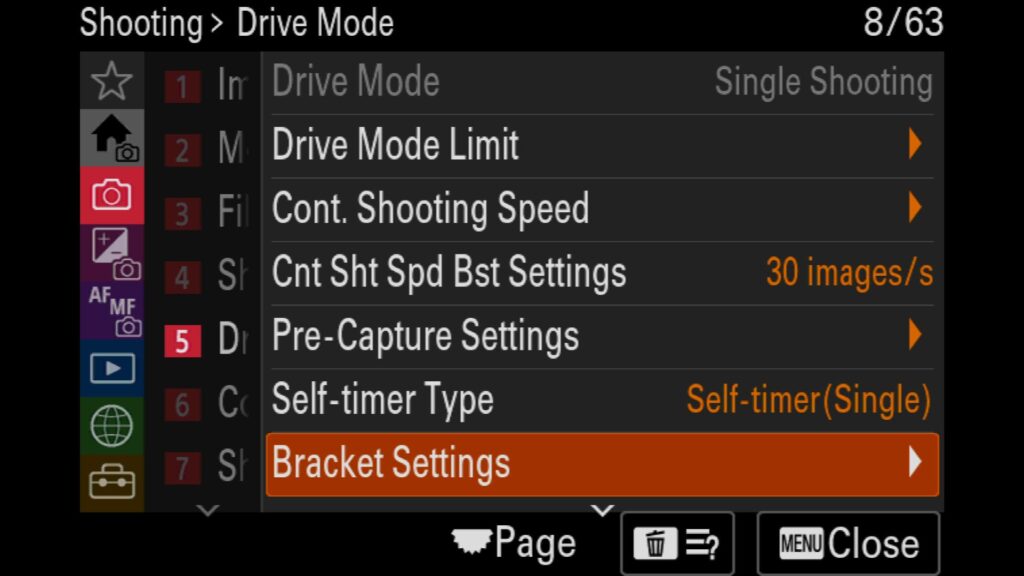
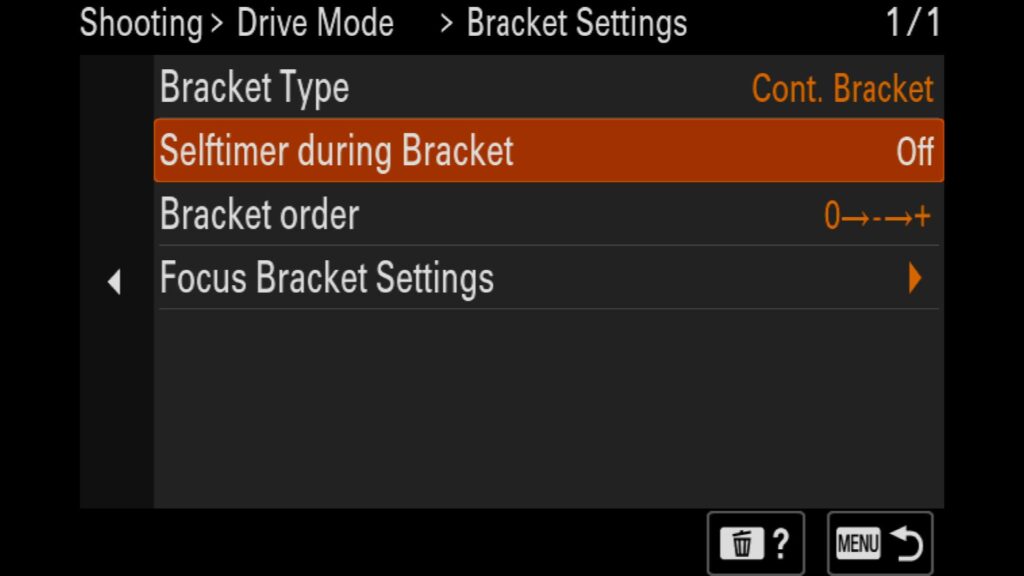
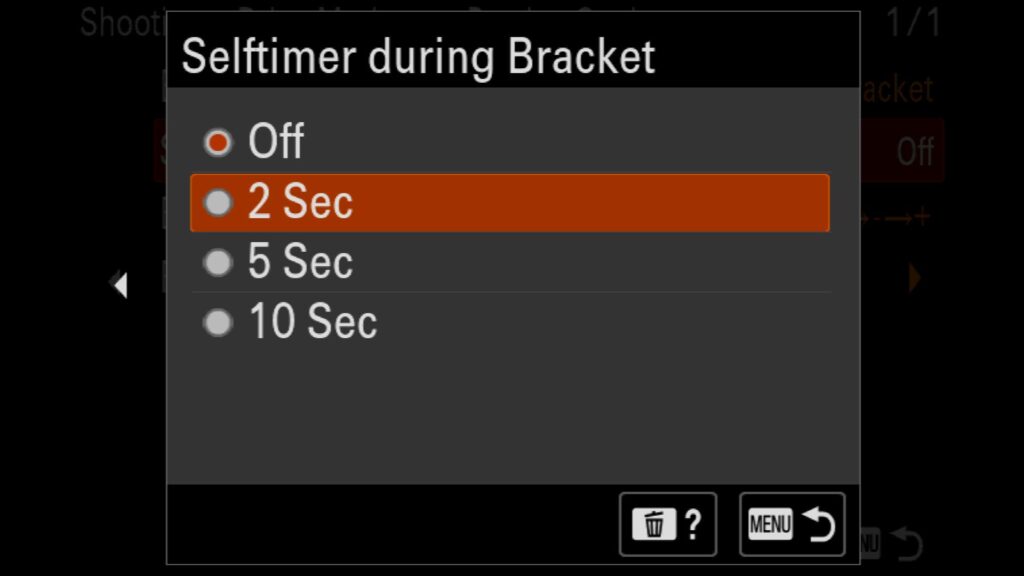
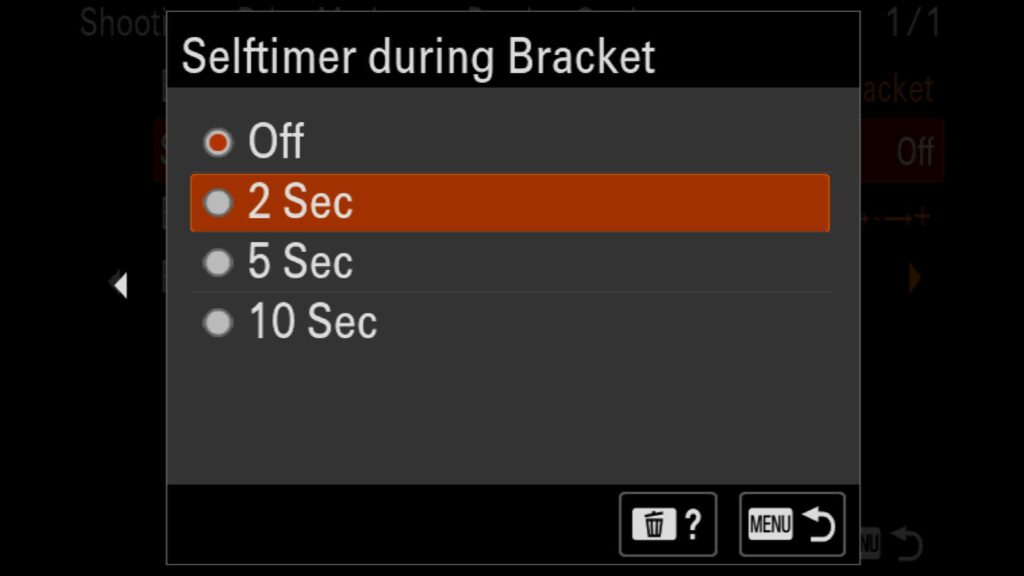
If you often shoot from a tripod and don’t own or like to use a wireless remote, adding a slight delay to any set of bracketed images you shoot can help you avoid any unnecessary vibrations that could cause your photos to be soft or out of focus. This setting will apply to all bracketed features on the a1 II (exposure, white balance, and focus).
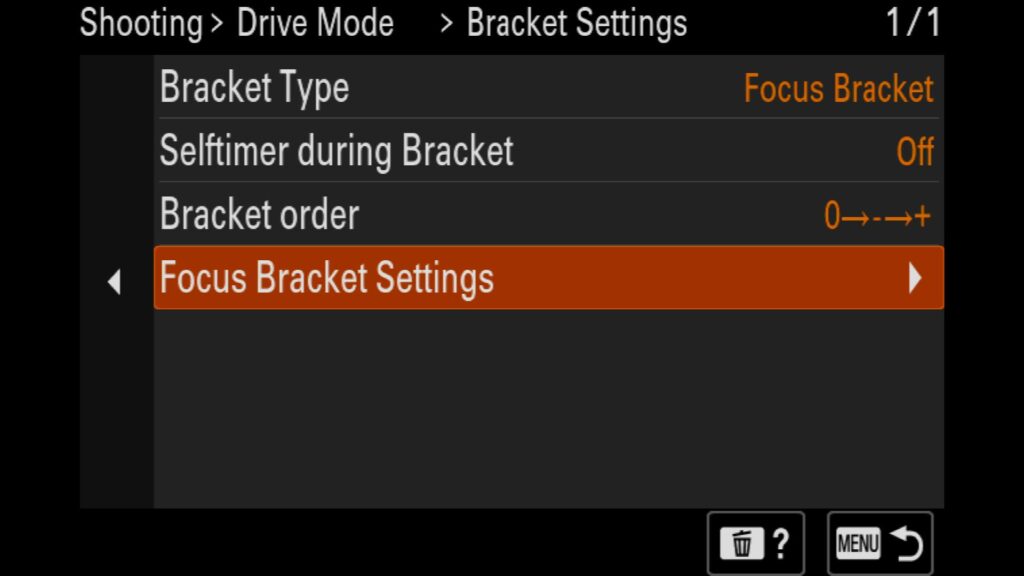
This setting can be found in the “Shooting” menu under “5: Drive Mode”. Look for “Bracket Settings” before seeing “Self-timer during Bracket” and turning it on.
Everything To Do With Focus Bracketing (New to the a1 II)
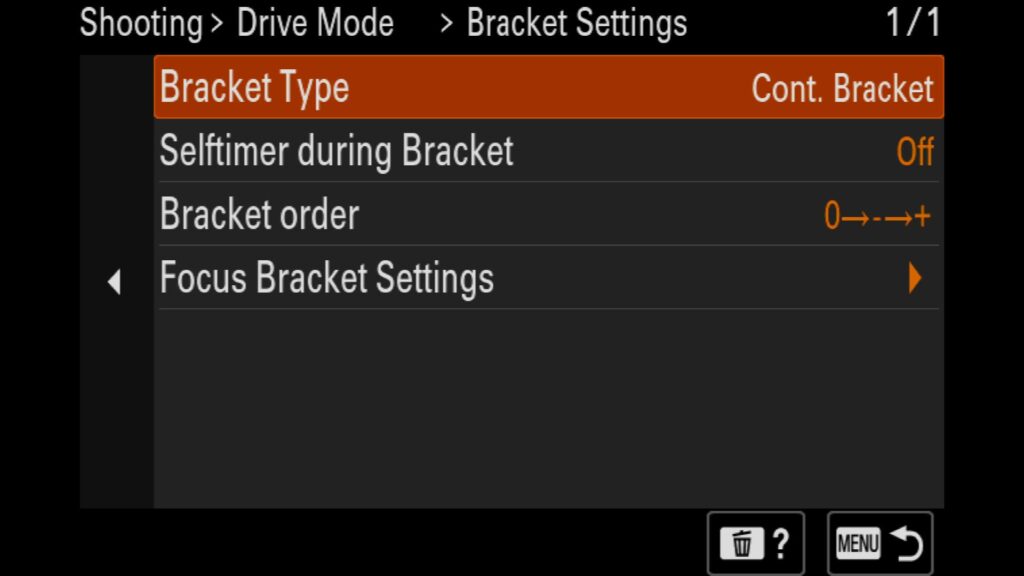
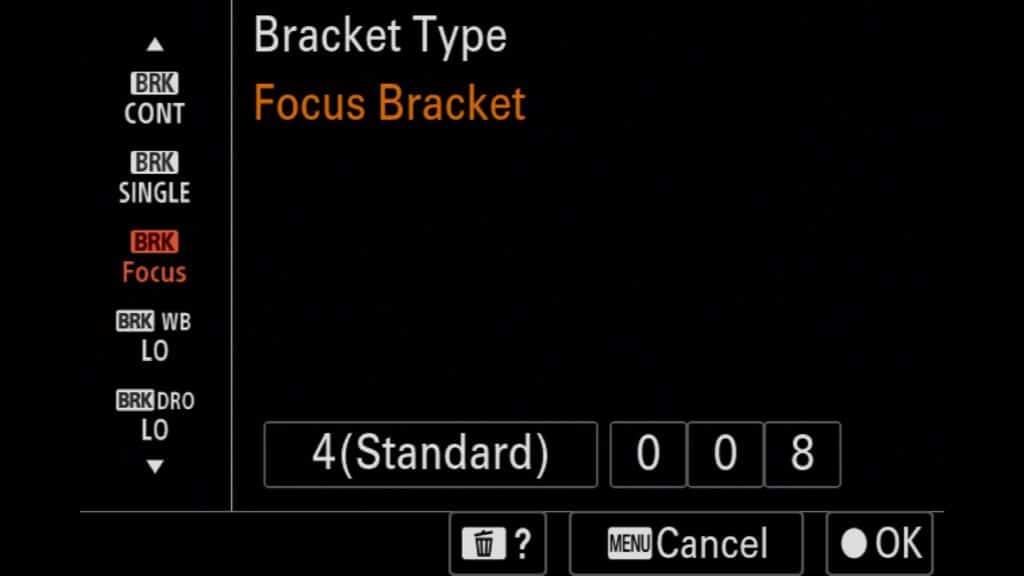
Once a highly requested feature of the Sony a1 series, the a1 II now allows you to use Focus Bracketing to automatically capture a series of images with different focal points that you can combine (in post-processing) to get everything in focus. This is commonly requested by landscape and macro photographers, who often struggle to have the foreground, midground, and background of an image all in focus. With the a1 II, you have two menu items you need to look at under “Bracket Settings”:
- Under “Bracket Type” you need to select “Focus Bracket”. Hit right on the rear control wheel to easily adjust the distance between shots (1 = Very Narrow to 10 = Very Wide) and select the number of images inside the focus bracket (1 to 999).
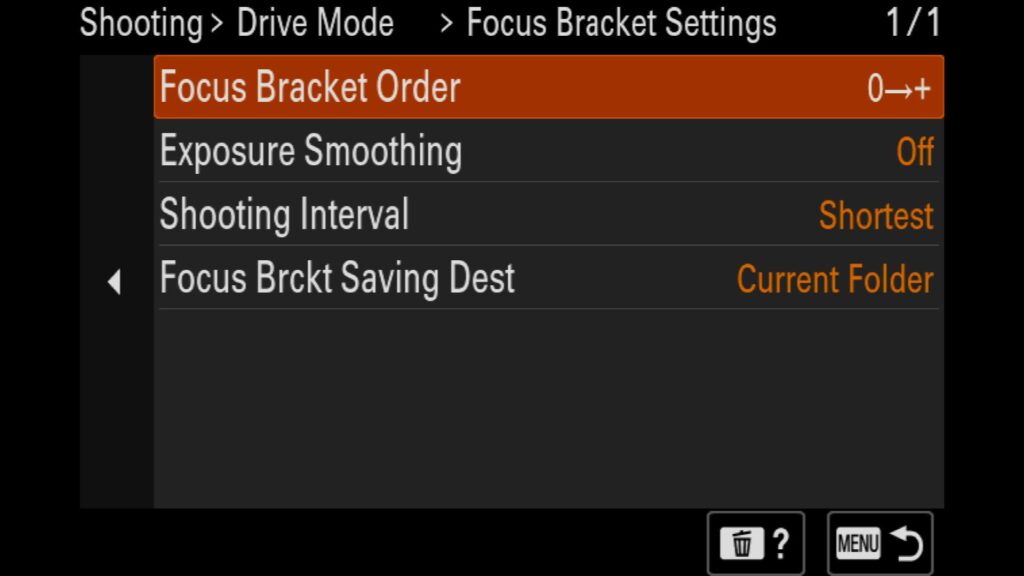
- Inside the “Bracketing Settings” menu, you will find “Focus Bracket Settings”. Her,e you have the following options:
- Focus Bracket Order – Change the order of the images in the bracket. I recommend leaving this on default.
- Exposure Smoothing – This can adjust the exposure between shots for your focus bracket. I recommend leaving this off.
- Shooting Interval – Change the interval between shots of the focus bracket.
- Focus Bracketing Saving Destination – Adjust the final destination of the focus bracket. You can either have all of the images sent to the regular photo folder on your memory card or ask it to create a new folder with every focus bracket.
These settings can be found in the “Shooting” menu under “5: Drive Mode”. Look for “Bracket Settings,” where you will find both the “Bracket Type” and the “Focus Bracket settings” menu items.
Exposure Bracketing Done Right
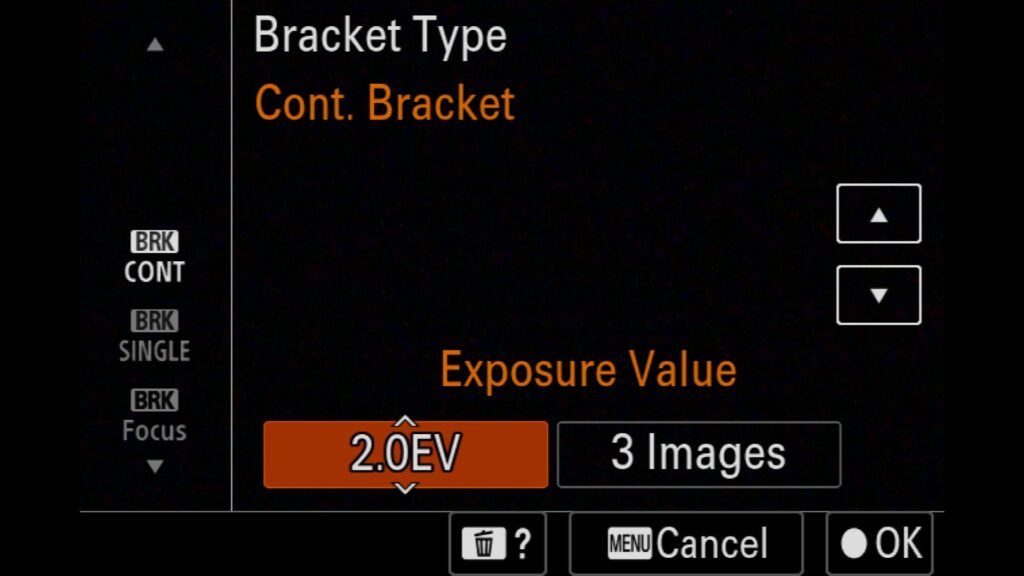
As a landscape photographer, you might want to shoot exposure brackets to create HDR-like images. Each image in the bracket will have a different exposure, allowing you to fully capture a given scene’s highlights, shadows, and midtones. To shoot an exposure bracket:
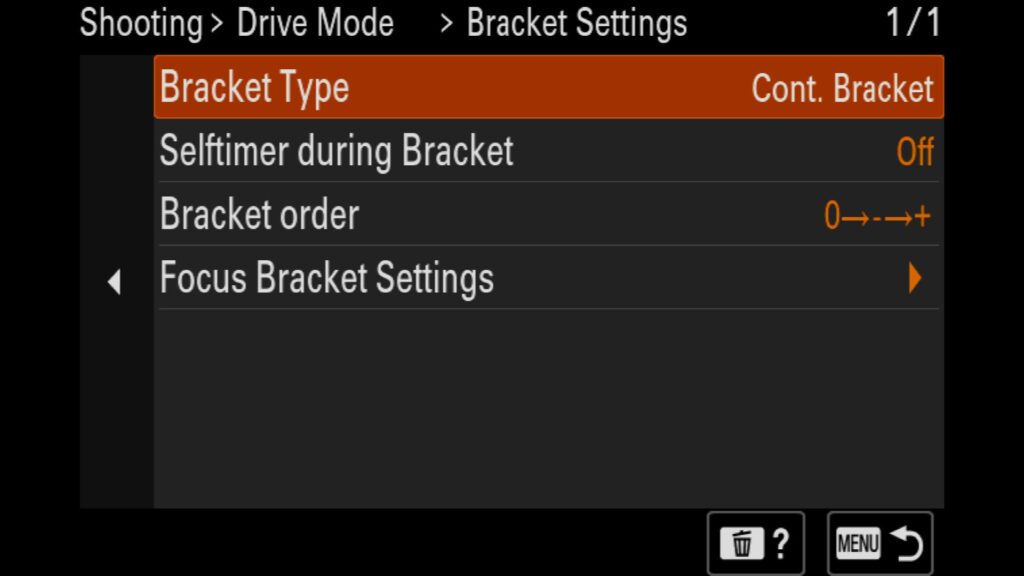
- Choose the “Continuous Bracket” under the Bracket Type. You can select the exposure difference between images (2 stops in this case) and how many images are in the bracket (3 Images).
- For your exposure bracket to take sequential images for you, make sure you turn on the “Self-timer during Bracket” option. I recommend at least a 2-second delay. Otherwise, you must press the shutter button for every image in the bracket.
All of these settings can be found in the “Shooting” menu under “5: Drive Mode”. Once there, select “Bracket Settings.”
Understanding the Interval Shoot Func. Menu (Timelapse Mode)
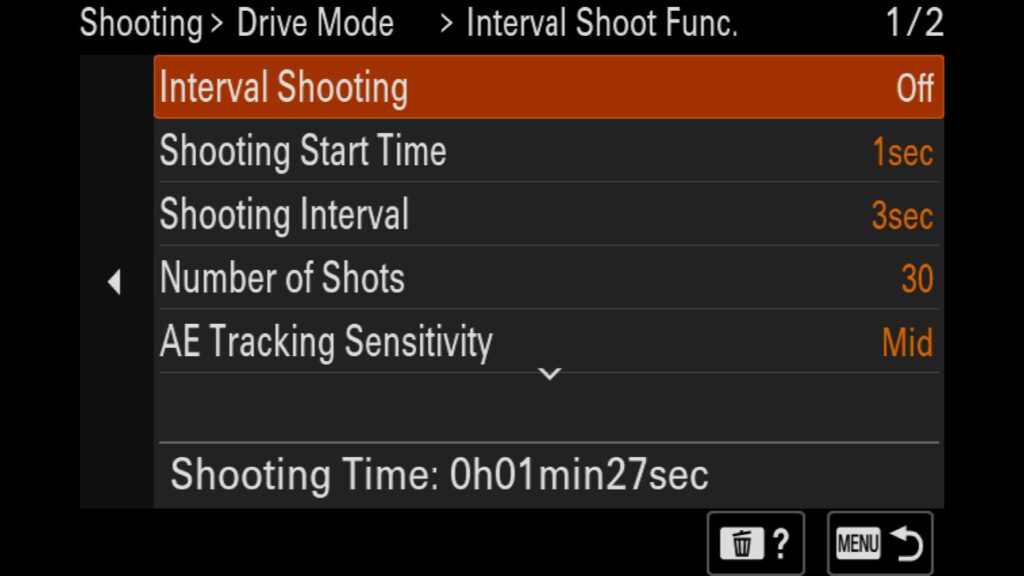
If you are interested in shooting Timelapses with your Sony a1 II, you will want to poke around the “Interval Shoot Func. Menu” a bit. It is important to note that in this mode, the a1 II is taking all of the images for your timelapse, but is not actually putting the timelapse movie together for you. You will have to do that yourself on your computer. The benefit to this approach is that you will always have all of your RAW images from the timelapse, so if something amazing happens, you will have both incredible still images as well as a timelpase you could compile afterwards.
Here are your options:
- Interval Shooting – In order to turn on Interval Shooting/Timelapse mode, this has to be set to “On”.
- Shooting Start Time – How long before the timelapse takes its first photo.
- Shooting Interval – The amount of time between shots of your timelapse
- Number of Shots. – The total number of images of your timelapse.
- AE Tracking Sensitivity – When shooting in P or Aperature Priority modes, allows the camera to adjust the exposure of the timelapse images as light changes in your scene.
- Shutter Type in Interval – Chooose electronic or mechanical for your shutter type.
- Shoot Interval Priority – When shooting in P or Aperature modes, the camera automatically adjusts the shutter speed to prioritize the interval between images taken for this timelapse.
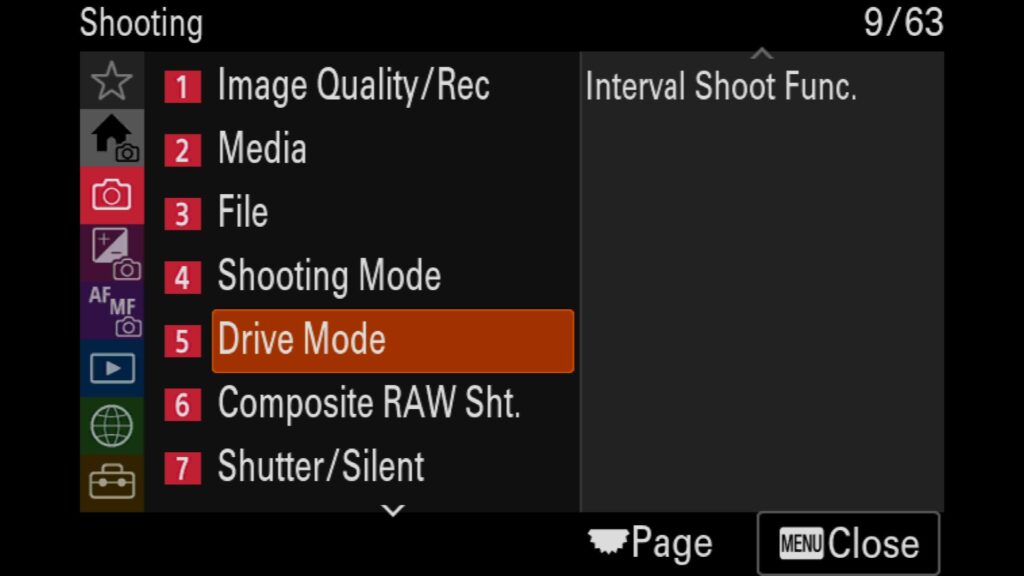
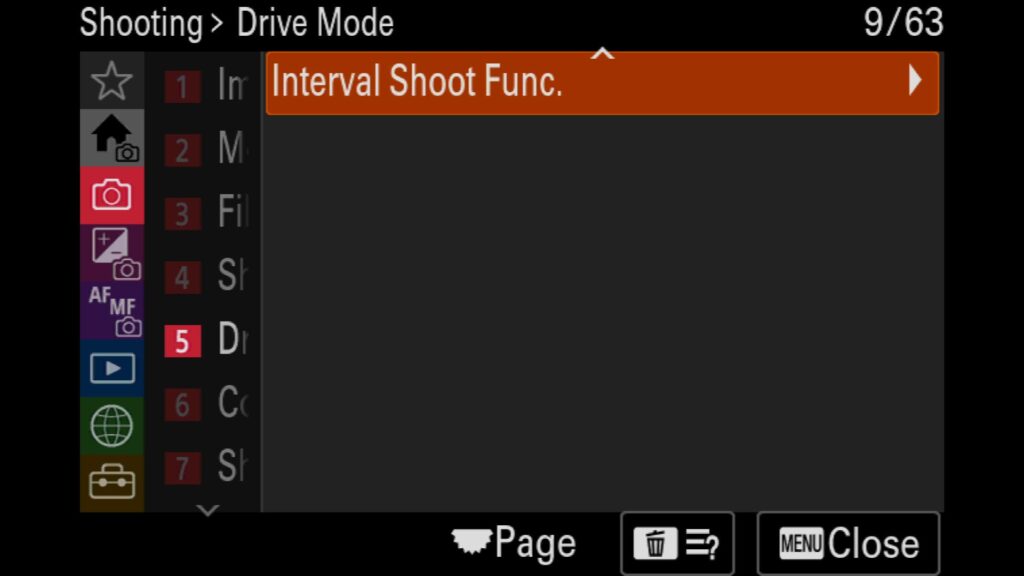
All of these settings can be found in the “Shooting” menu under “5: Drive Mode”. From there, scroll down to the second page and find “Interval Shoot Func.”
Using the Pixel Shift Mode
Another often overlooked feature found on Sony’s mirrorless cameras is Pixel Shift. When turned on, Pixel Shift allows the camera to take sets of 4 or 16 images while the sensor shifts slightly for each shot. This allows the sensor in the a1 II to capture incredible detail in a given scene that goes beyond what you can get from a single photo. The catch is that you need to use a tripod and Sony’s software on your computer to combine the sets of images. In my experience, this works best with shots of architecture that don’t include moving elements.
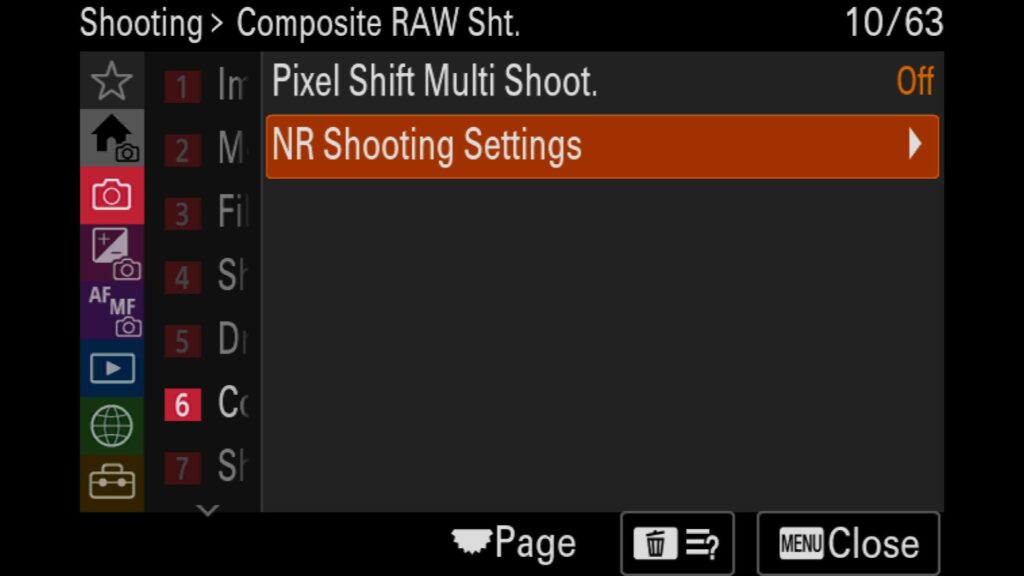
These settings are in the “Shooting” menu under “6: Composite RAW Sht.”. There you will find “Pixel Shift Multi Shoot.”.
Using the Noise Reduction Mode (New to the Sony a1 II)
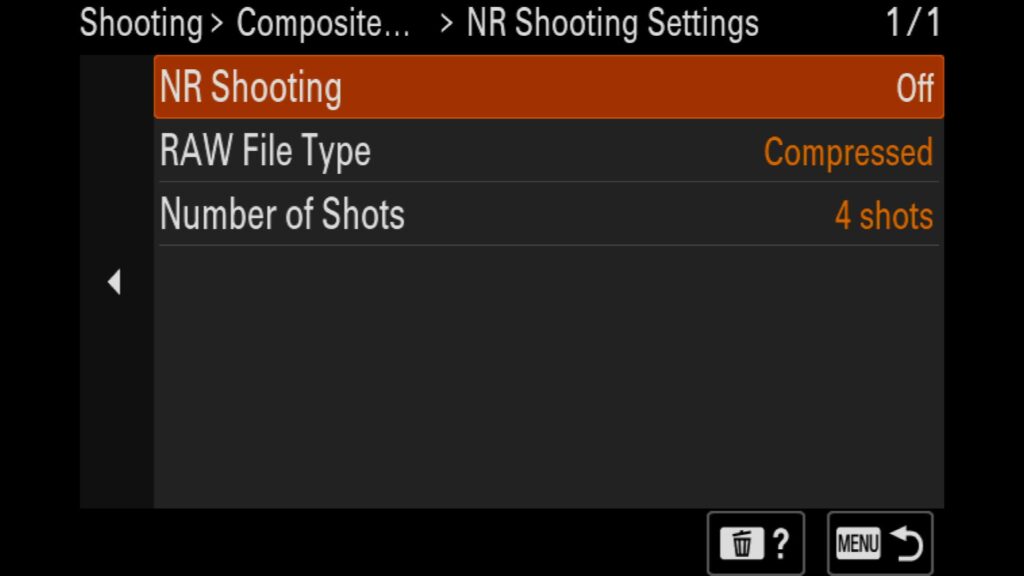
Not to be confused with Long Exposure Noise Reduction, the Sony a1 II will allow you to take multiple images of the same exact scene and stack them together to help eliminate any noise. This is a common method for astrophotographers to help remove noise from a photo of the night sky, although historically, they have used 3rd party software to combine the images. Either way, it is nice that Sony has this feature built into their latest cameras.
These settings are in the “Shooting” menu under “6: Composite RAW Sht.”. There you will find “NR Shooting Settings.”.
Download my a1 II Settings File over on my other blog post: "Customizing Your Sony a1 II"
Manually Selecting Mechanical or Electronic Shutter
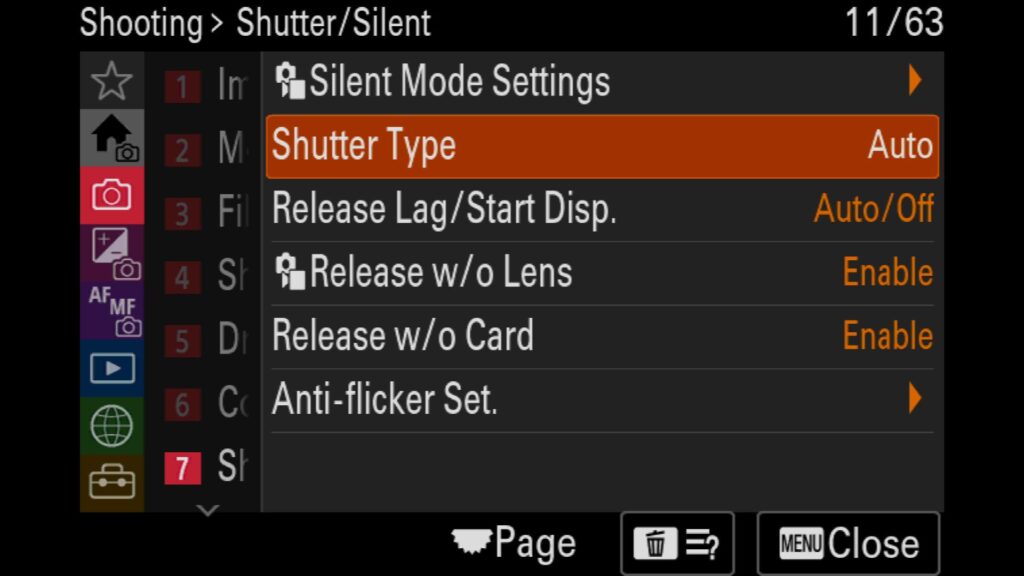
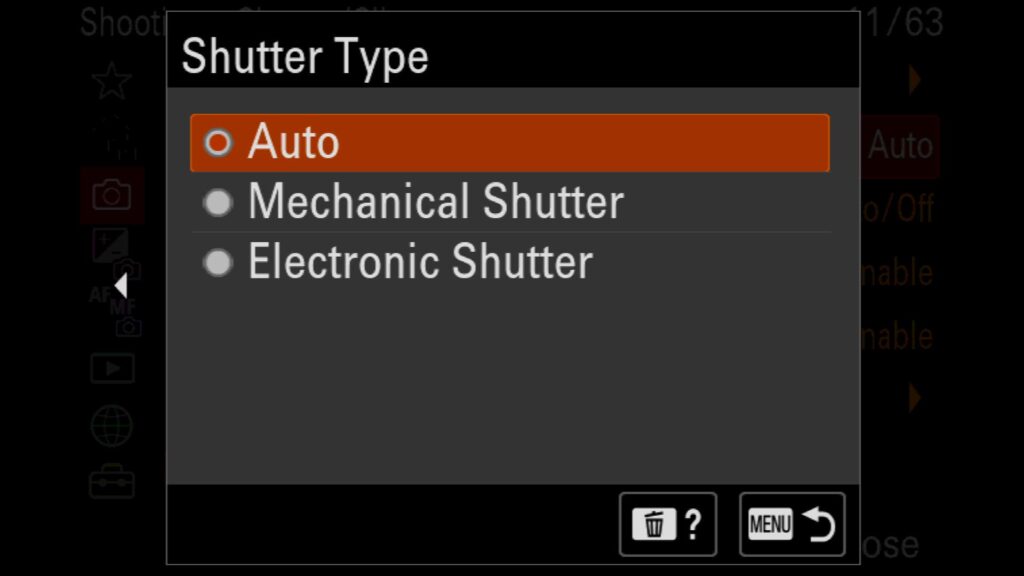
While the Sony a1 II has an incredible set of stacked BSI ( Backside Illuminated) sensors that work excellently using the Electronic Shutter, you might find a need to use the Mechanical Shutter as well. This can be especially helpful when shooting around LED lights that might cause banding issues in your photos. Your three options are Auto, Mechanical Shutter, or Electronic Shutter.
You can find these settings in the “Shooting” menu under “7: Shutter/Silent”. There you will see “Shutter Type”.
Turning On Grid Lines
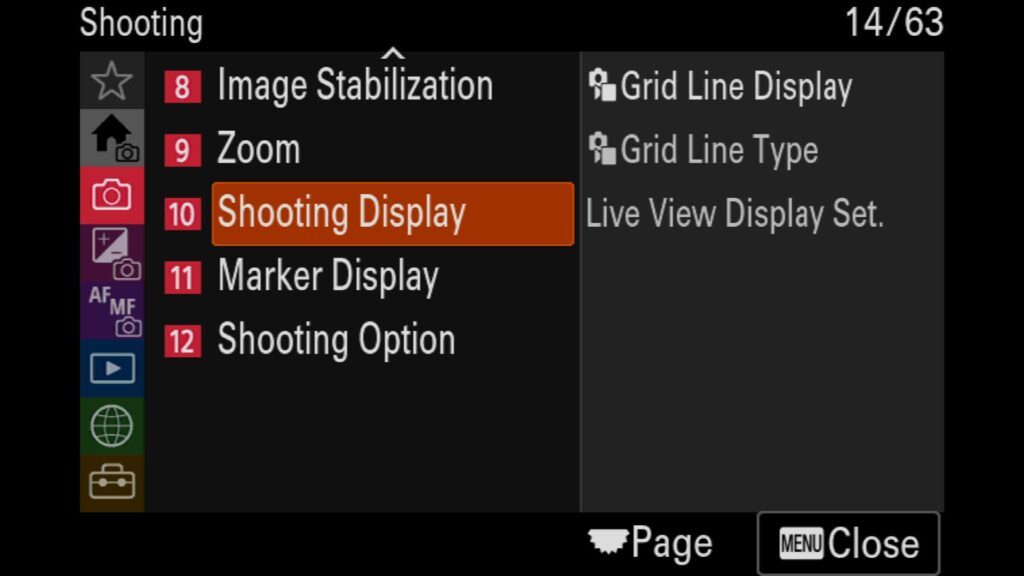
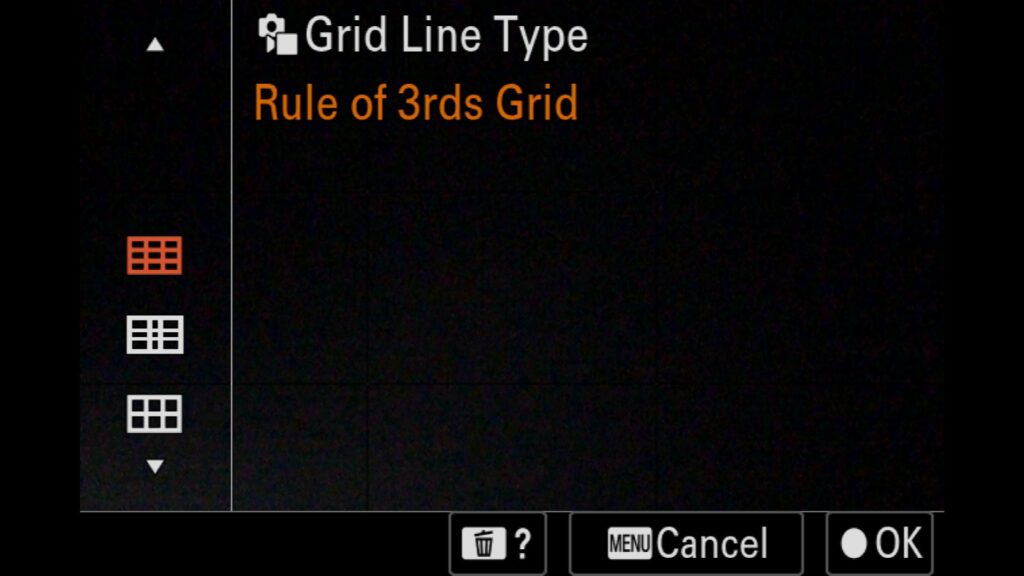
In my experience, a helpful tool worth turning on is the Grid Line for the rear LCD and the viewfinder. This tool can help you determine if your horizons are level while shooting. My favorite option within these settings is the “Rule of 3rds” as it can also help you with subject placement while you are figuring out your composition.
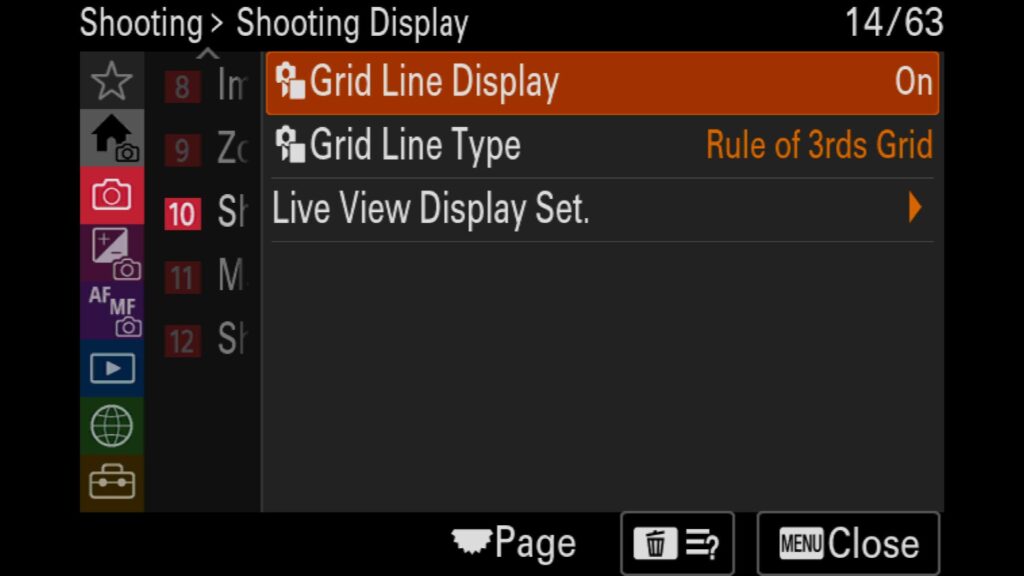
These settings are in the “Shooting” menu under “10: Shooting Display”. There you will see options for:
- Grid Line Display – To turn on this feature
- Grid Line Type – You can choose between Rule of 3rds, Golden Ratio, Square Grid or Diagonal + Square Grid.
Adjusting the Bulb Timer Settings
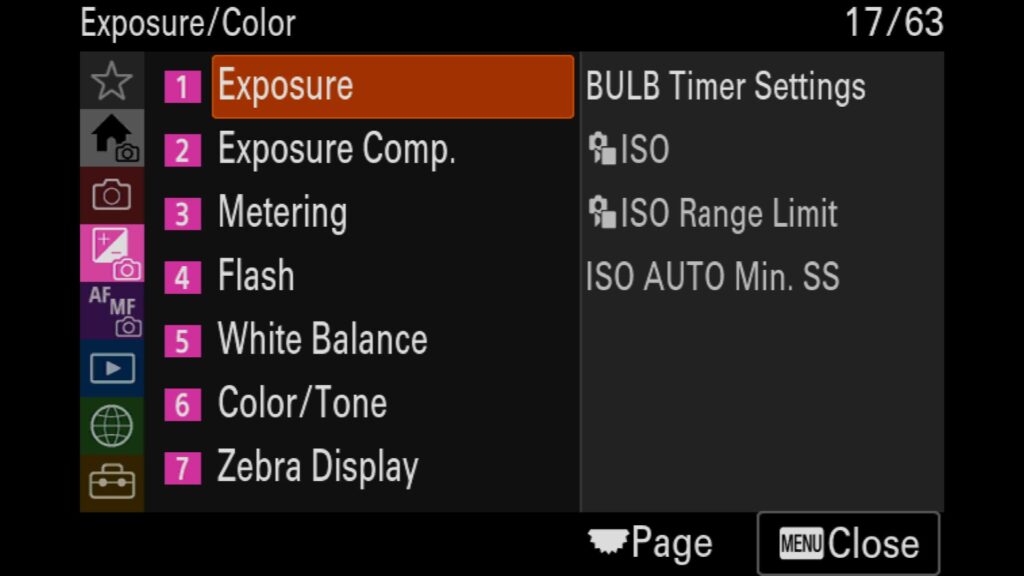
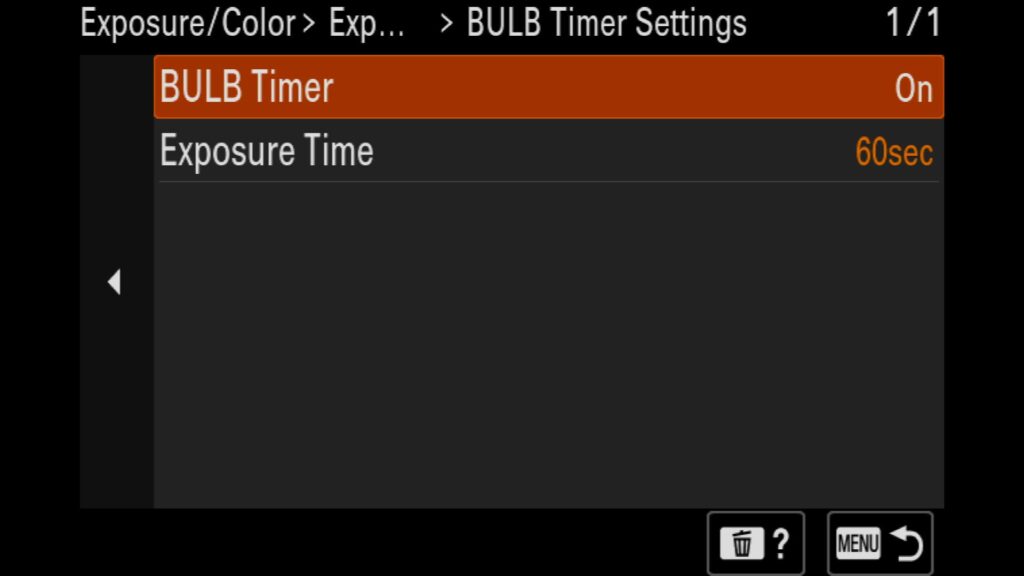
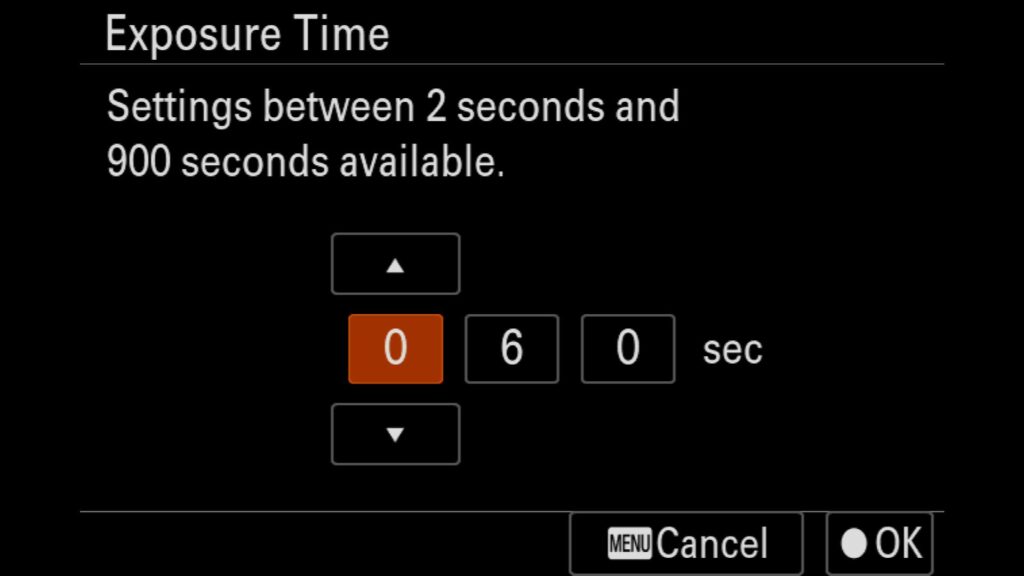
While you can jump into the Sony a1 II’s BULB mode by scrolling past a 30-second exposure in Manual mode, you cannot control how long the shutter stays open outside of pressing the shutter button again or using a remote. That is unless you turn on the dedicated BULB Mode setting. There, you can choose exactly how long you want the exposure (between 2 and 900 seconds).
These settings are in the “Exposure/Color” menu under “1: Exposure”. There you will find “BULB Timer Settings”.
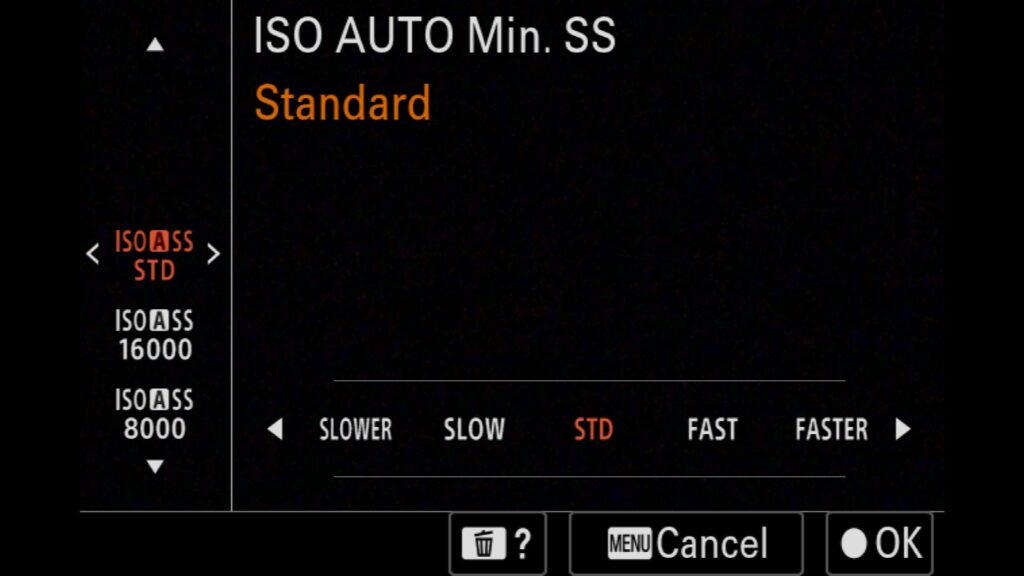
Changing the ISO Auto Minimum Shutter Speed Settings
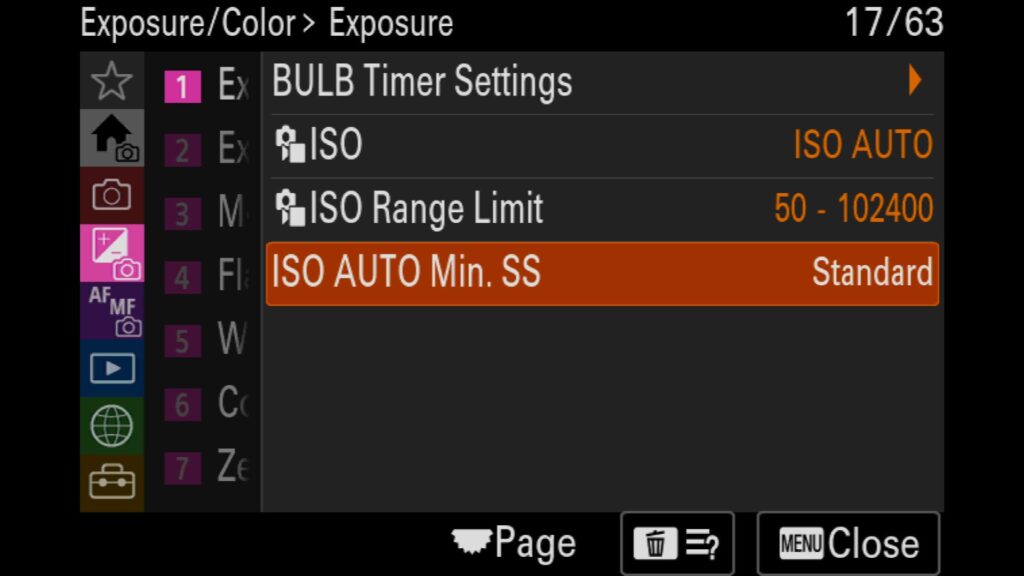
Some wildlife photographers prefer to shoot in Aperture Priority Mode with AUTO ISO to focus on composition rather than Shutter Speed and ISO. In this situation, you will want to set a minimum shutter speed so the camera doesn’t drop below a set speed. If the shutter speed drops too low, it can cause your photos to look blurry and out of focus because of the photographer’s and subject’s natural movement. To prevent this from happening, the camera will automatically increase the ISO of your image to counter and maintain the minimum shutter speed that was set.
These settings are in the “Exposure/Color” menu under “1: Exposure”. There, you will find “ISO AUTO Min. SS”. Once inside the setting, you can pick from a preset group (Slower, Slow, Standard, Fast, or Faster) or manually select a Shutter Speed from 16000 to 30 seconds.
Turning Off the D-Range Optimizer
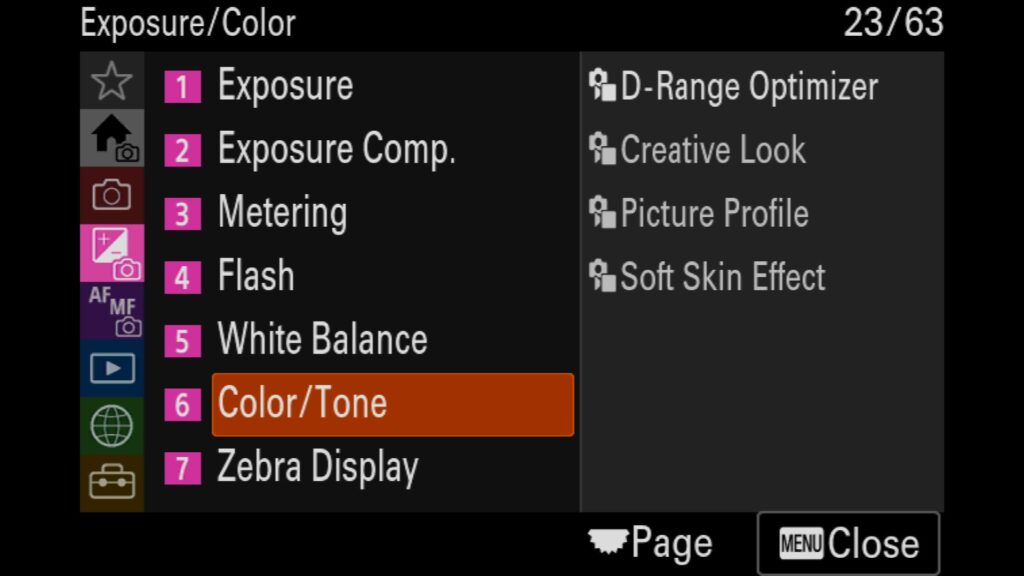
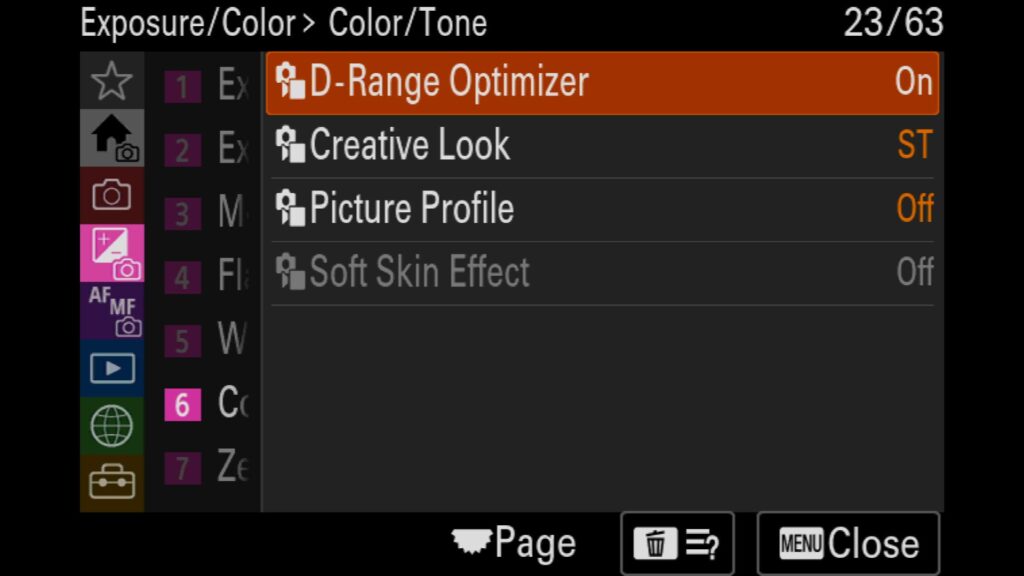
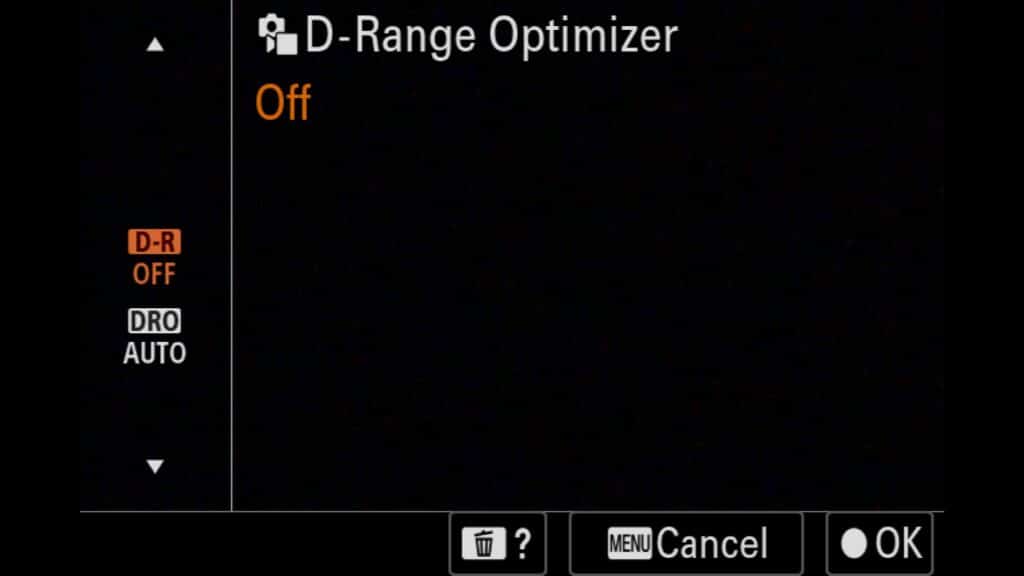
One of the last settings that I want to turn off with the Sony a1 II is the D-Range Optimizer, otherwise known as own as DRO. This setting will artificially pull up an image’s shadow exposure/details. The problem with this is that it only affects JPEG images, but since your RAW files create a JPEG thumbnail preview, it can give you an unrealistic expectation of the exposure of a photo you have taken. Why? Because it is that JPEG thumbnail that you look at on the back of your camera when you check out your images, even if you are shooting in the RAW file format.
These settings are in the “Exposure/Color” menu under “6: Color/Tone”. There, you will find “D-Range Optimizer”.
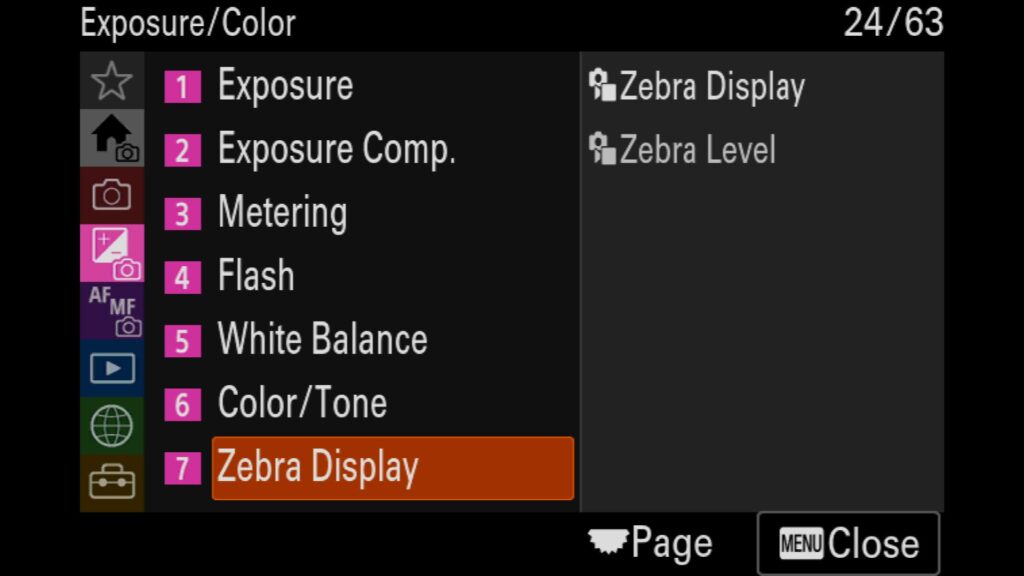
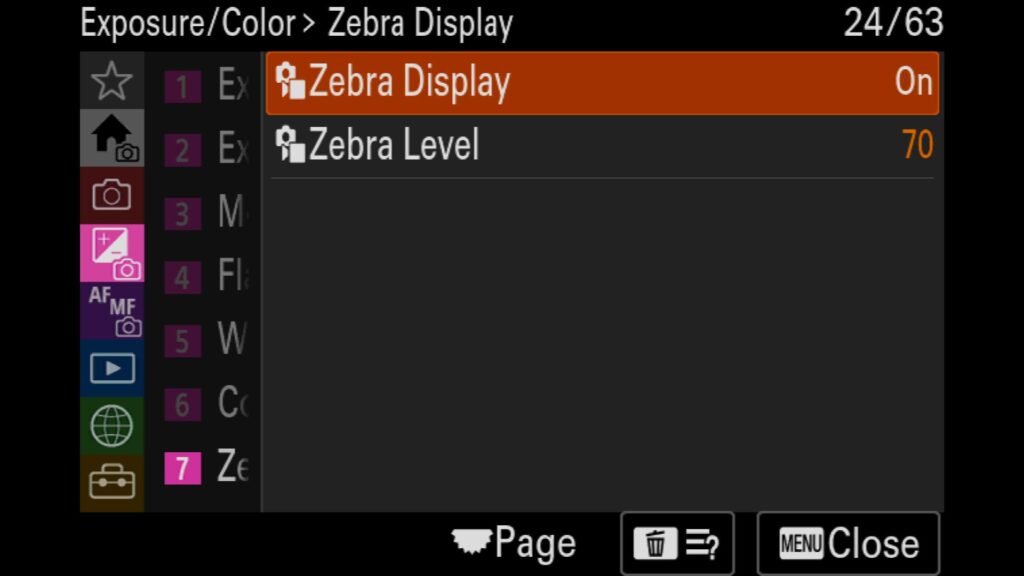
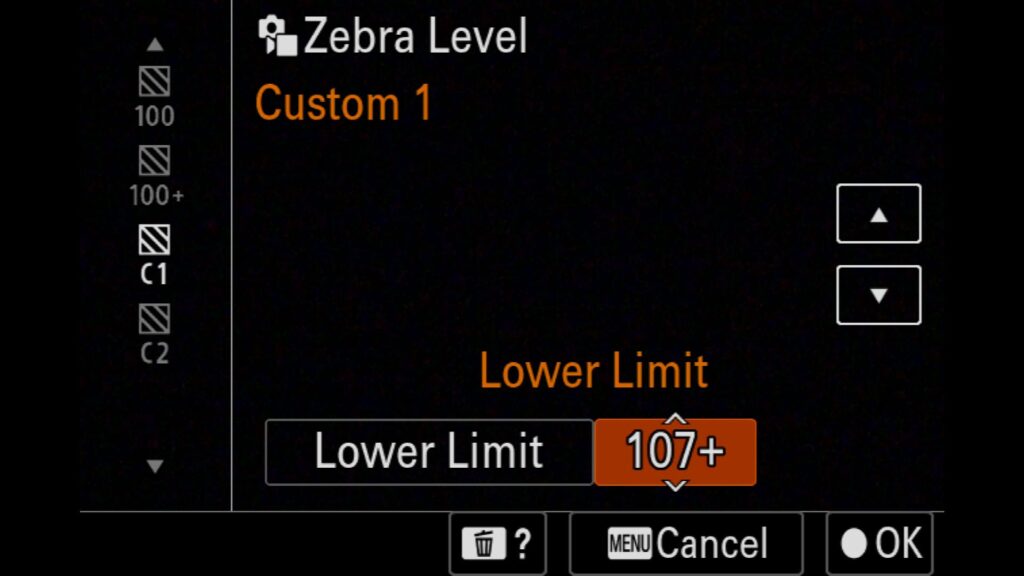
Selecting a Custom Zebra Display Level for Protecting Highlights
If you have spent any time shooting video, you are probably familiar with the Zebra or Dancing Ants setting on most digital cameras. Because it is harder to recover blown-out highlights with video, Zebra can be a helpful tool. However, with the Sony a1 II (and the original a1), it was discovered that it could be helpful with photos too. If you set a custom zebra level to a “Lower Limit of 107+”, you have a good idea of knowing if you have clipped the highlights in your image. You know you are good to go if you don’t see the “Dancing Ants” or Zebra lights flashing on any part of your frame. For example, this is incredibly helpful when shooting birds in flight with white feathers.
These settings are in the “Exposure/Color” menu under “7: Zebra Display”. There, you will find both “Zebra Display” and “Zebra Level”.
Adjusting the Focus Peaking Settings For Manual Focus
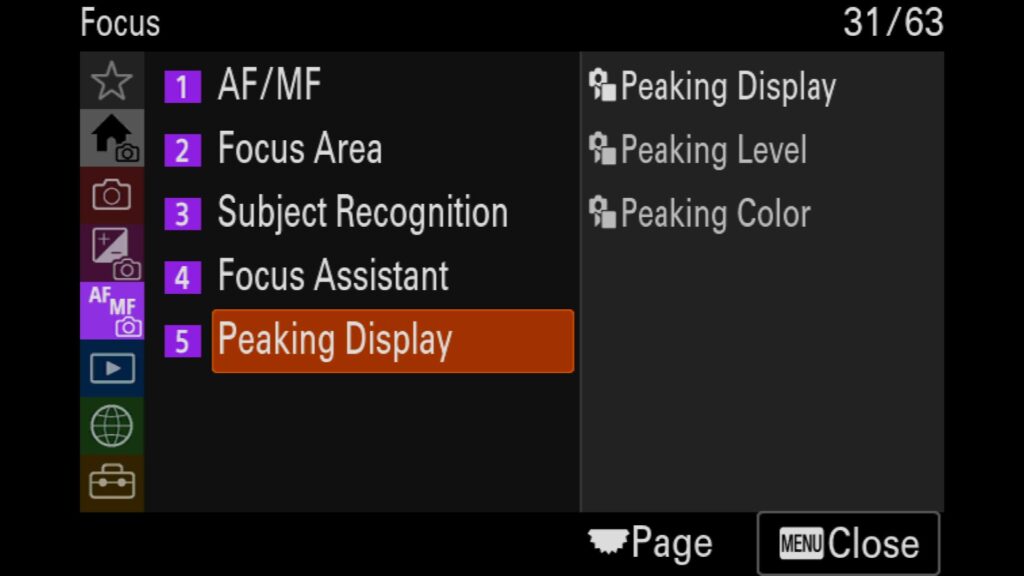
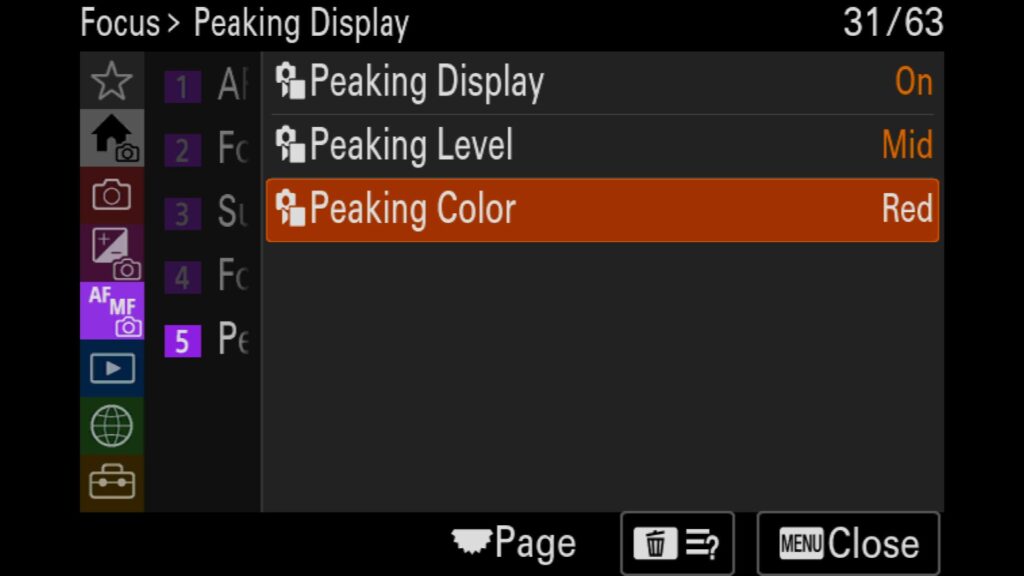
Focus Peaking is an excellent feature on Sony’s mirrorless cameras, including the a1 II. With it turned on, when you are in the manual focusing mode, color pixels will appear where the camera believes you are close to being in focus. It is not meant to represent a tac sharp image but more of a guideline to let you know that you are close to finding focus.
These settings are in the “Focus” menu under “5: Peaking Display”. Inside that menu you will find the following:
- Peaking Display – Turn this setting On
- Peaking Level – You can select low, medium, or high. I recommend medium.
- Peaking Color – Select Red, Yellow, Blue, or White. I recommend you use Red or Blue, as they are easier to see in most situations where you might use MF.
Grouping Images from a Burst Together
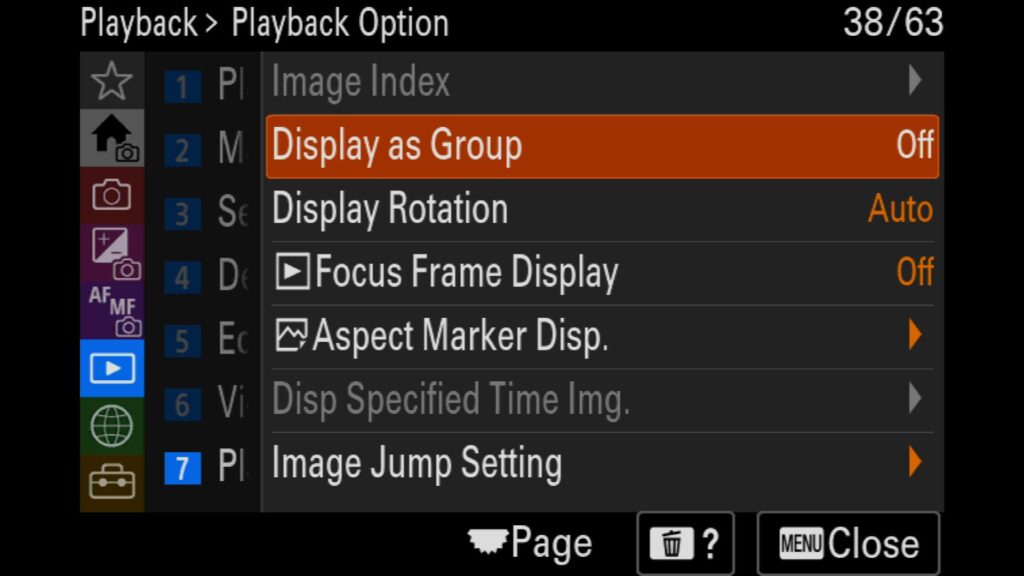
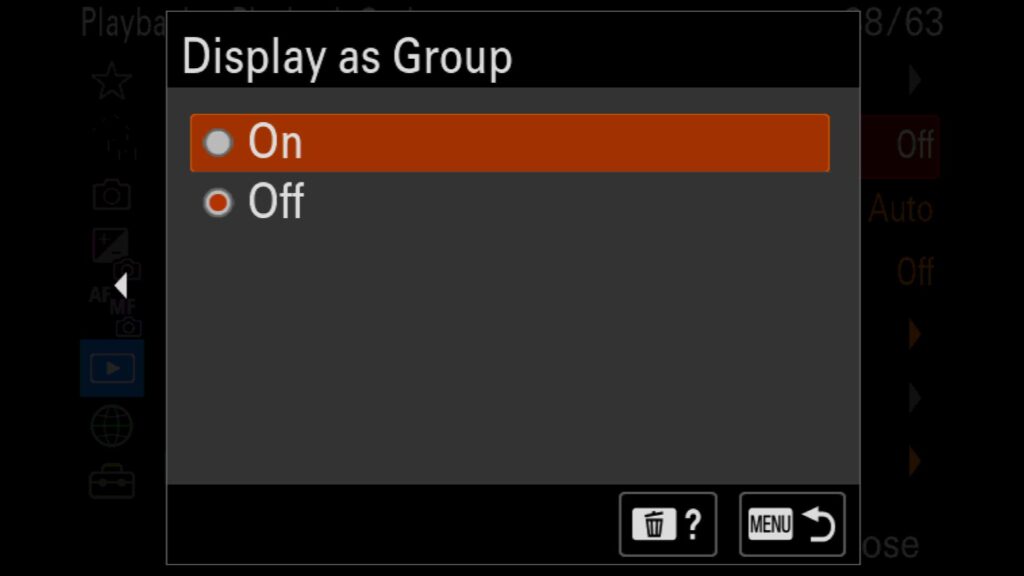
One of the challenges of using a camera that can shoot with high FPS is that you will have a lot of images to go through at the end of the day. But if you want to get a head start on this process, I love turning on the “Display as Group” setting, which allows all of the images from a burst to be grouped together in Playback mode. Because there is usually only a handful of images you will want to keep from a given burst, you can “Protect” the images you want to keep (By pressing the C3 button on the back of the a1 II by default) and then delete the group from your camera. This will keep the images you flagged as “Protected” and remove everything else from that burst.
This setting is in the “Playback” menu under “7: Playback Option,” where you will find “Display as Group”.
Displaying The AF Point On Images Already Captured
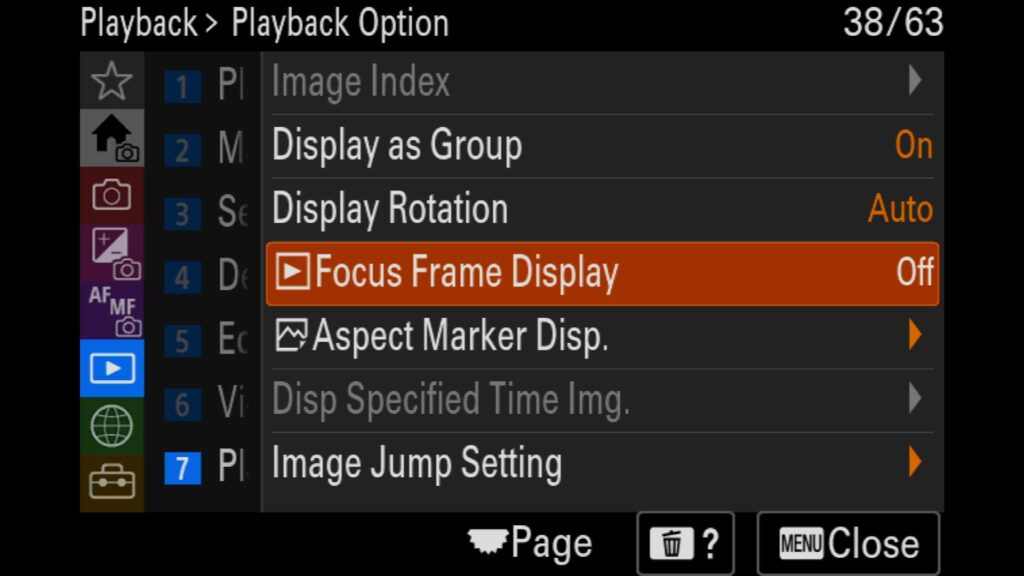
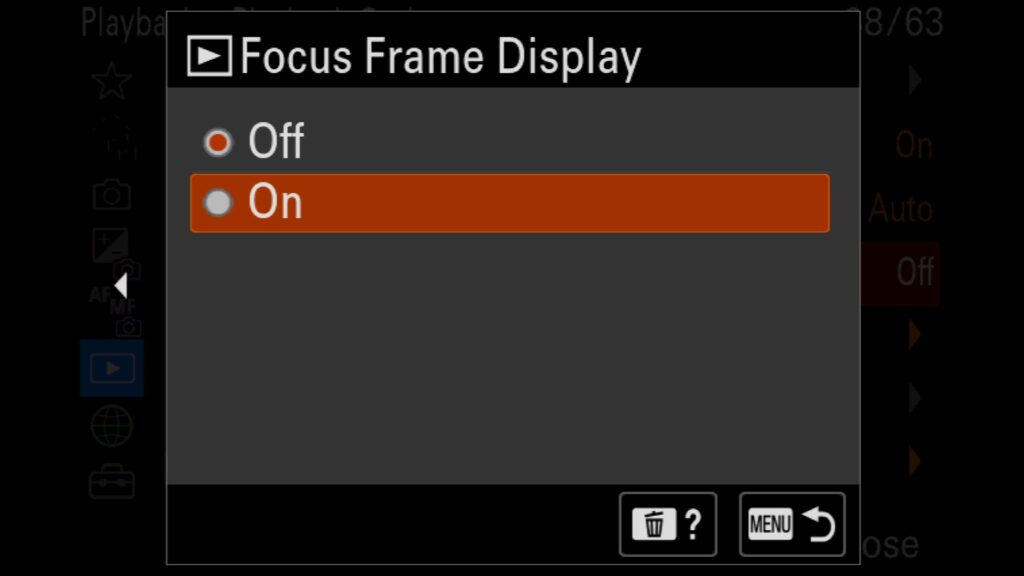
If you want to see where the a1 II decided to focus on an image you have taken with the camera, you can turn on “Focus Frame Display.” This will artificially place a small green box on top of your image where the camera’s focal point was when the photo was taken. Just so you know, this will only be viewable inside the camera in the Playback mode.
This setting is in the “Playback” menu under “7: Playback Option,” where you will find “Focus Frame Display”.
Using the Camera as a Webcam (New to the Sony A1 II)
A lesser-known feature of the latest Sony mirrorless cameras is that they can easily be used as a webcam. Talk about upping the quality of those work Zoom calls! 😉 With the Sony a1 II, you have two options for streaming with the camera: USB or Network.
USB Streaming
Connecting your a1 II to your computer to act as a webcam is extremely easy.
Step 1 – Plug in a USB-C cable (I highly recommend a USB-C 3.2 cord for the best quality) into the side of your a1 II and then plug the other end into your computer
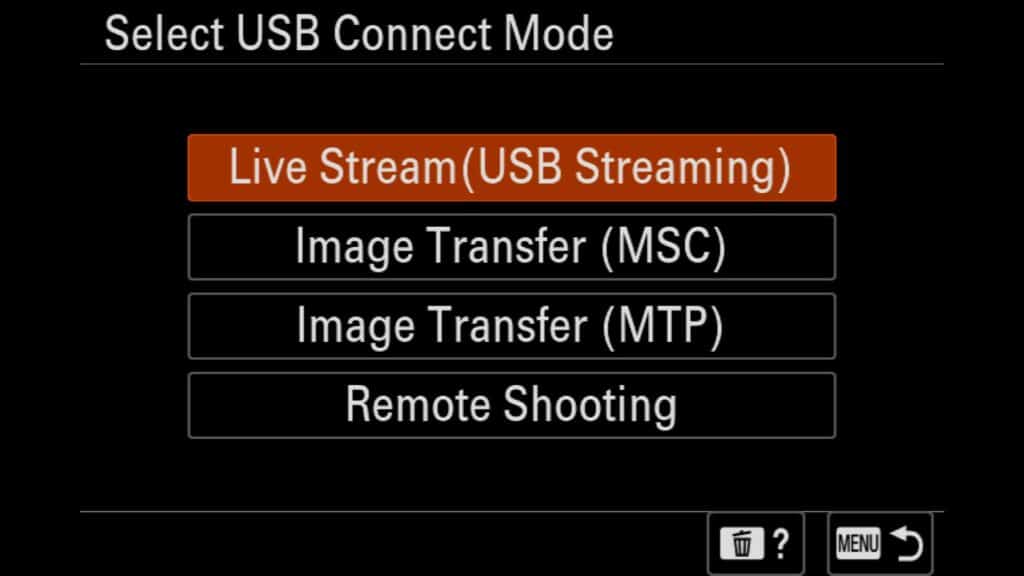
Step 2 – A window will pop up on the a1 II asking if you want to: Live Stream (USB Streaming), Image Transfer (MSC), Image Transfer (MTP), or setup Remote Shooting.
Step 3 – Select Live Stream (USB Streaming) and then select the a1 II as an option for your webcam on your computer.
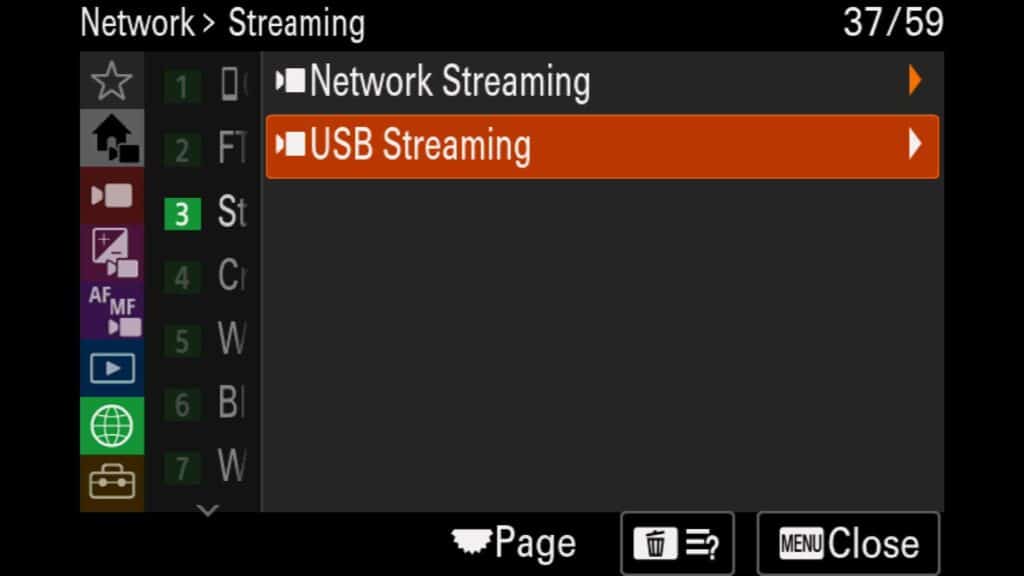
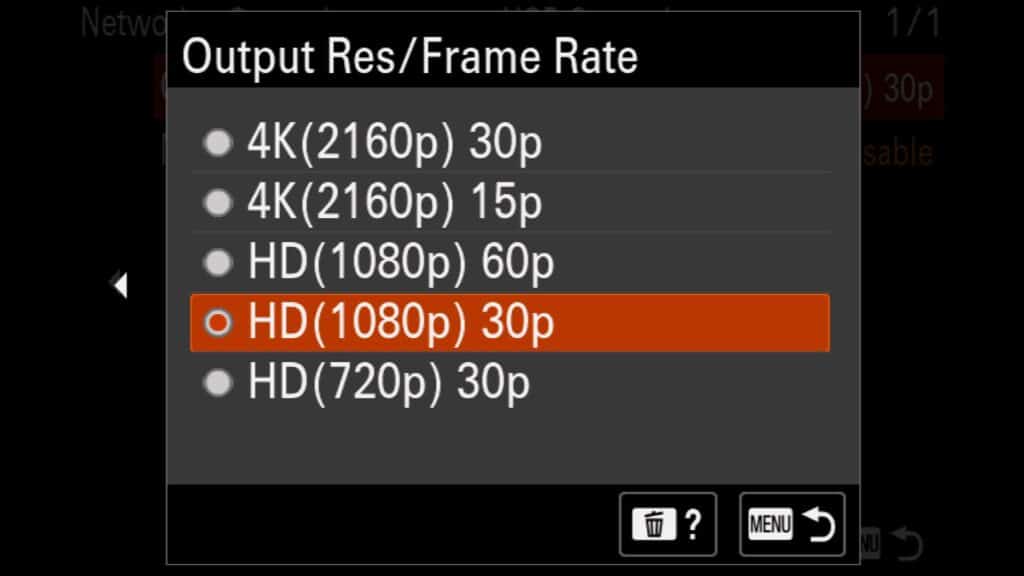
You can also adjust the quality and frame rate of the video output by viewing it on USB. Head to the “Network” menu and look for “3: Streaming”. Find “USB Streaming,” and there you will find your two options: “Output Res/Frame Rate” and “Movie Rec During Streaming”.
Network Streaming
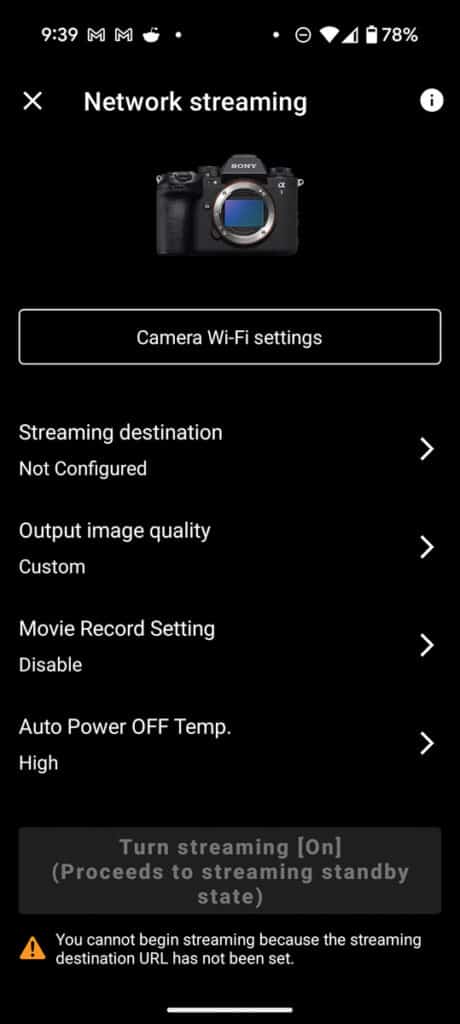
New to the a1 II is the ability to stream using the network/internet, although you must have your camera set up with Sony’s Creator App on your Android or Apple device.
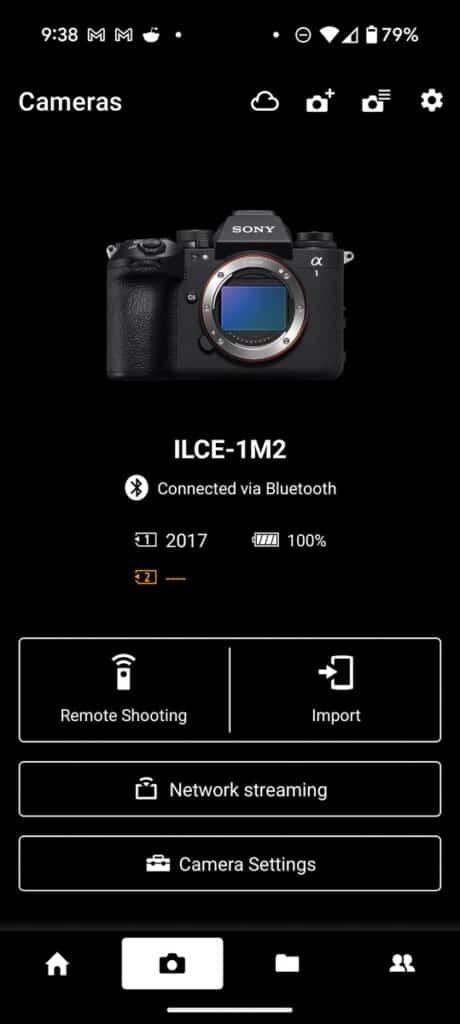
Step 1 – With your a1 II already set up with the Creator’s App on your phone, open the app and move to the “Camera” tab.
Step 2 – Press the “Network streaming” button. Click “Next” on the next window.
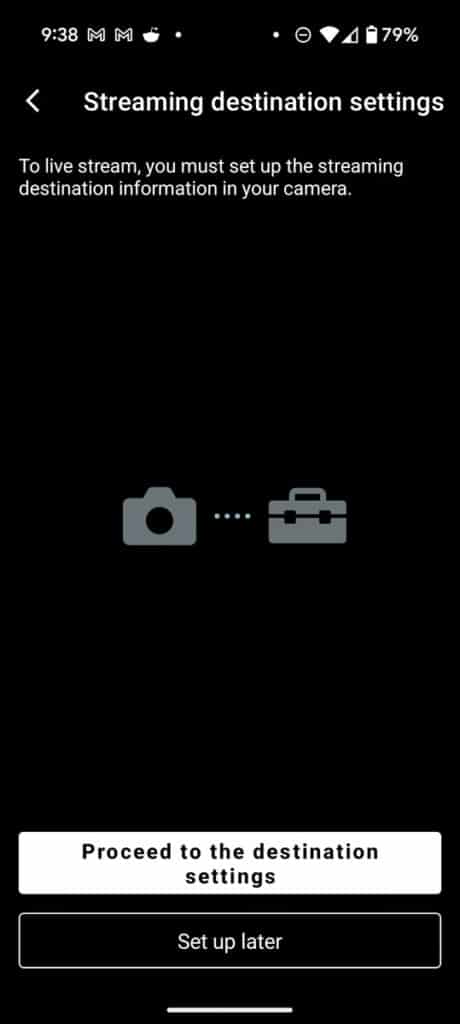
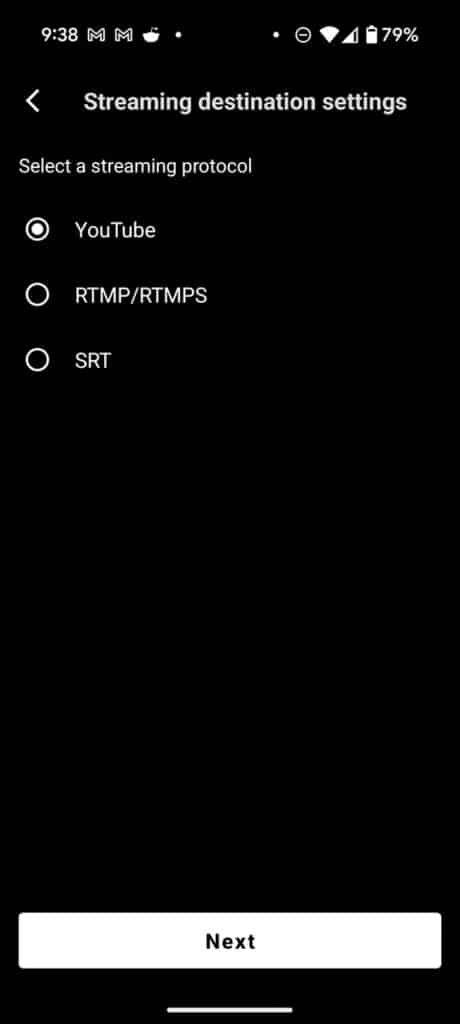
Step 3 – Click the “Proceed to the destination settings” button where you need to input the streaming protocol from Youtube, RTMP/RTMPS, or SRT. Hit “Next” when you are done.
Step 4 – Click on the “Camera Wifi settings” app and connect the a1 II to your wifi or use the dedicated ethernet port.
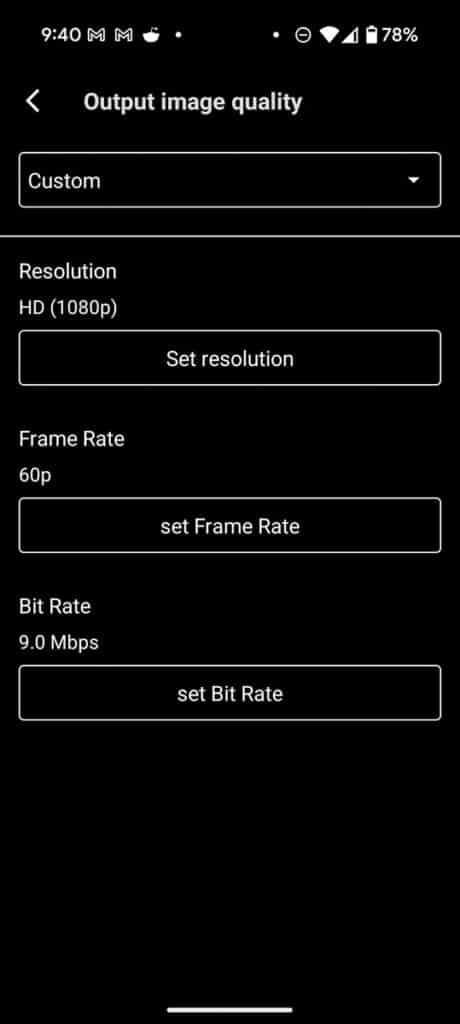
Step 5 – You can adjust the “Output image quality” settings by selecting your Resolution, Frame Rate, and Bit Rate.
Step 6 – Once everything has been dialed in, press the “Turn Stream On” button at the bottom of the Network streaming page in the App itself.

Using a Wireless Bluetooth Remote
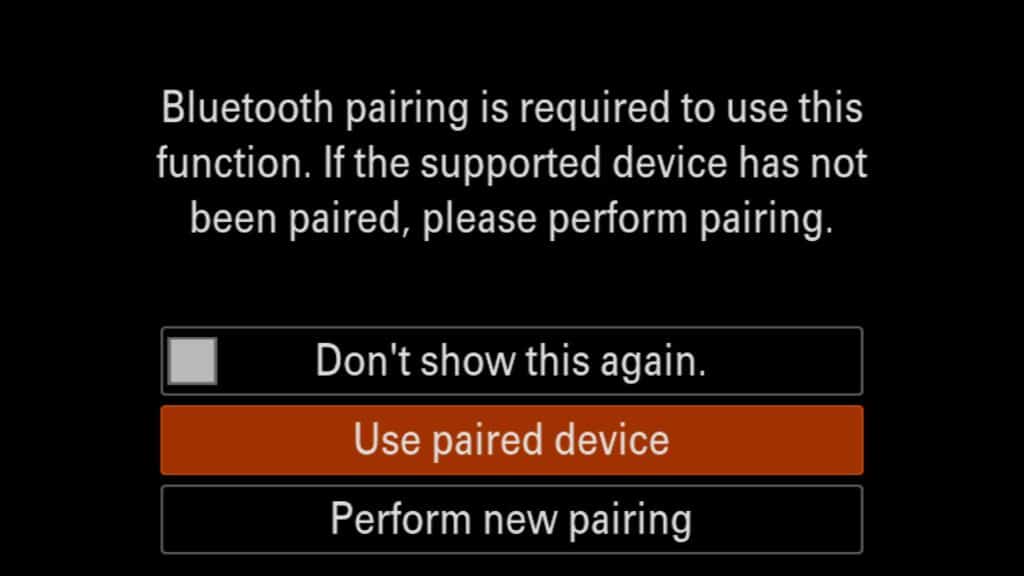
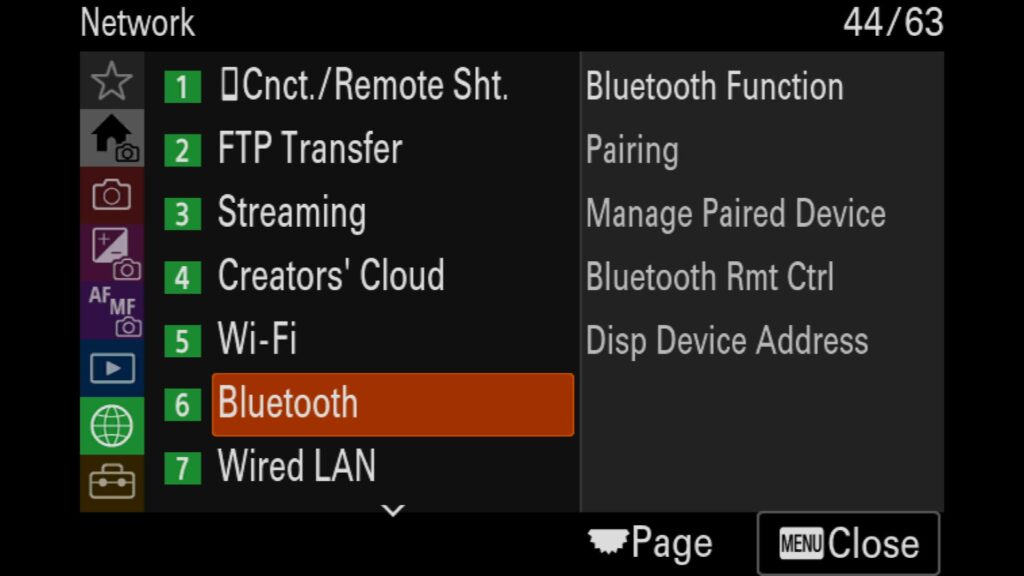
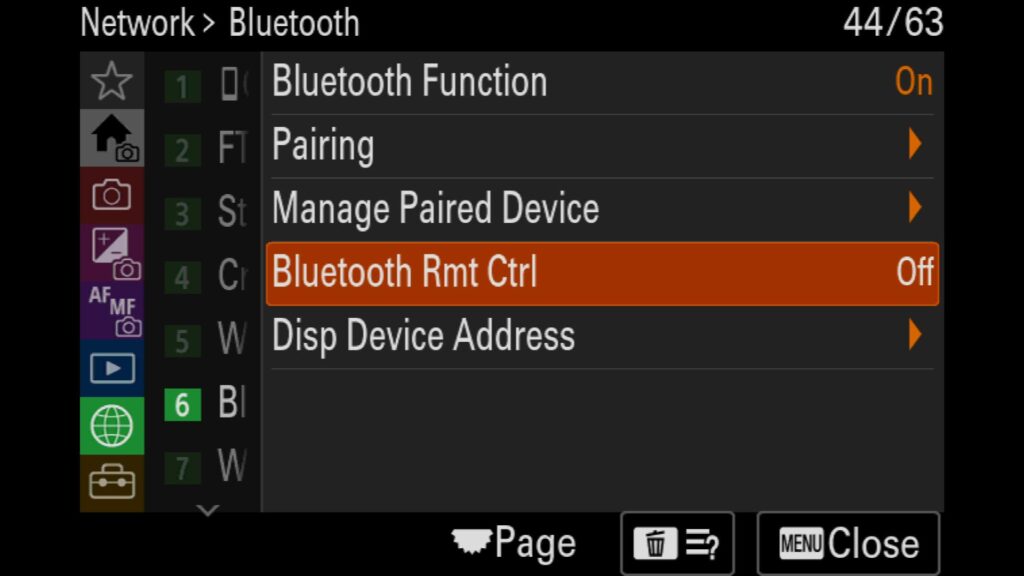
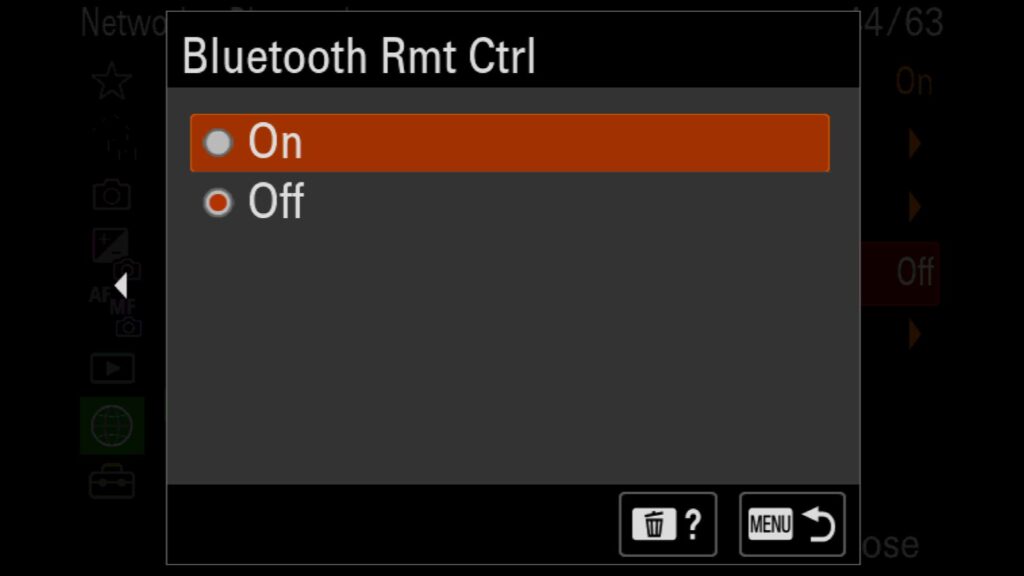
To use a Bluetooth remote with the Sony a1 II, you must first turn on the “Bluetooth Rmt Ctrl” setting in the camera. Once you have done that, it will ask you to pair a new remote with the camera or select a list of remotes you have already paired with the a1 II.
This setting is in the “Network” menu under “6: Bluetooth,” where you will find “Bluetooth Rmt Ctrl”.

Turning on "Airplane Mode" To Save Battery Life
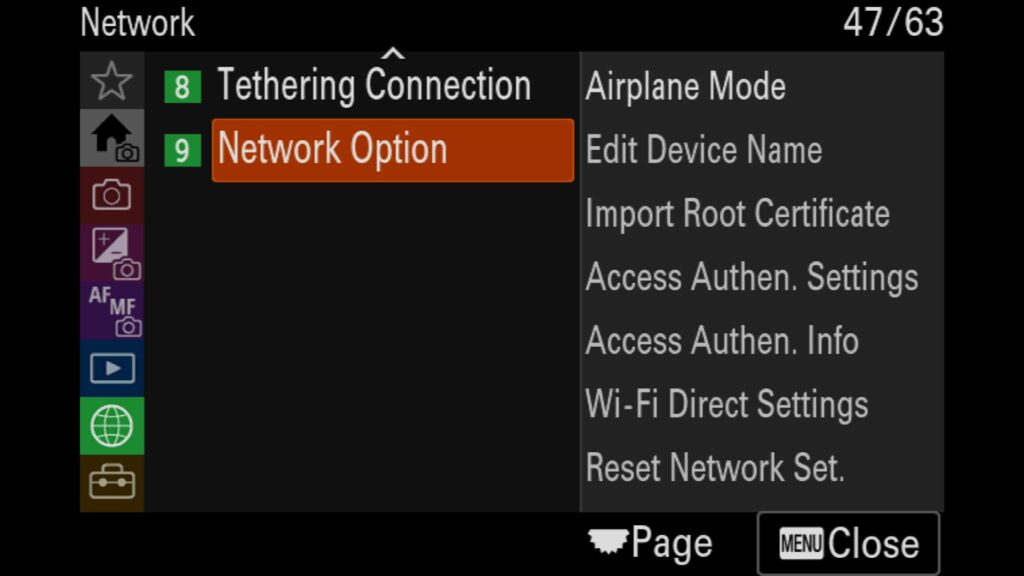
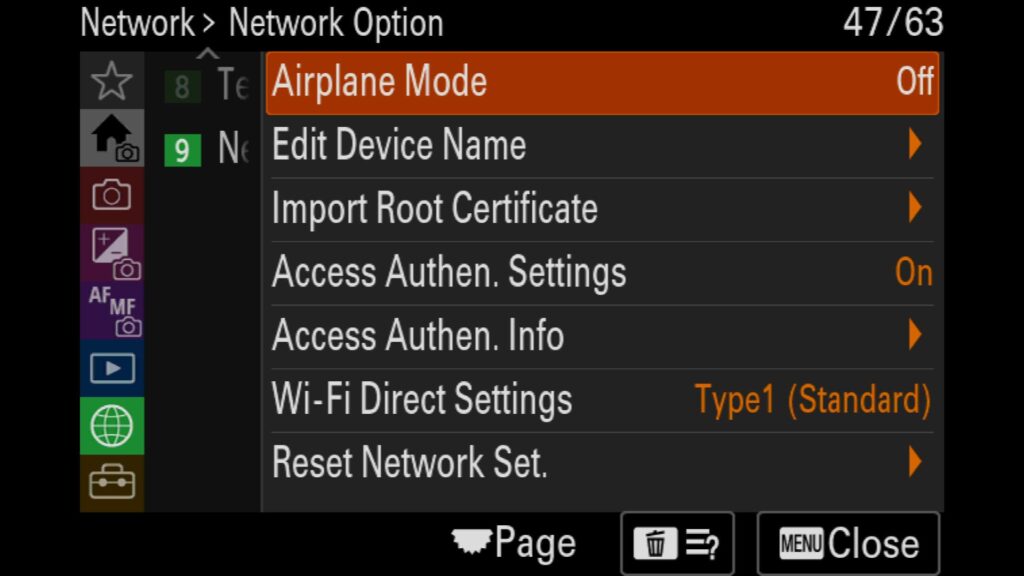
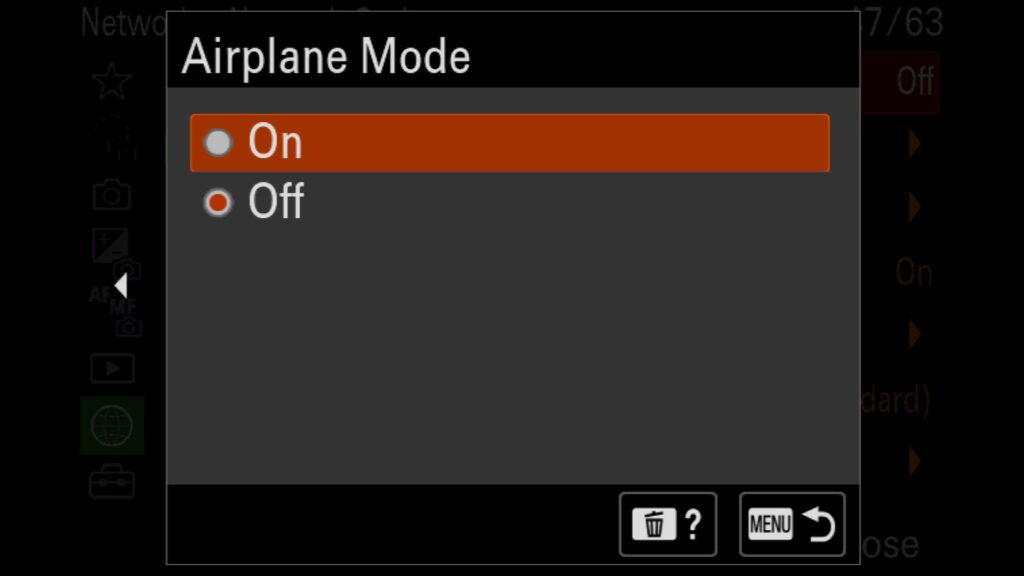
One of the few drawbacks to mirrorless cameras is that they are purely digital cameras and, therefore, can sometimes chew through batteries. To help preserve some of your battery life, you can turn on Airplane mode so that no wifi or Bluetooth features are used when you don’t want them to.
To turn on Airplane mode, go to the “Network” menu under “9: Network Option,” and you will find “Airplane Mode”.
Adjusting the Quality & Frame Rate of the Viewfinder Display
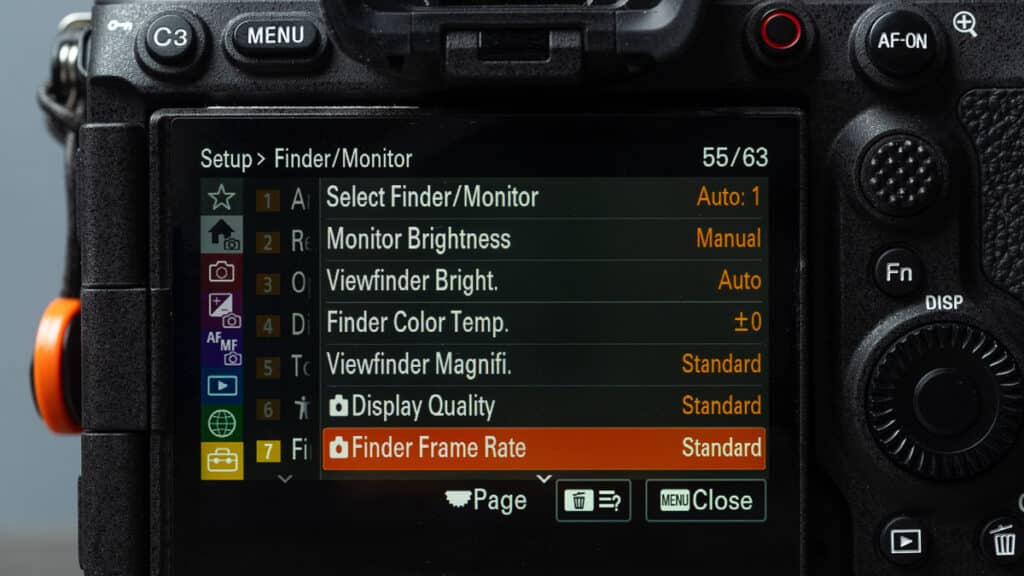
The Sony a1 II’s viewfinder is impressive, with a 9.44 million dot display that can work up to 240 fps. However, you have a few settings you can play with to get the most out of the viewfinder, depending on what you photograph.
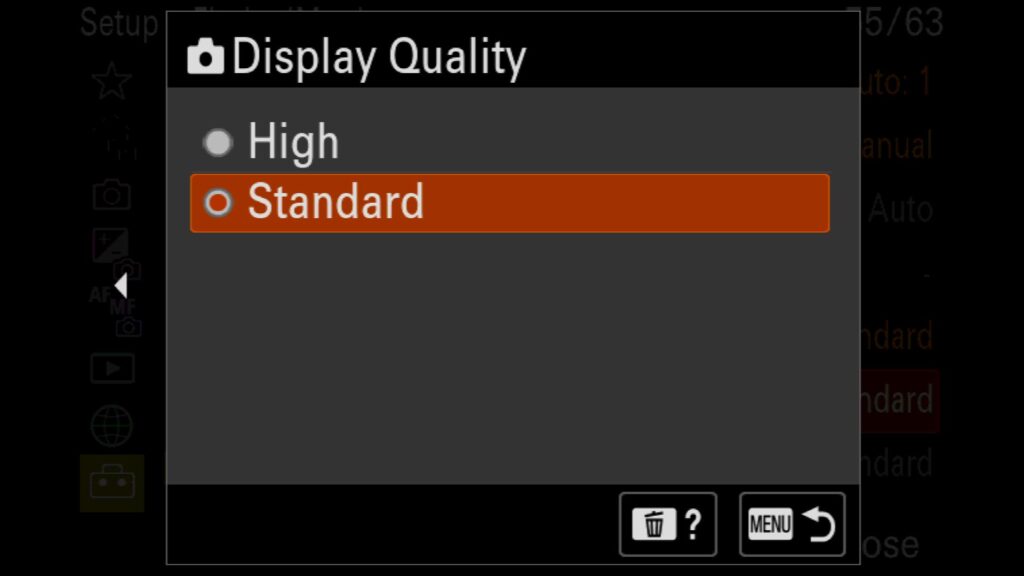
Display Quality – You can adjust the display resolution of the viewfinder from “Standard” to “High.” High will output a higher resolution display but at the cost of a bit of battery life.
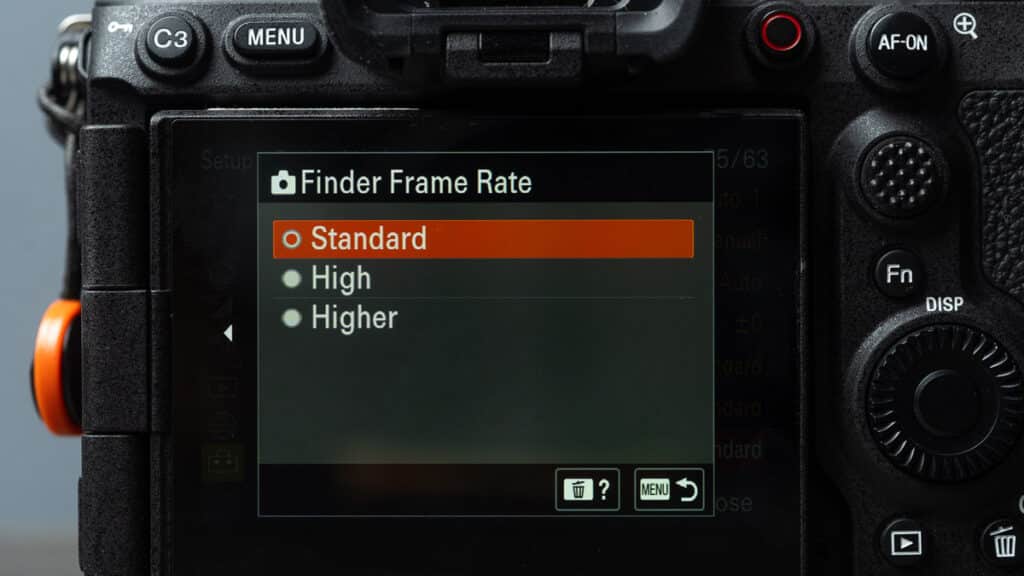
Finder Frame Rate – You can also adjust the frame rate of the viewfinder from “Standard” to “High” to “Higher.” The higher the frame rate, the easier it is for you to use the viewfinder to track fast-moving subjects that don’t appear blurred. Because the display is digital, a higher frame rate means you see more frames per second as the subject moves across your screen. This is similar to how shooting a movie works. Just know that increasing the viewfinder’s frame rate forces the “Display Quality” setting to “Standard.” You can not currently set a High “Display Quality” and a High or Higher “Finder Frame Rate.”
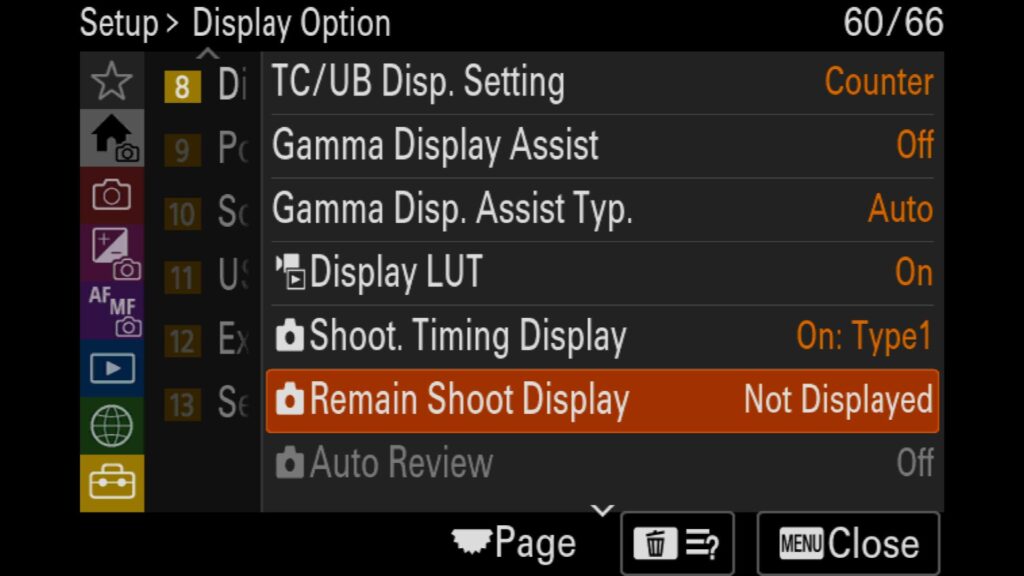
Turn On Remaining Shoot Display
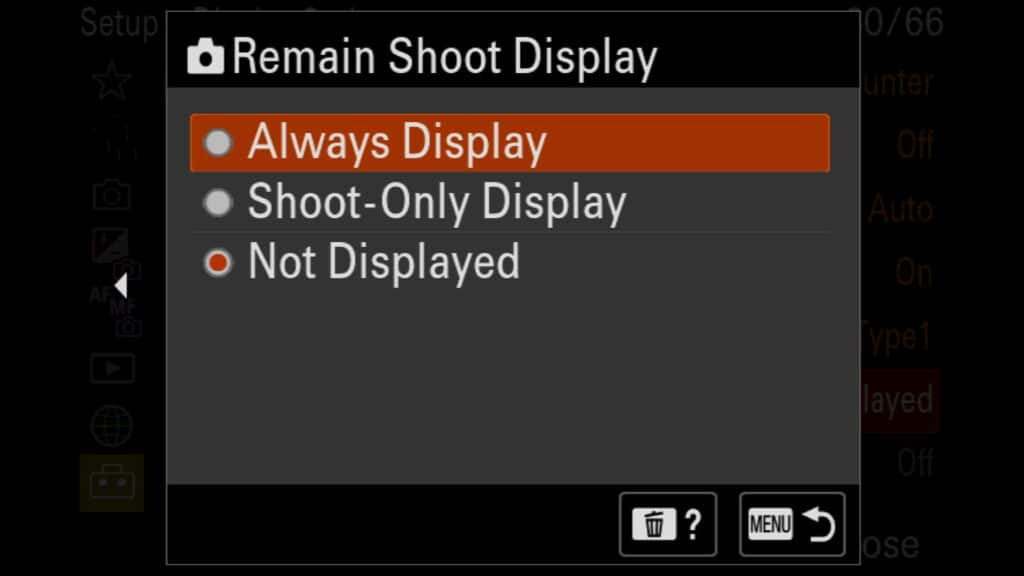
A helpful tool with the Sony a1 II, especially now that it has Pre-Capture is the ability to see how many images you have left in your image buffer. With “Remain Shoot Display,” a bar will appear on the left side of your frame that indicates your image buffer. It is white with a complete image buffer, but as you begin to take the photos, you will see the bar drain from the top. Once the bar is empty, you have hit your buffer limit, and your FPS will slow dramatically to allow the buffer to try to catch up.
You have three options within this feature:
Always Display – Always display the remaining amount of images in your buffer.
Shoot-Only Display – Only display the image buffer when you are shooting.
Not Displayed – Don’t display the image buffer bar.
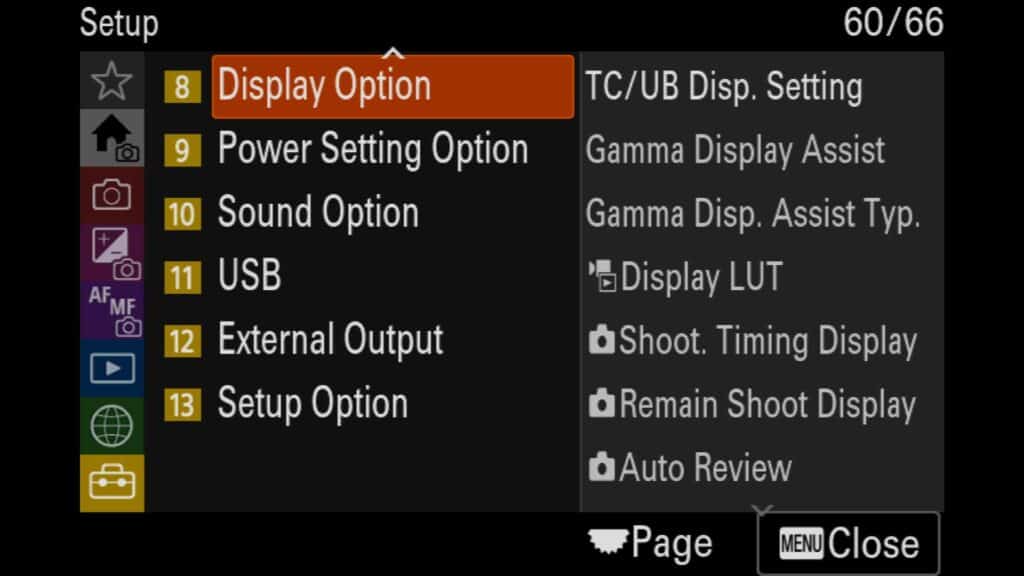
This is in the “Setup” menu under “8: Display Options”. There you will see “Remain Shoot Display.”
Turning Off Those Annoying Audio Sounds
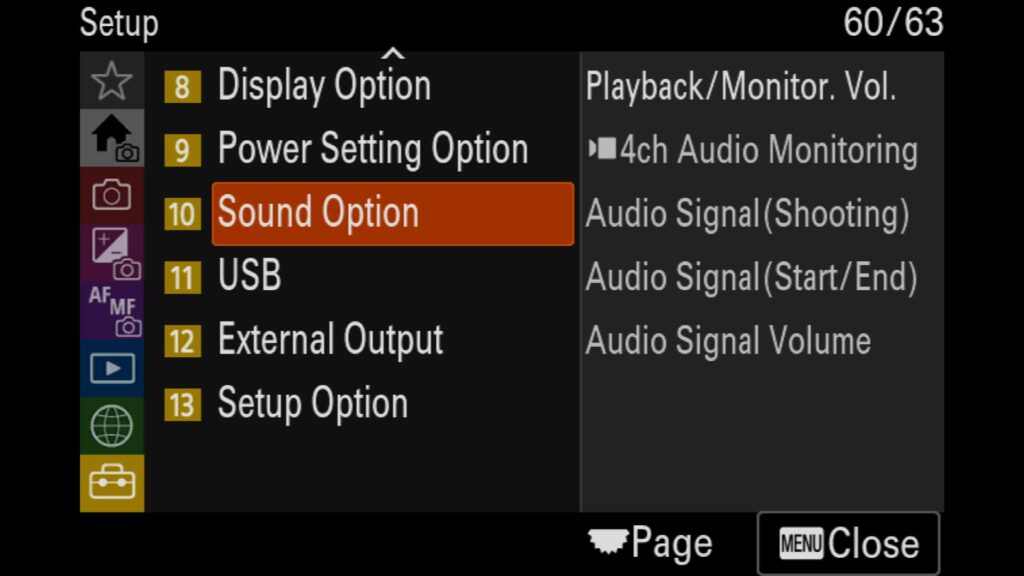
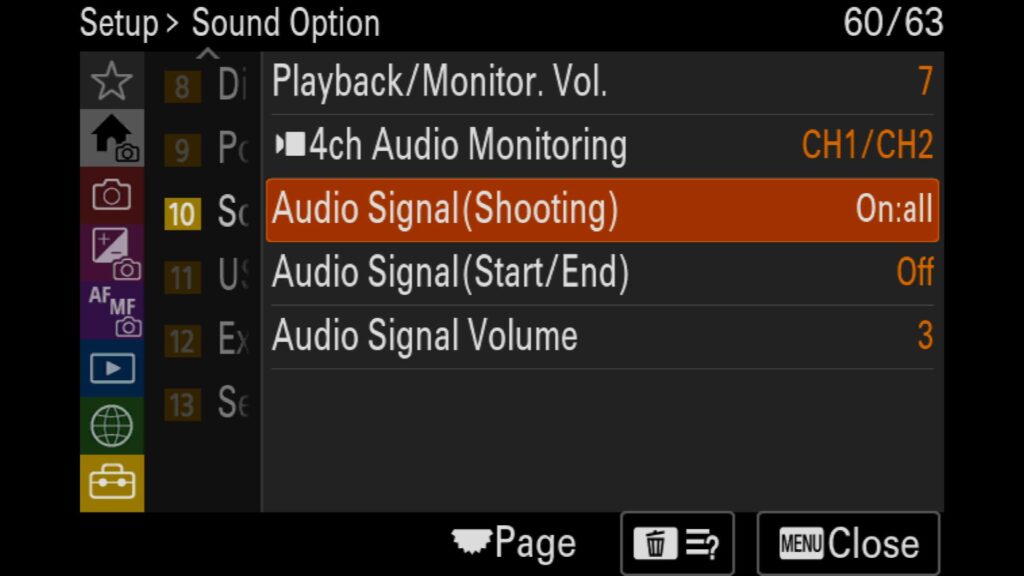
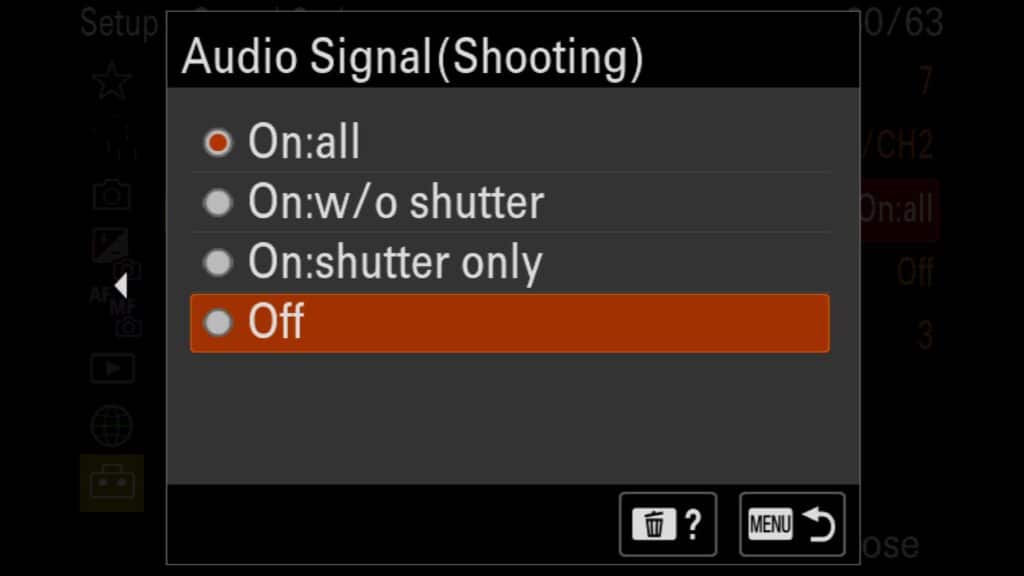
In my mind, there is nothing worse than getting a brand new mirrorless camera that is capable of being genuinely silent and then all of a sudden you hear several beeps and sounds from your camera letting you know when you have achieved focus, during shutter delay or when you are starting and stopping recording a video.
To turn all of those “alerts” off, head to the “Setup” menu and look for “10: Sound Option”. There, you will see three “Audio Signal” settings. Make sure “Shooting” and “Start/End” are set to “Off”.
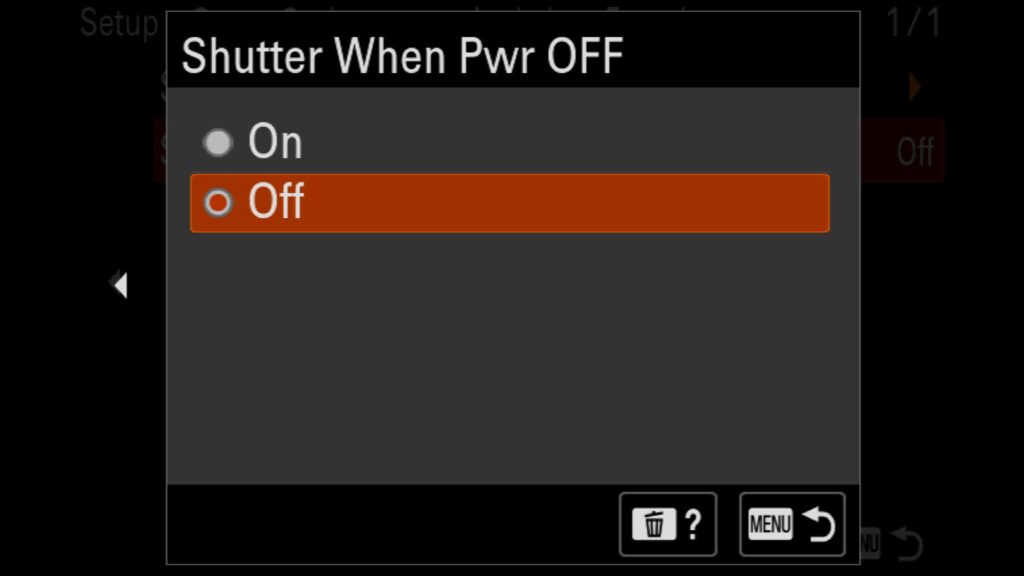
Closing The Shutter When The Camera Is Turned Off
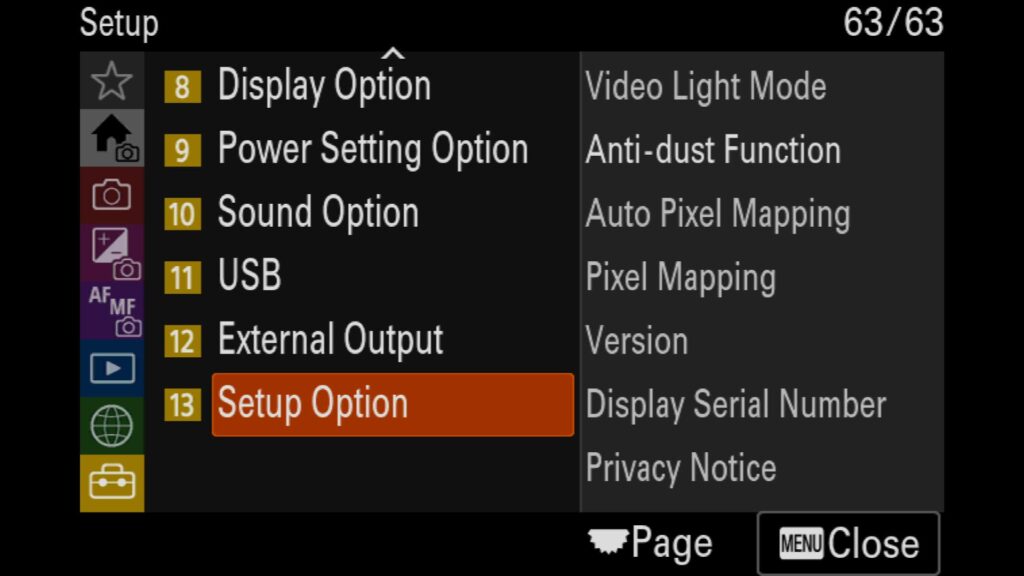
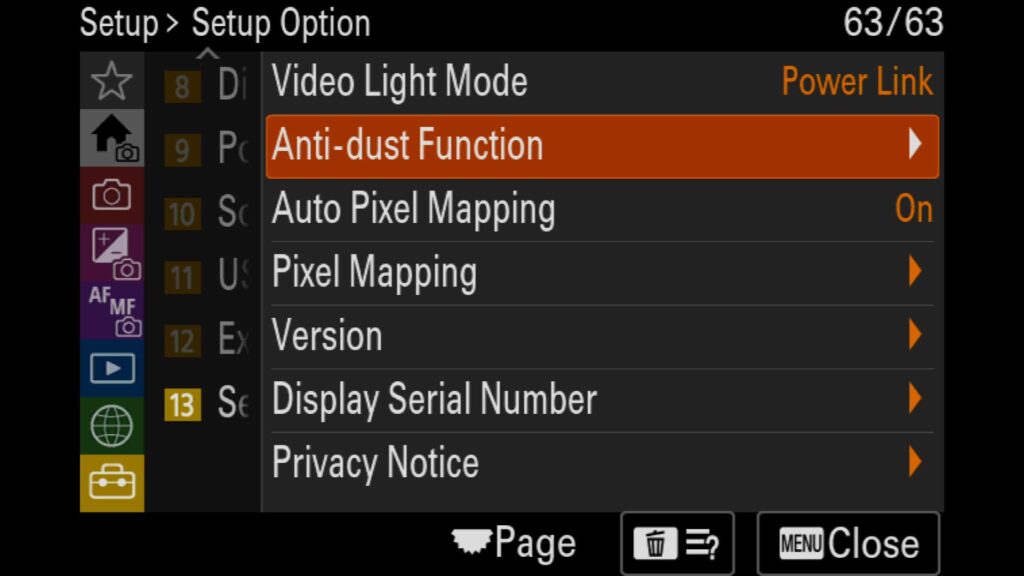
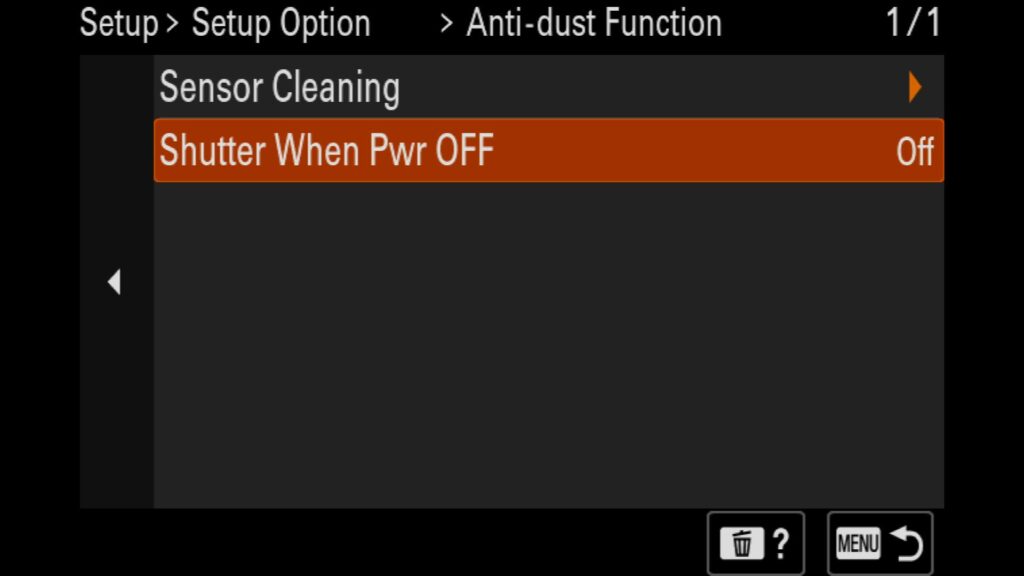
One of the best ways to protect the sensor of your mirrorless camera from getting dust, dirt, or rain on it when changing a lens in the field is by having the Sony a1 II’s shutter close when the camera is off. This will drastically decrease the times you must physically clean your sensor, especially if you constantly change lenses.
To turn on this setting, navigate to the “Setup” menu and find “13: Setup Option”. You will select the “Anti-dust Function” option there before turning on the “Shutter When Pwr OFF” setting.
Keep scrolling to continue…
A Quick Look At Upcoming Photo Workshop Adventures...

Bolivia Astro Photography Workshop
February 18th – 24th, 2026
Join me in Bolivia for an incredible adventure focuses on astro, landscape and wildlife photography as we explore the famous Salar de Uyuni with its glass like reflections as well as the high-altitude lagunas full of a variety of different species of Flamingos.
Uganda Photo Safari – A Trip of a Lifetime
July 27th – August 3rd, 2024
Uganda is one of the most unique wildlife destinations on the planet. Here you can find the endangered Silverback Gorilla along with amazing troops of Chimpanzees and the world-famous tree-climbing lions, which are found in a single area of Queen Elizabeth National Park. Join us on an adventure of a lifetime that offers some of the most intimate and incredible wildlife experiences on the planet.
Patagonia Photo Workshop – Argentina Edition
April 14th – 23rd, 2024
Patagonia is one of the most wild, beautiful & dramatic mountain ranges on the planet. We split our time between the incredible Torres del Paine National Park in Southern Chile and Los Glaciares National Park in Argentina, home to both Cerro Torre and Mt. Fitz Roy.

Discover Cuba
February 1st – 8th, 2026
With this adventure, our focus will be on capturing the beauty of the Cuban people, culture, and architecture throughout the Island of Cuba. From the classic cars and ocean side highways in Havana to the cobblestone streets of Trinidad and everything in between. With so much uncertainty in the US/Cuban relationship, NOW is the time to go!
Diving Into the Drive Mode/AF System of the Sony a1 II
With the Sony a1 II, you have one of the most advanced and impressive AF systems ever created. In typical Sony fashion, you have a ton of settings you can adjust to help you get the most out of any given situation.
The Physical AF Mode Dial
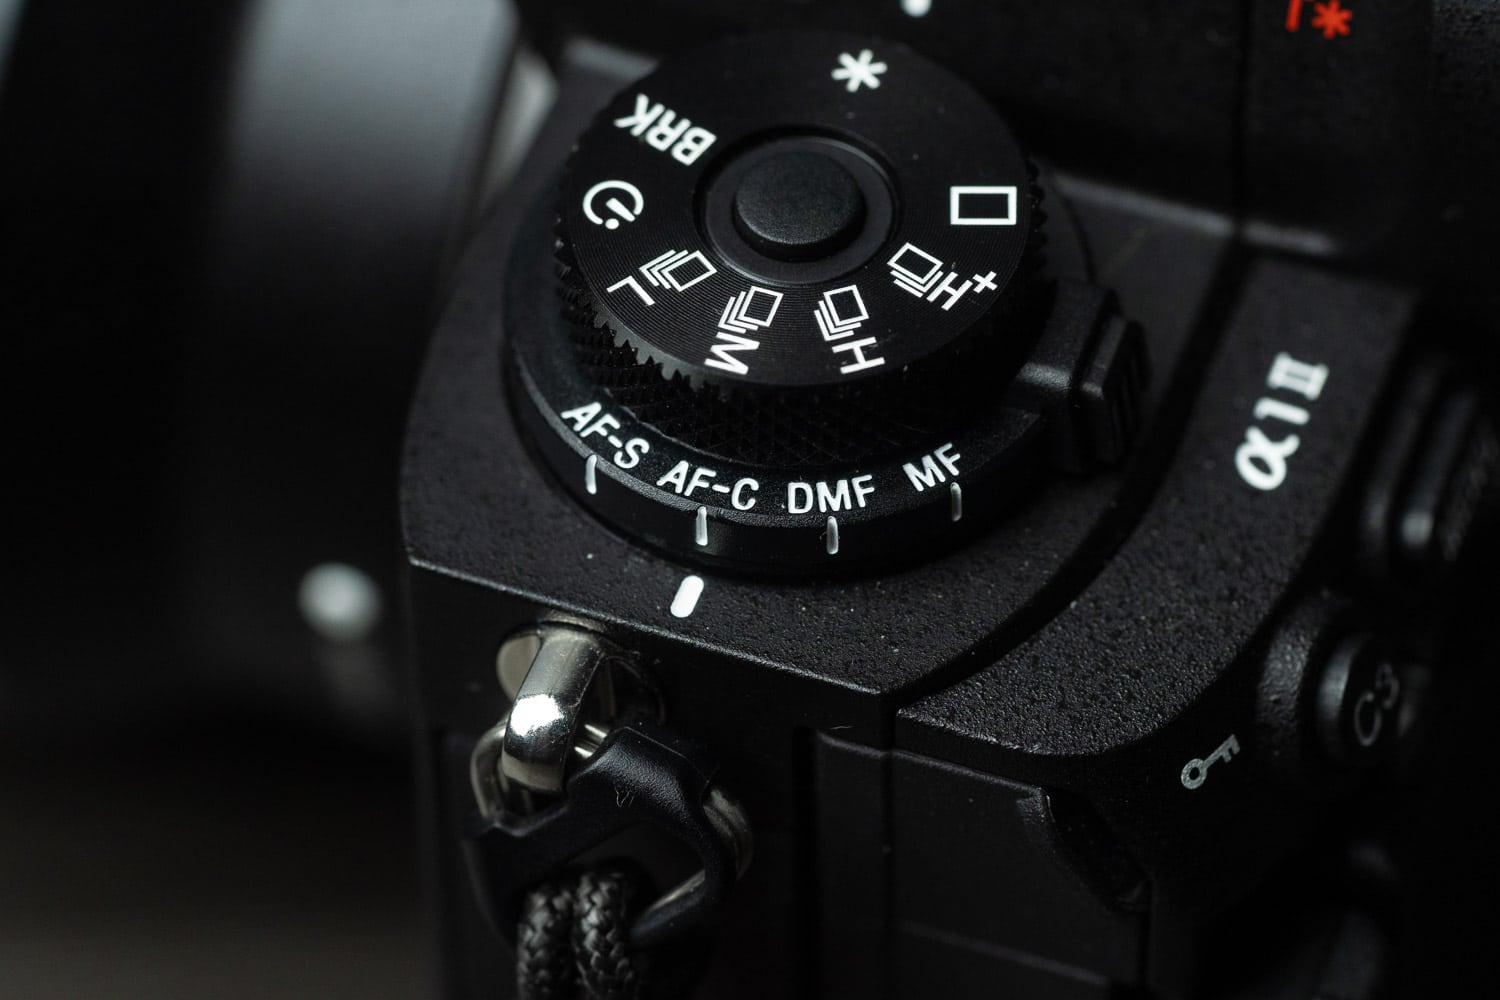
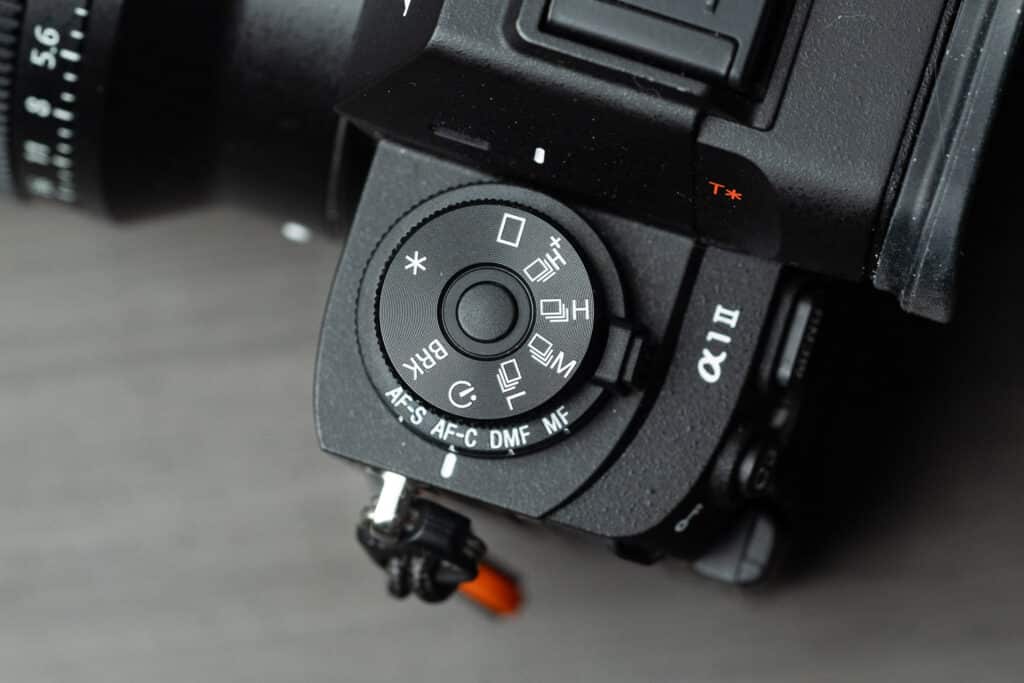
Unlike other mirrorless cameras, the a1 II (like the original a1 and a9 series) takes the AF modes out of the menu system and moves it to a top dial on the camera. By turning the bottom dial once you have pressed the button dial, you can move between:
- AF-S – Single Focus mode. Suitable for static subjects that are not moving.
- AF-C – Continuous Focus Mode. Suitable for moving subjects so that the camera can repeatedly attempt to keep a subject in focus as it moves.
- DMF – Direct Manual Focus. This is a hybrid AF mode where you can use the manual focus ring on your lens to help you achieve focus along with the AF system of the camera.
- MF – Manual Focus Mode. This is the only mode that can also be found on most native Sony lenses. If MF is selected on this dial or via the lens, it will override the other.
The Drive Mode Dial (New to the Sony a1 II)
You will find the Drive Mode settings for the a1 II on the same dial as the AF modes. You have a locking button located in the middle of the top of the dial, allowing you to lock a drive mode in so that you don’t accidentally change the drive mode while shooting. New to the a1 II, is the ability to turn off the top dial and instead opt to adjust the Drive mode via the camera’s digital menu system. This is represented by the “*” found on the dial.
Here, you will find the following options based on the default settings (these can be customized):
- Single Shot – Shooting a single image
- Hight + – 30FPS by default ( other Requirements to achieve)
- High – 20 FPS by default
- Medium – 15 FPS by default
- Low – 5 FPS by default
- Shutter Delay – Sets a countdown timer before an image is taken
- Bracket Mode – Jumps into the Bracketing mode you had chosen via the menu system
- * – If you set the Drive Mode Dial to “*”, you can change the drive mode via the digital menu system rather than just with the top dial. This is a new feature to the a1 II.
Vastly Improved Steadyshot/Stabilization (New to the Sony a1 II)
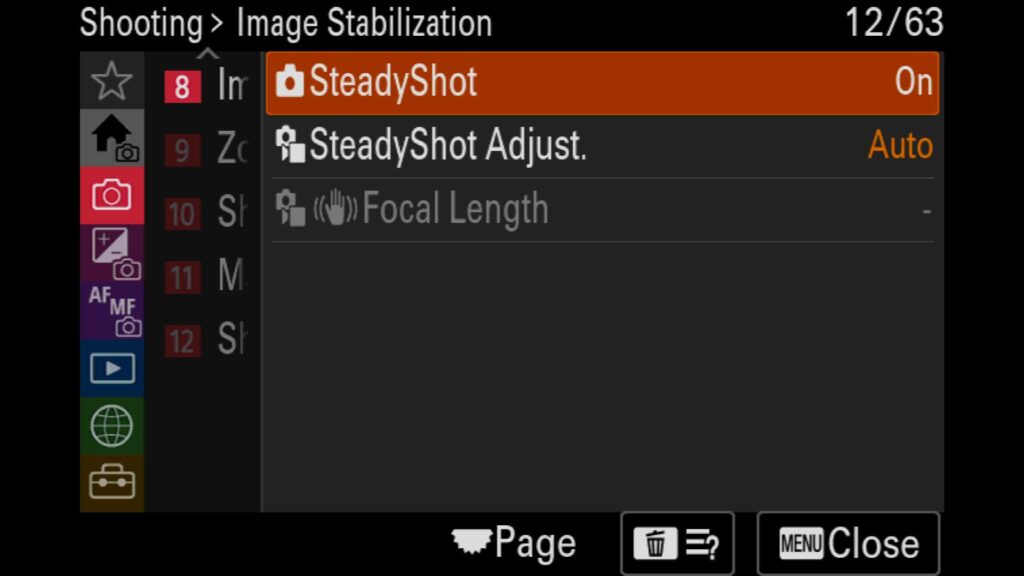
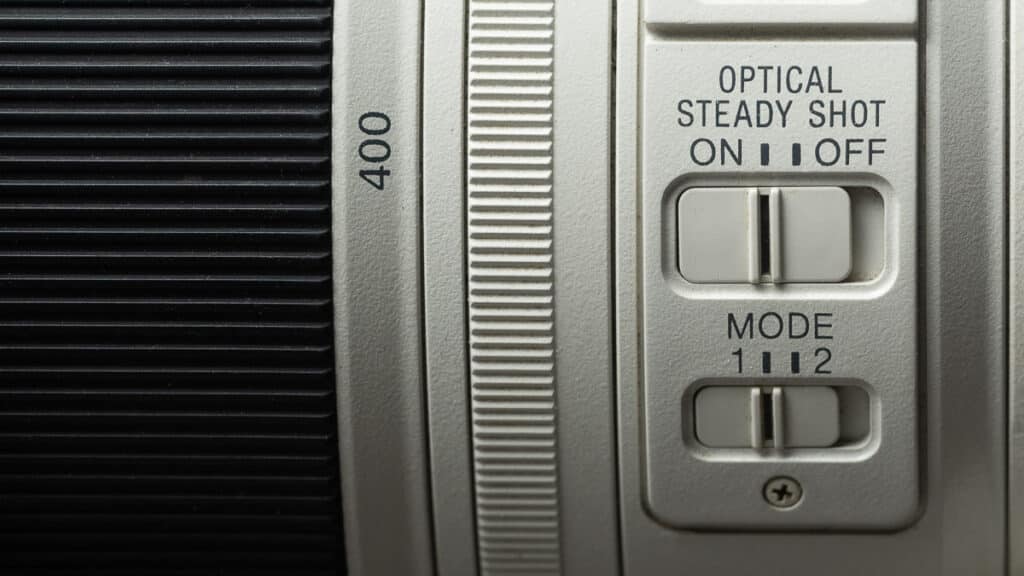
Another new feature worth mentioning is the improvement to Steadyshot, the camera’s stabilization mode. With the original a1, you had five stops of stabilization; now, with the a1 II, you get up to 8.5 stops. That is a pretty significant increase. Luckily for you, the only setting you need to turn on is “SteadyShot.” However, like the MF switch on many Sony lenses, you can also find a SteadyShot switch. If SteadyShot is turned off in the menu system or via a Lens switch, it will override the other and be turned off completely.
Changing the Shooting Speed Modes
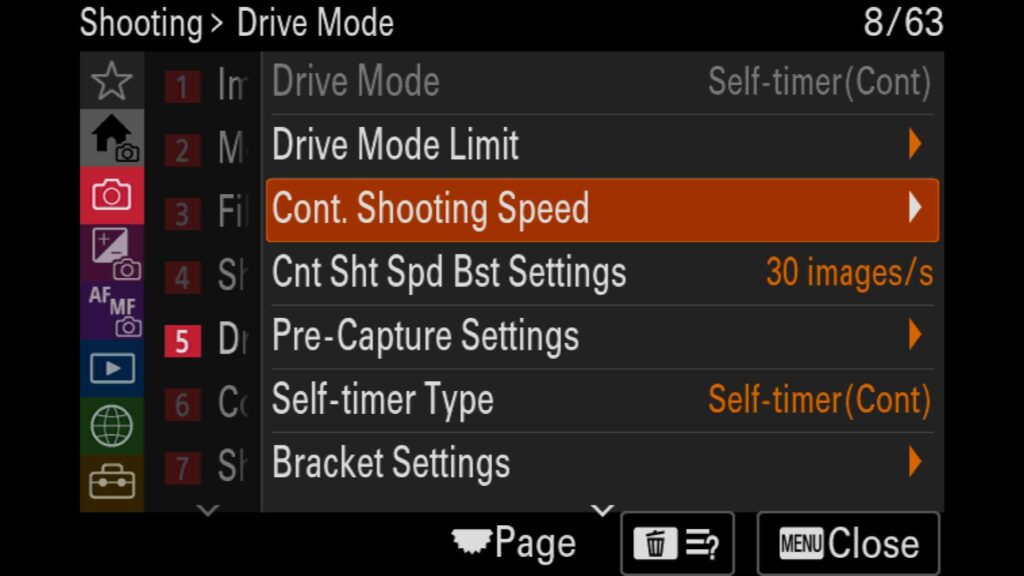
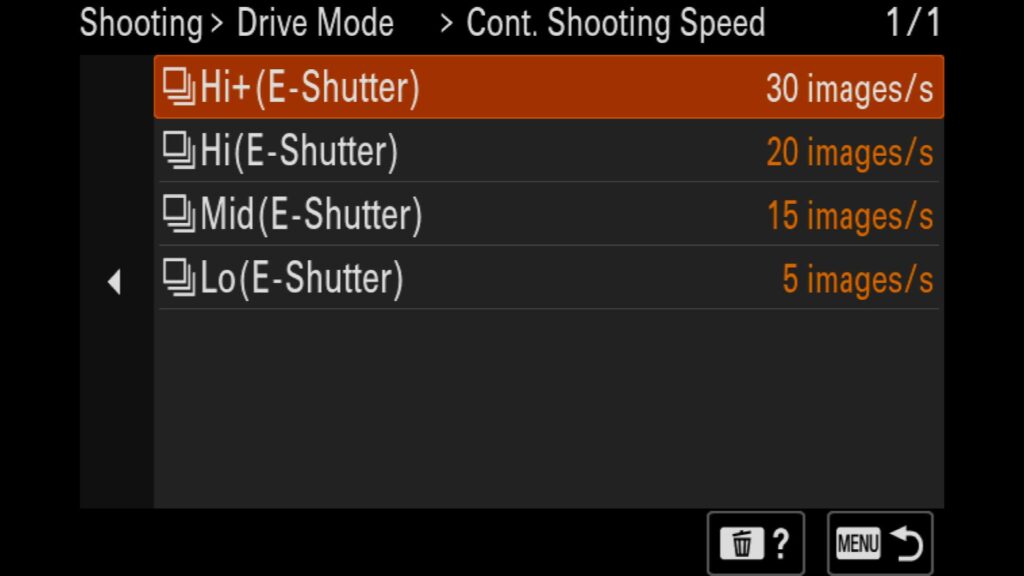
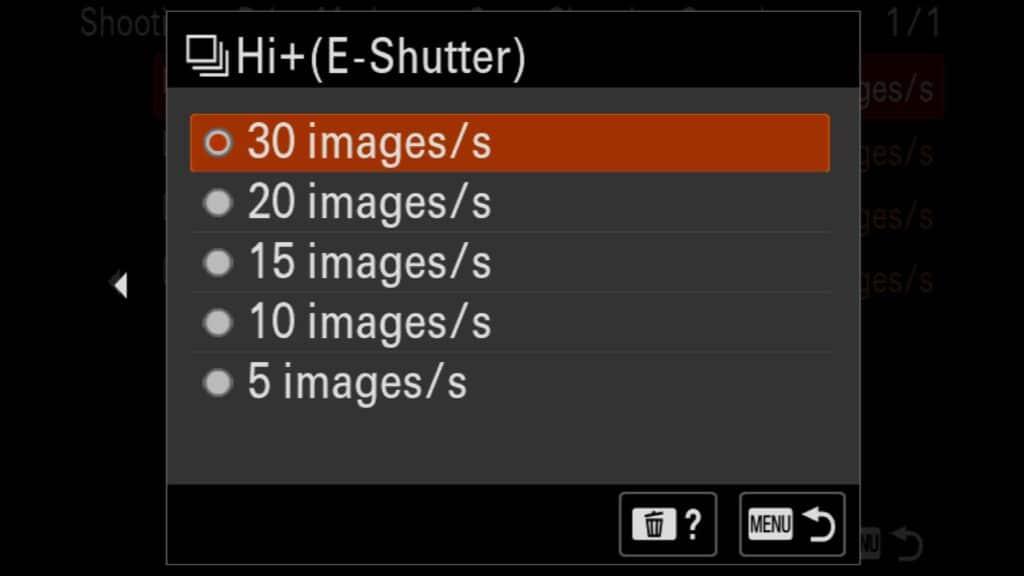
With the Sony a1 II you can customize the different FPS shooting modes on the camera to suit your needs as a photographer. Here, you can choose precisely what the High+, High, Medium, and Low FPS settings represent.
To adjust these settings, head to the “Shooting” menu and look for “5: Drive Mode”. You will find the “Cont. Shooting Speed” menu item there.
Customize The Continuous Shooting Speed Shift Button
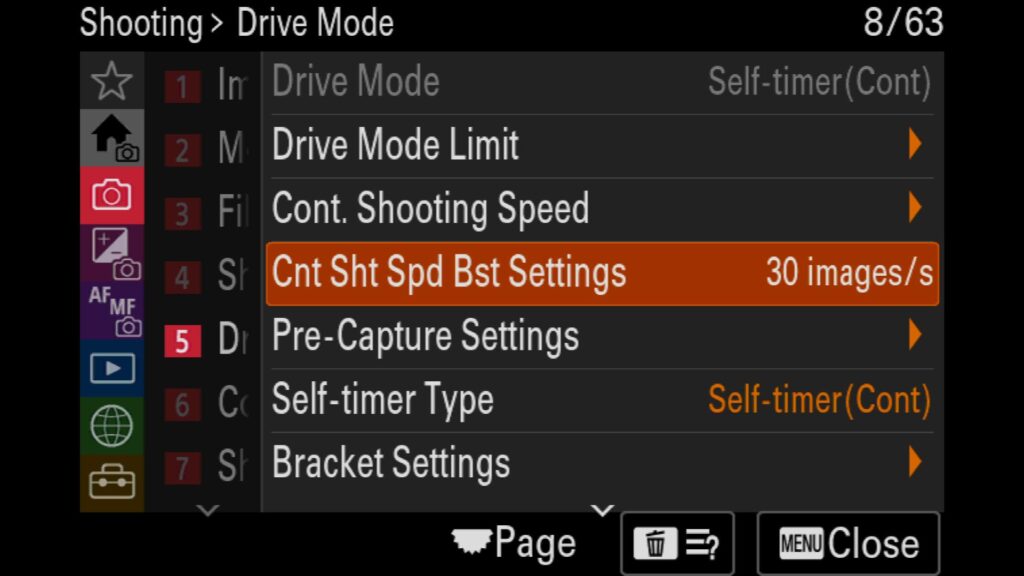
A feature on the a9 III found its way to the a1 II. The custom button inside the front of the camera’s grip lets you shift the FPS speed to a preset number on the fly. So, if you are shooting at 10fps and suddenly want to shoot at 30FPS for a specific scene, you can press and hold the button inside the camera’s grip to shift it to 30fps. If you let go of the button, it returns to the 10fps you initially set it at.
*There is a rumor going around that if I set the C5 button to 30fps, it will automatically (and temporarily) change my RAW file type to Compressed RAW to reach 30fps. I have not confirmed this with Sony yet. Stay tuned!
You can find this setting in the “Shooting” menu under “5: Drive Mode”. There, you will see “Cont Sht Spd Bst Settings.”

What Is Required to Shoot at 30FPS?
To shoot at 30fps, you need to meet a certain number of requirements and settings that need to be changed to hit this impressive speed with 50mp images.
- You have to be in compressed RAW or the JPEG file format (uncompress RAW or lossless compressed RAW has a maximum FPS of 20)
- AF-C mode selected and Drive mode set to Hi+
- Selection of an Electronic shutter and shutter speeds selected between 1/250th and 1/32000 of a sec
- Priority Set in AF-C to Release (not balanced emphasis)
- The “Tracking” AF modes will drop a few FPS, so try to stick with the other AF areas such as Zone or Wide.
- Have a compatible lens that can shoot at 30fps (see the next section)
Compatible Lenses for Shooting at 30 FPS with the a1 II
To shoot at 30 fps, you need to use a compatible native Sony lens. No 3rd party lenses will work at 30fps, unfortunately.
Getting the Most Out Of The Pre-Capture Feature (New to the A1 II)
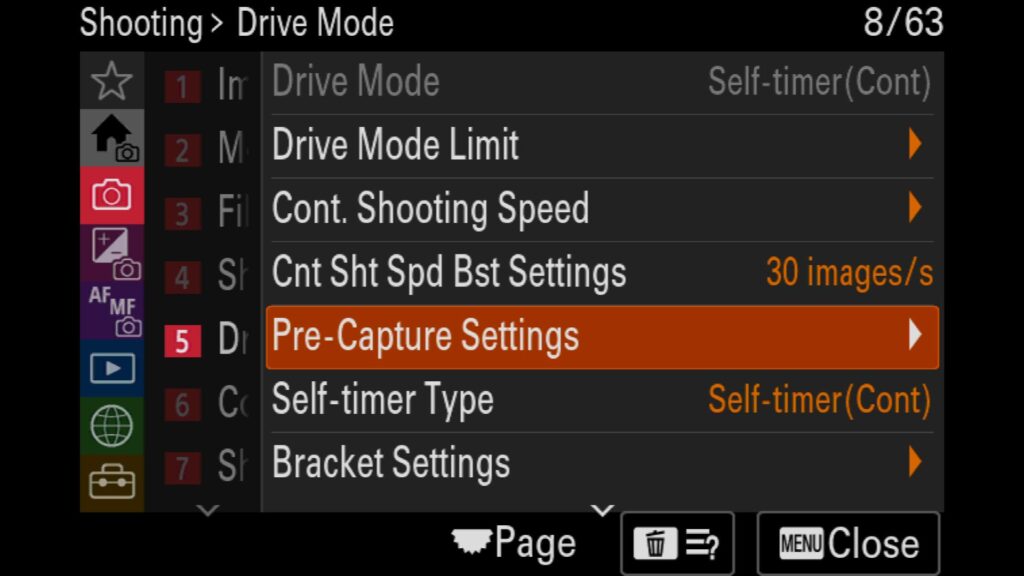
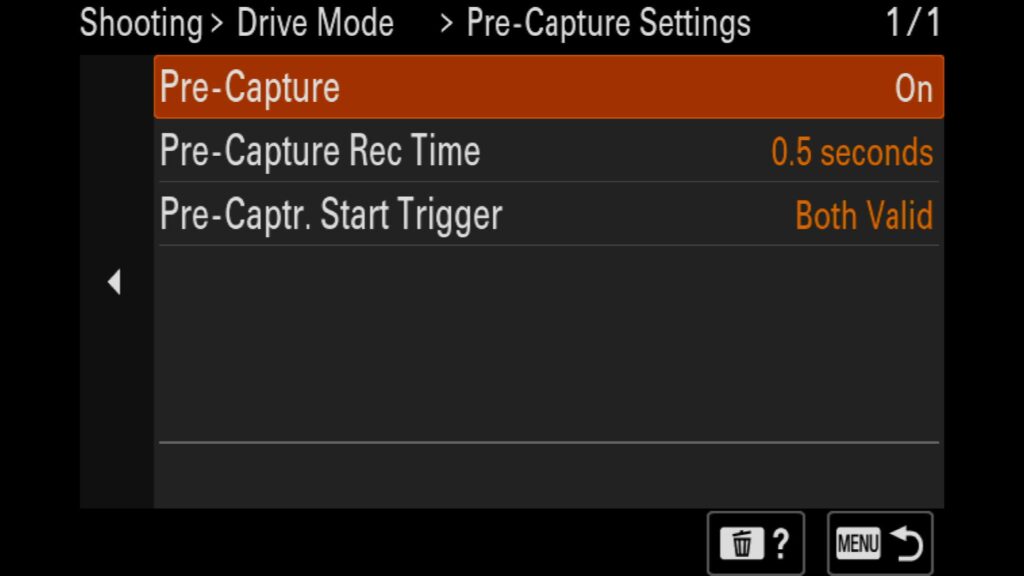
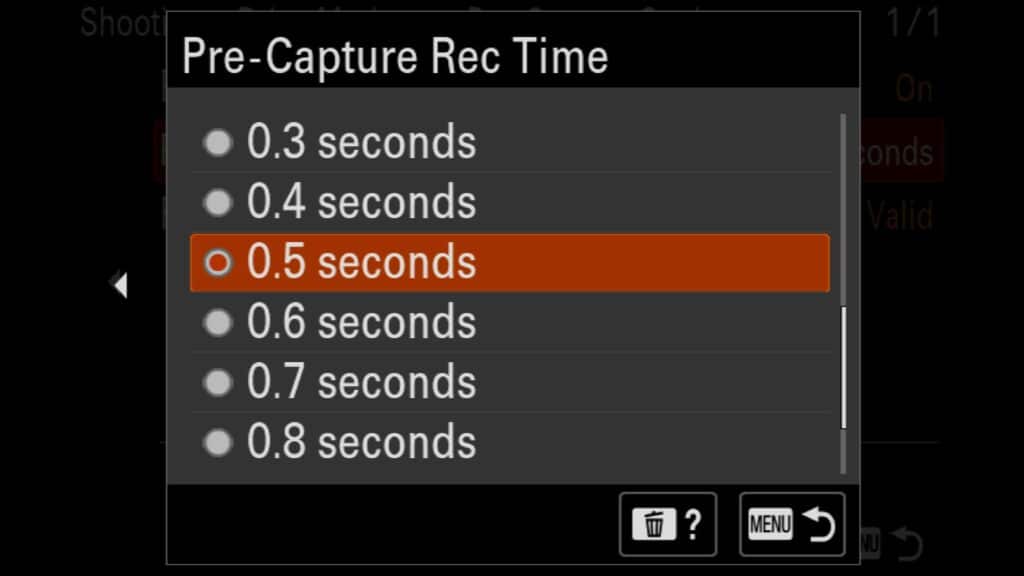
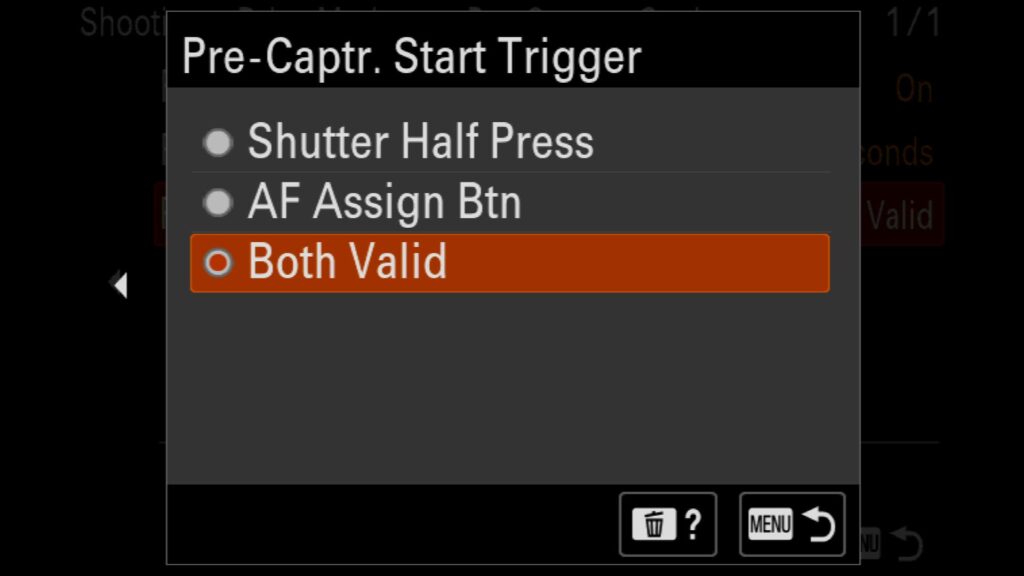
One of the most popular new features of the Sony a1 II is RAW Pre-Capture. So how does it work? Once the setting is turned on, any time you half-press and hold the Shutter Release Button or the Back AF Button (depending on how you configure the setting), the a1 II will start shooting RAW images in the background at the FPS you currently had selected via the Drive mode. It will hold these images in an “Image Buffer” for anywhere between .03 seconds to 1 Second before it starts writing over the image buffer as time continues, as long as you continue to half-press the Shutter or Back AF Button. Once you choose to take an image by fully pressing the shutter release button, the camera will also officially store all of the photos in the “Pre-Capture” image buffer. For example, if you were looking at a perched bird and it took off before you fully pressed the shutter button, but you had pre-capture running for .5 seconds, anything that happened in your frame for that .5 seconds before you took your first photo will also be stored. If you never choose to take a photo, the Pre Capture image buffer will clear on its own, and no images will be saved.
These settings are in the “Shooting” menu under the “5: Drive Mode” menu. There you can find “Pre-Capture Settings” and the following options:
- Pre-Capture – Turn this feature on or off. You can also customize a button on the a1 II to turn this settings on or off.
- Pre-Capture Rec Time – Set the length of the Pre-Capture image buffer between .03 seconds up to 1 full second.
- Pre-Captr. Start Trigger – Choose for Pre-Capture to begin when the Shutter Release button is pressed halfway, the Back AF Button is pressed down, or either one is engaged.
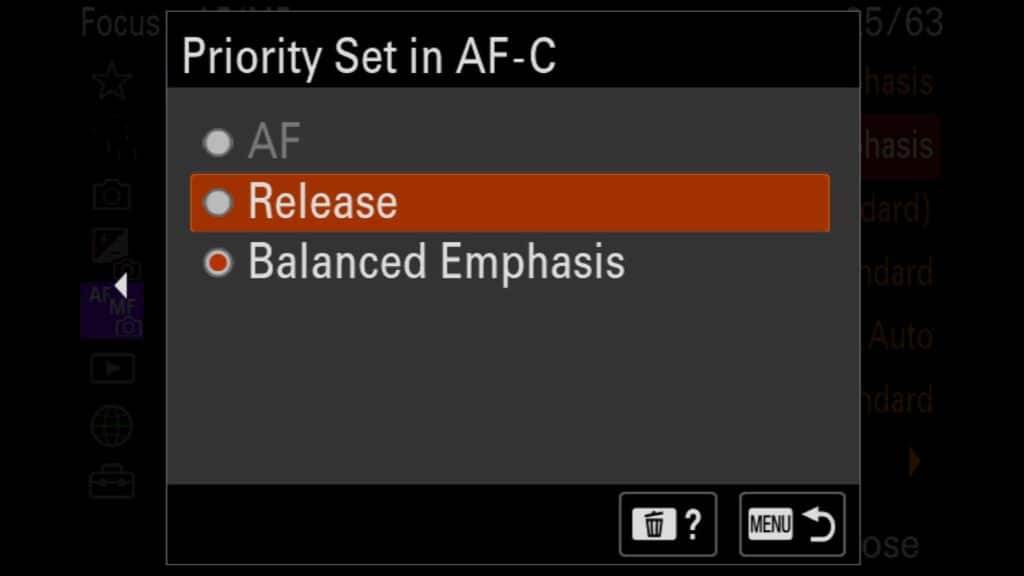
Priority Set for Auto Focus
With the Sony a1 II you can prioritize the shutter’s release in AF-S (Single) or AF-C (Continuous) modes:
- AF – Only take an image once you know you have an image in focus.
- Release – Allow the camera to take a photo even if the AF system hasn’t fully acquired the subject. This mode is required for AF-C if you want to shoot at 30fps.
- Balanced Emphasis – The default setting sets the priority between the other options.
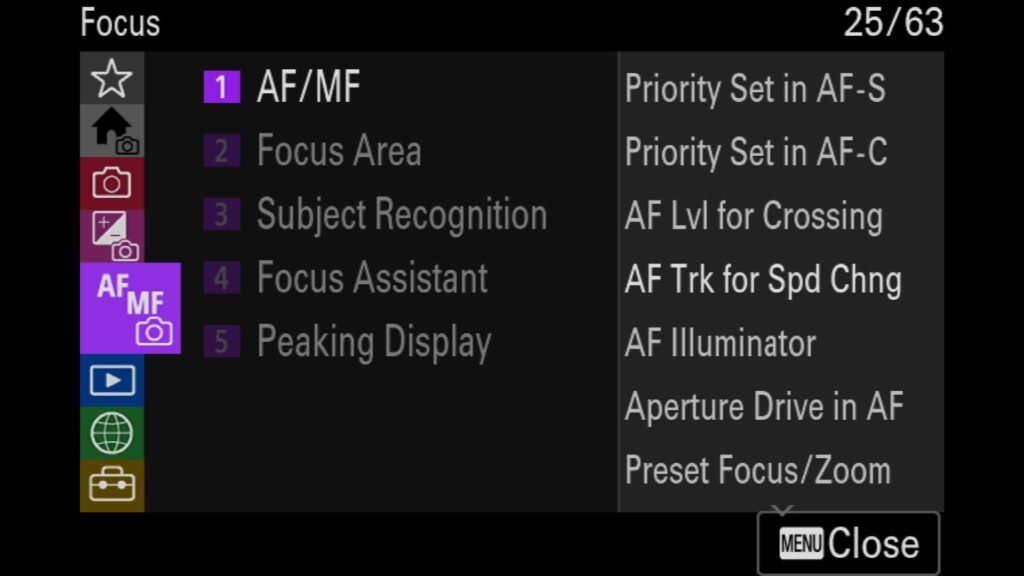
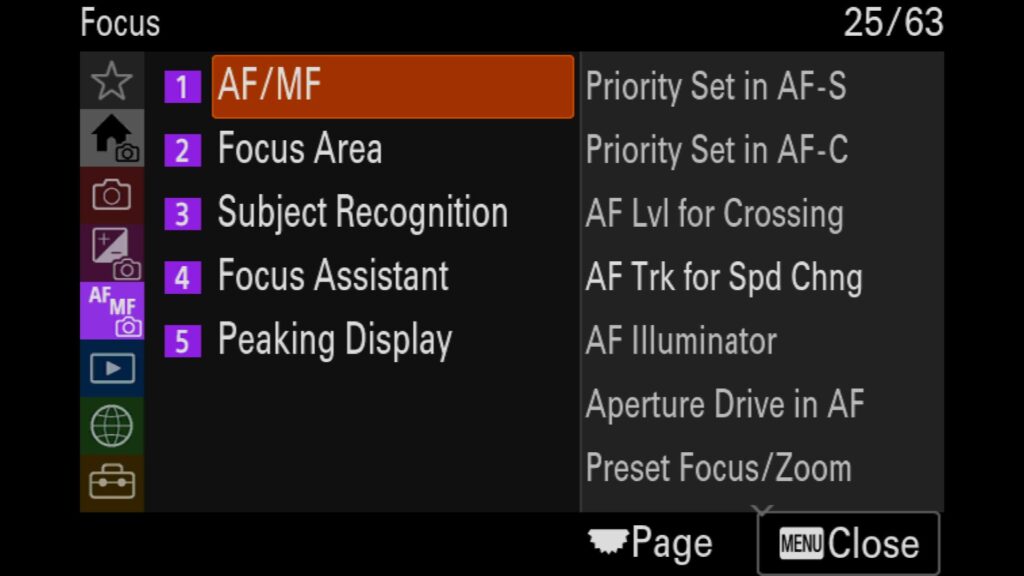
This setting can be found in the “Focus” menu under “1: AF/MC”. You will find the “Priority Set in AF-S & AF-C” options there.
Adjusting the AF Sensitivity Settings
Another way you can fine-tune the AF system for the a1 II is through the AF Sensitivity Settings found on the camera.
AF Level for Crossing – Adjust the sensitivity for when something crosses in front of the subject you are tracking. Your options: 1 (Locked On), 2, 3 (Standard/Default), 4 or 5 (Responsive). Adjust this setting depending on the subject you are trying to photograph. For example, when I know I am trying to photograph a specific bird flying, I will use either 2 or 1 so my AF system feels more “sticky.” and sticks with my target subject more aggressively.
AF Tracking for Speed Change – When the AF system is locked onto a moving subject, you can set the speed of the AF Tracking system. You can choose Stable (For static or slow-moving subjects), Standard (The default option), or Responsive (For rapid-moving subjects that are erratic in their behavior).
These settings are in the “Focus” menu under “AF/MF”. You will find both “AF Lvl for Crossing” and “AF Trk for Spd Chng.”
Playing With The Touch Focus Settings
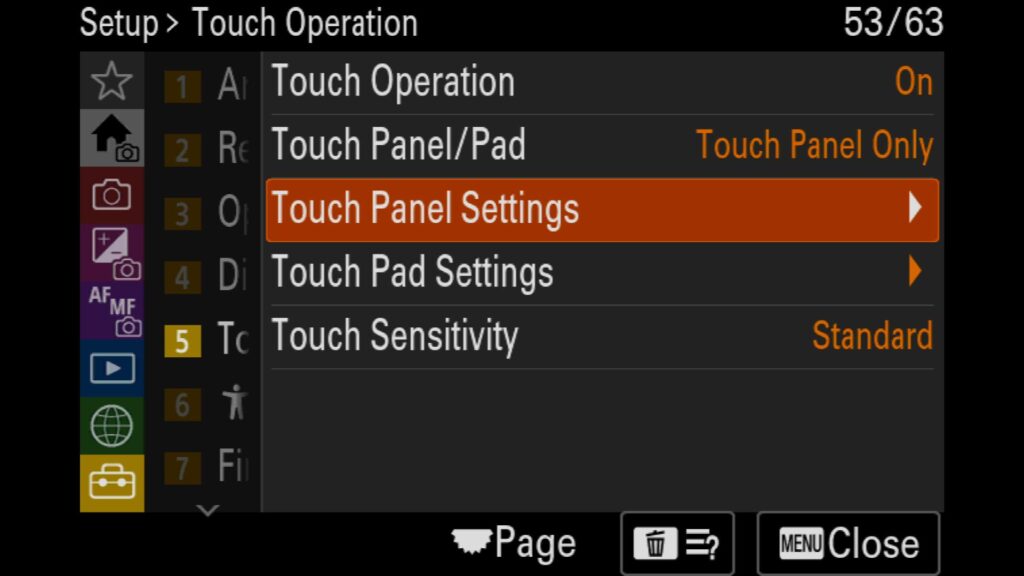
The support for touch on the read LCD screen on the Sony a1 II works very well. You can use it to navigate the camera’s menu system and pinch and zoom in on an image you have taken to check for focus. Additionally, when set up correctly, you can use it to take a photo, achieve focus, and start tracking a subject with the AI-based AF system.
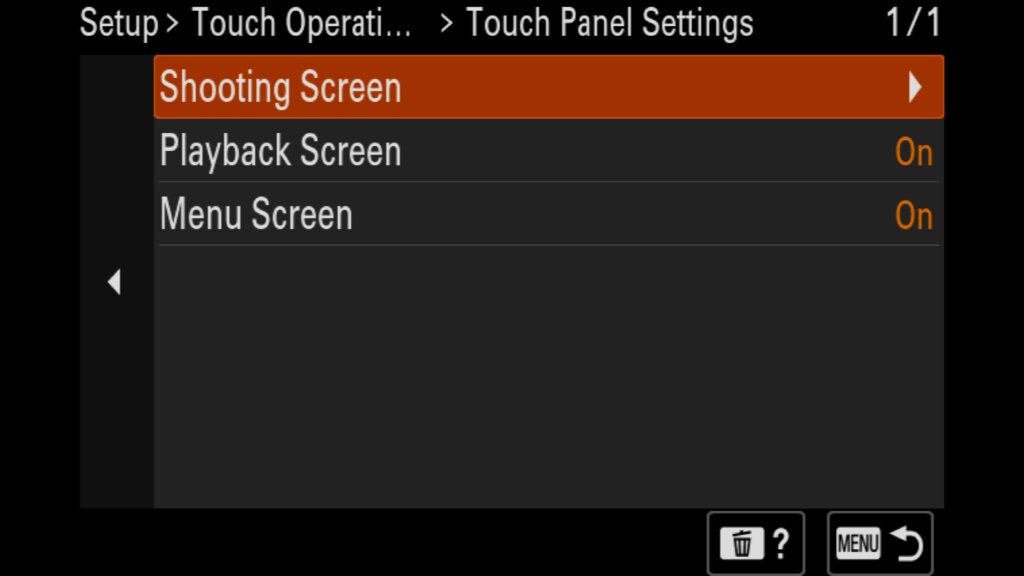
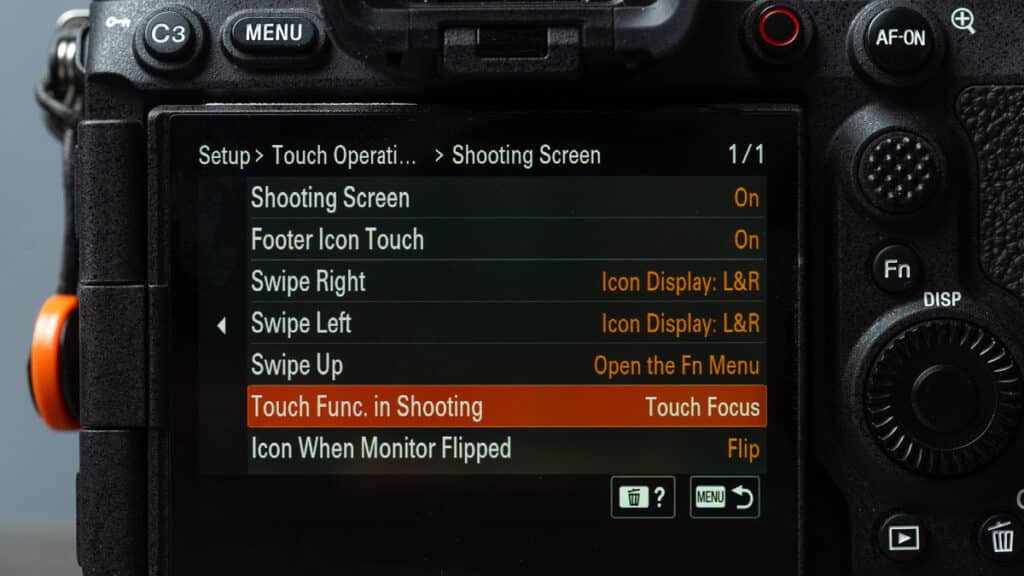
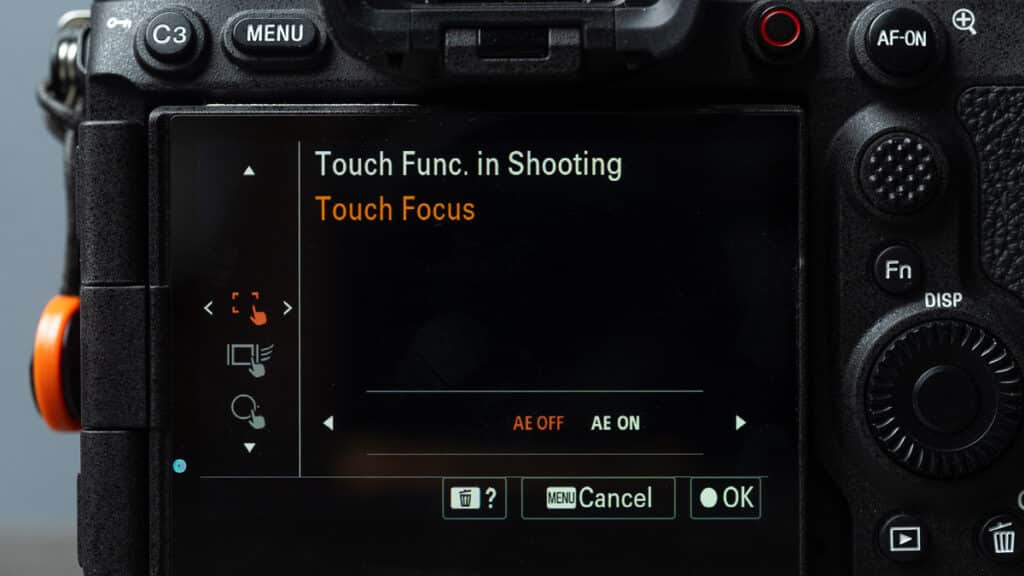
All of these settings are found in the “Setup” menu under “5: Touch Operation”. From there go to “Touch Panel Settings” and select “Shooting Screen”. Scroll all the way down to “Touch Func. in Shooting” and there you can select the following options:
- Touch Focus – Tap the screen to initial focus
- Touch Tracking – Tap the screen on a subject to start tracking it with the Ai AF system
- Touch Shutter – Tap the screen to take a photo
- Touch AE – Adjust the brightness of the image to match the area of the screen you touch
- Off – Self explanatory
Understanding the Focus Area & Focus Area Limit Settings (New to the Sony a1 II)
Within the AF system with the a1 II, you might need to change the focus area depending on what you are trying to photograph. Please note that the XS, L and Custom AF options are all new to the Sony a1 II. Here are the options you can choose from:
- Wide – An all-encompassing option that allows the AF system to search for a subject throughout the entire frame.
- Zone – A sizeable boxed-in area that you can move around the frame using the rear joystick. This mode is great when you want to place your subject in a specific area of your frame.
- Center Fix – If you know your subject will be in the center of your frame at all times.
- Spot (XS, S, M, L or XL) – When working with small subjects like birds, these adjustable spots can be selected in different sizes and moved around the frame as needed.
- Expanded Spot – Similar to the adjustable spot, this single AF point will look for a subject in its box, but if it can’t find a subject, it will look just outside the AF point edges for alternatives.
- Custom 1, 2 or 3 – You can set a customized sized and shaped AF zone within this menu setting to use in the field.
- Tracking Modes – You can use any above modes (except wide) in a dedicated “tracking” AF mode. I use this setting when I know I am trying to photograph moving subjects.
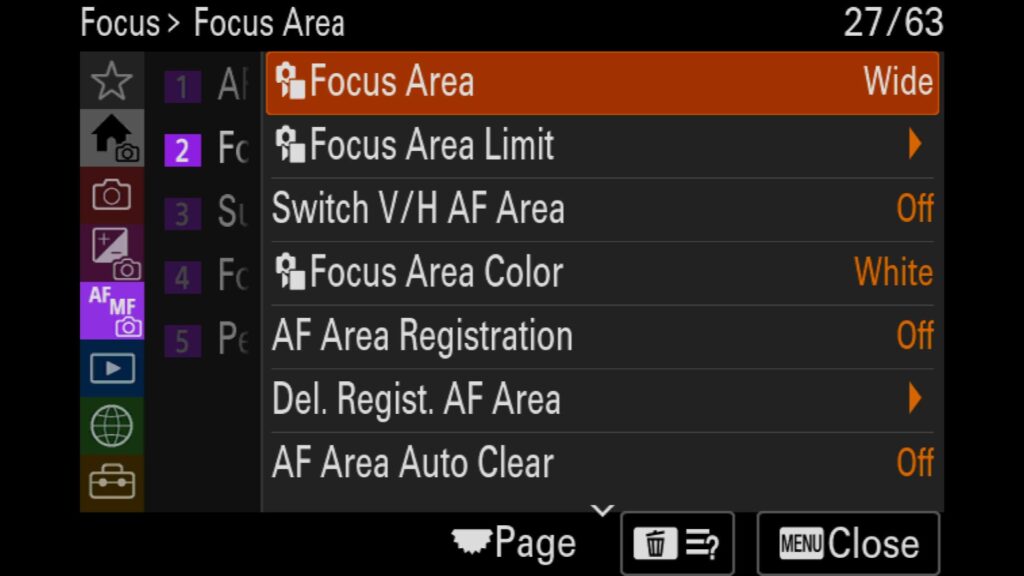
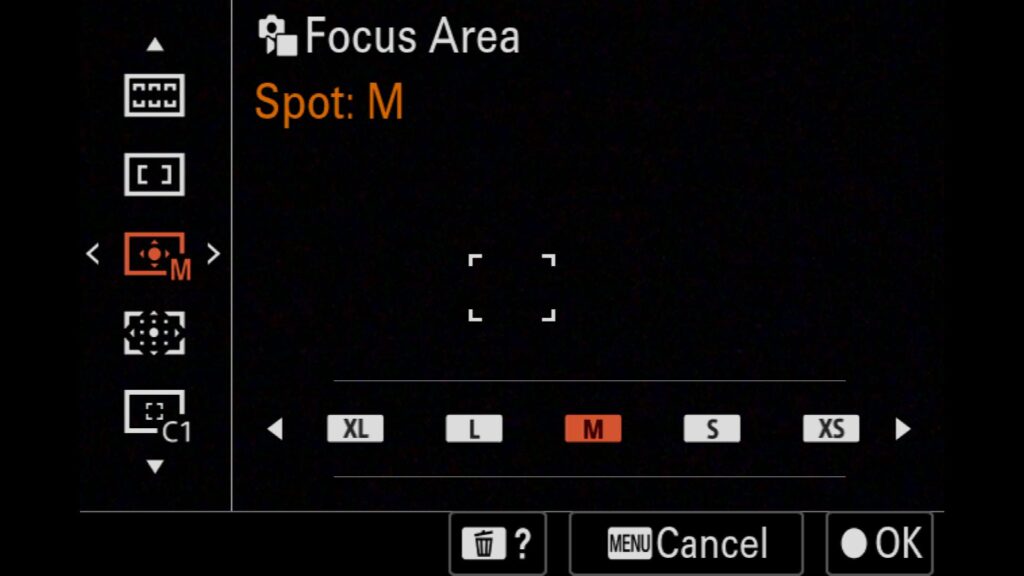
With the Sony a1 II, you have a lot of options at your disposal when it comes to all of the AF Areas we just covered. But when you find yourself in the AF Area selector, it can feel overwhelming with so many options to cycle through. With the “Focus Area Limit” setting, you can choose which options are present when trying to change your AF Area. This is an excellent tool if you rarely use specific AF Areas. You can remove them from your choosable list of options (by unchecking the box) so that you have fewer choices when looking for the right AF area to select.
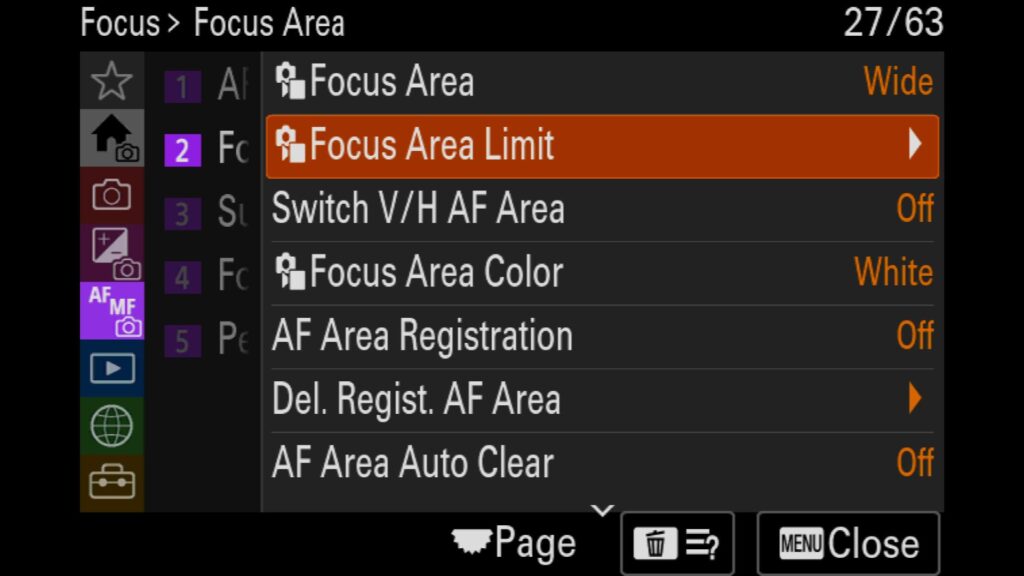
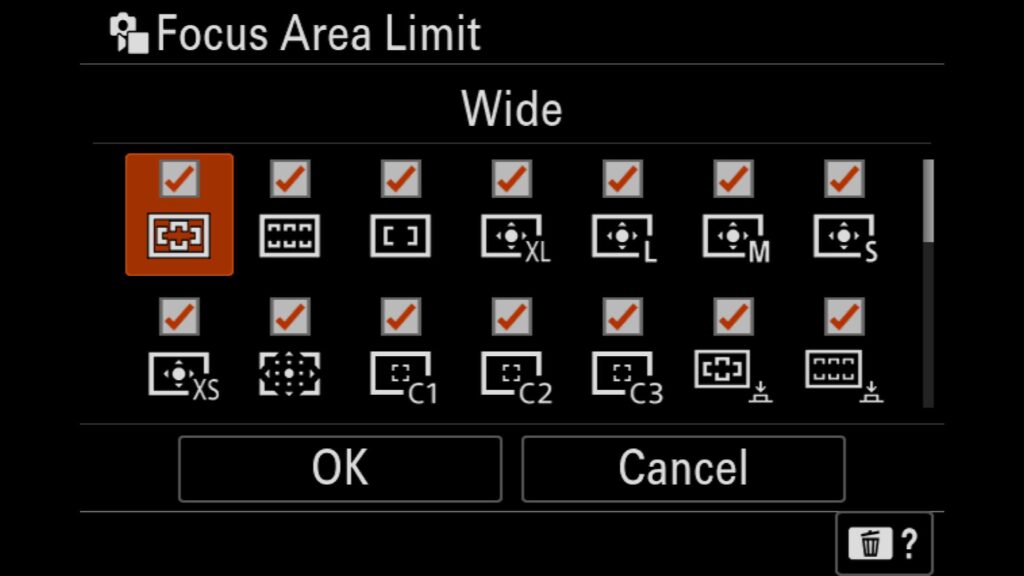
These settings are in the “Focus” menu under “Focus Area”. You will find the “Focus Area” and “Focus Area Limit” menu items there.
How the AI AF Subject Recognition System Works (New with the Sony a1 II)
One of the most exciting new features of the Sony a1 II is the new dedicated AI/AF Processor that is designed explicitly for subject identification and AF acquisition. What does this mean? It means you have a separate dedicated CPU to help the camera quickly identify different types of subjects, but more specifically, prioritize their Eyes, Head, and or Body in real-time. In real-world tests, the AF system is simply incredible. But in typical Sony fashion, they want to give you full control over how the system works. How so? Not only are you able to choose Auto, Human, Animal/Bird, Animal, Bird, Insect, Car/Train, or Airplane…but you can fine-tune the AF settings of each of those subjects individually.
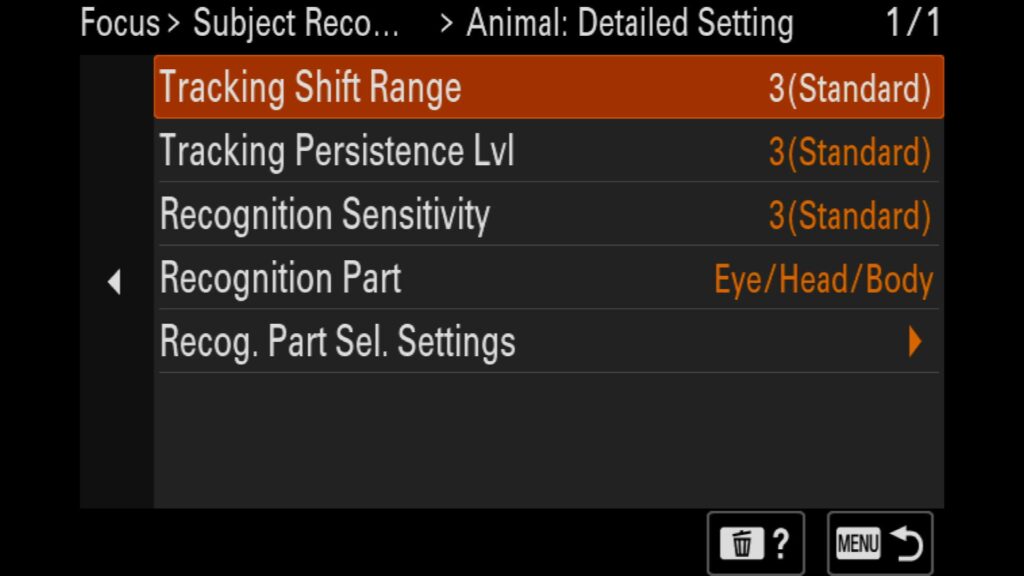
For example, I can go into the “Animal: Detail Setting” by pressing “Right” on the rear control wheel with the Animal subject selected, and from there, I can adjust the following:
- Tracking Shift Range – Adjust the distance (From Narrow to Wide) between the AF target tracking frame and the subject as it moves.
- Tracking Persistence Level – Adjust how “Sticky” the AF system is once locked onto your animal subject.
- Recognition Sensitivity – Changes the scope of the kinds of animals the AI system is trying to identify as your subject. Increase this setting if the camera is not recognizing the specific animal and lower it if you want it to find more subjects outside the general “animal” domain.
- Recognition Part – Choose what parts you want to be recognized by AI/AF: Eye/Head/Body, Eye/Head, or just Eye.
- Recognition Part Select Settings – Choose if you want the above part options to be selectable in the menu. Uncheck the box if you don’t want it to be an option.
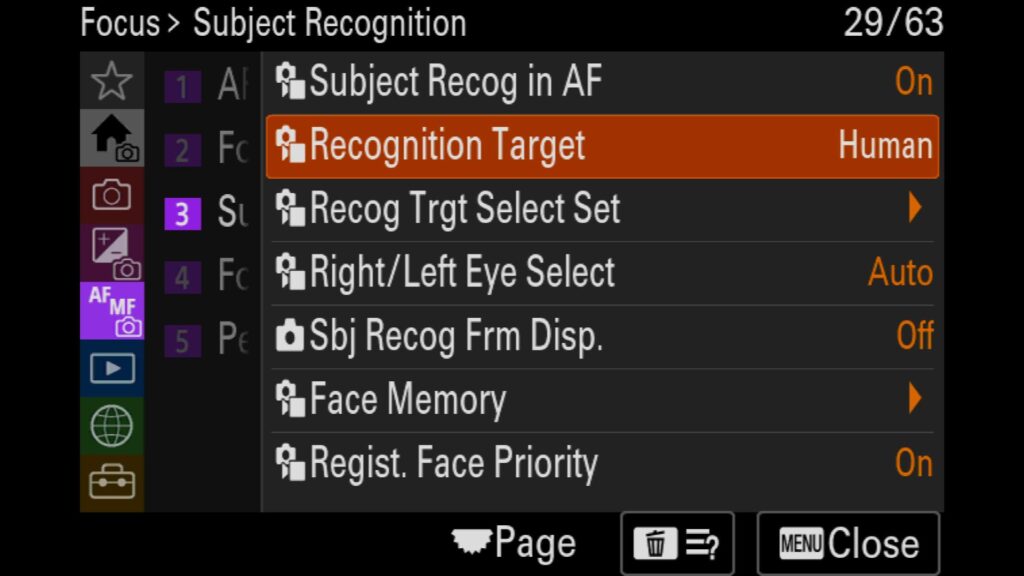
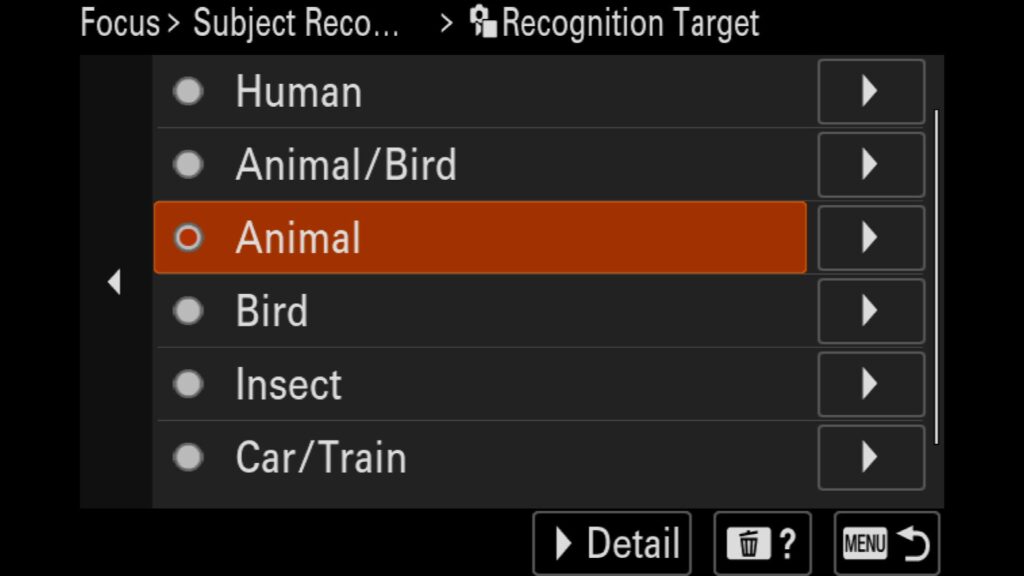
Another setting worth looking at is if you want the a1 II to put a frame around any subject it identifies within your composition. This can be a handy tool to see what the dedicated AI-based AF processor is identifying when it comes to the subjects you are trying to photograph.
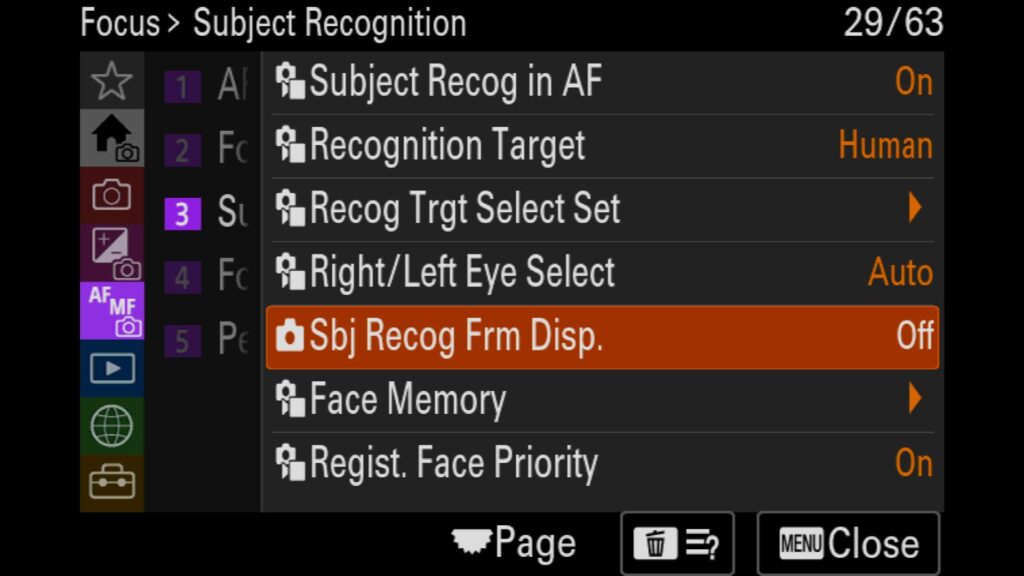
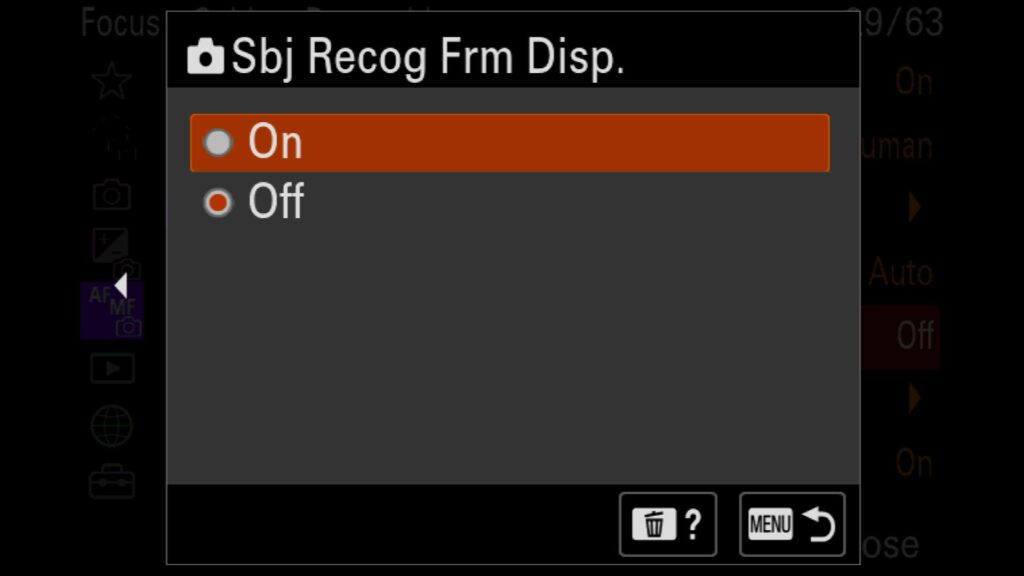
All of these settings can be found in the “Focus” menu under “Subject Recognition.”
Understanding Shooting Video on the Sony a1 II
If you have ever wanted to get into shooting video with the Sony a1 II, here is a breakdown of most of the settings tied to the video camera mode on this camera.
Video File Formats
With the Sony a1 II you have various file formats you can pick from when it comes to shooting video. Here is a small breakdown of your options:
XAVC HS 8K – The largest resolution that is possible to capture with this camera
XAVC HS 4K – The highest quality 4k video mode you can shoot in
XAVC S 4k – The standard 4k mode you can film in
XAVC S HD – The standard HD (1920x1080p) that you can capture
XAVC S-I 4k – This mode can make editing this 4k video much quicker/easier, but the files sizes can be massive
XAVC S-I HD – This mode can make editing this 1080p video much quicker/easier, but the files sizes can be massive
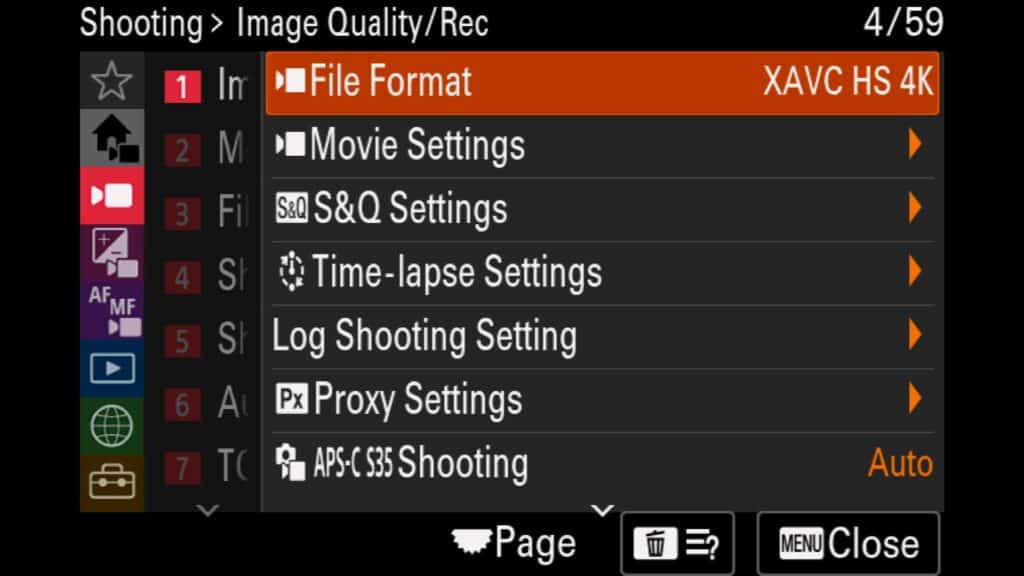
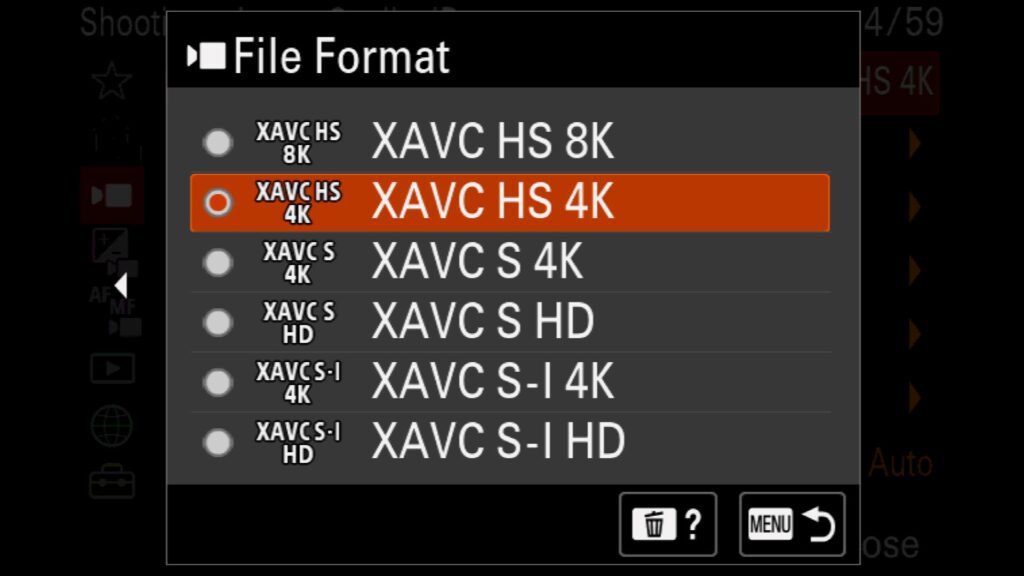
These settings are in the “Shooting” menu under “Image Quality/Rec. You must be in the “Video” camera mode to see these settings specific for video. Otherwise, you will be taken to the photo version of these settings.
Movie Settings
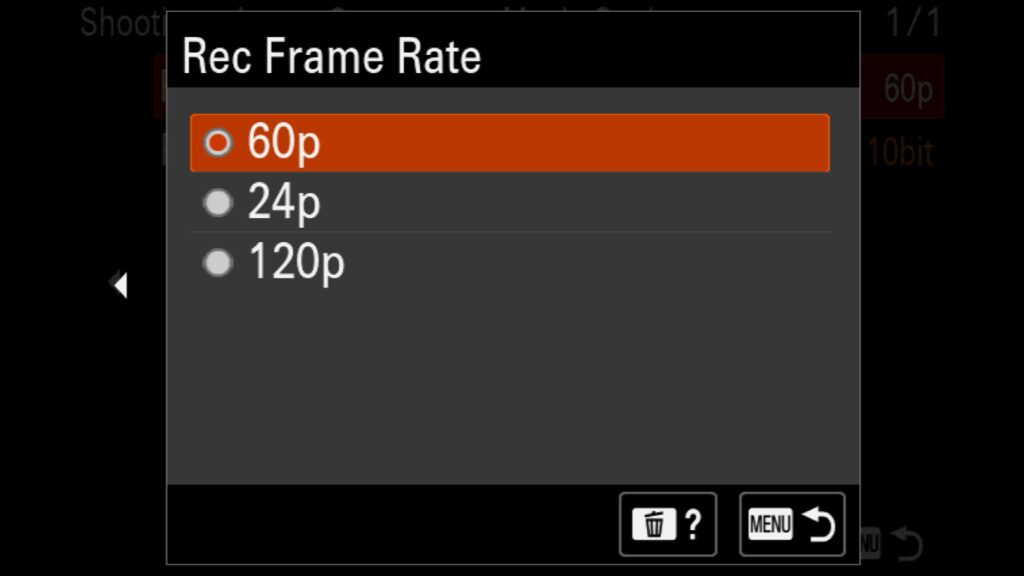
Now that you have chosen the resolution for your video, it is time to pick the video frame rate. Here are your options with the a1 II, which can vary depending on your choice of video resolution above:
24p – A cinematic or film-like look and feel.
30p – A mode that is more in line with your standard internet video or something taken with your smartphone.
60p – If you shoot with high FPS, such as 60p, you have more flexibility to slow down the footage in post (up to 2x).
120p – Offering the ability to more dramatically slow down (up to 5x) a clip if it is shot at 120fps.
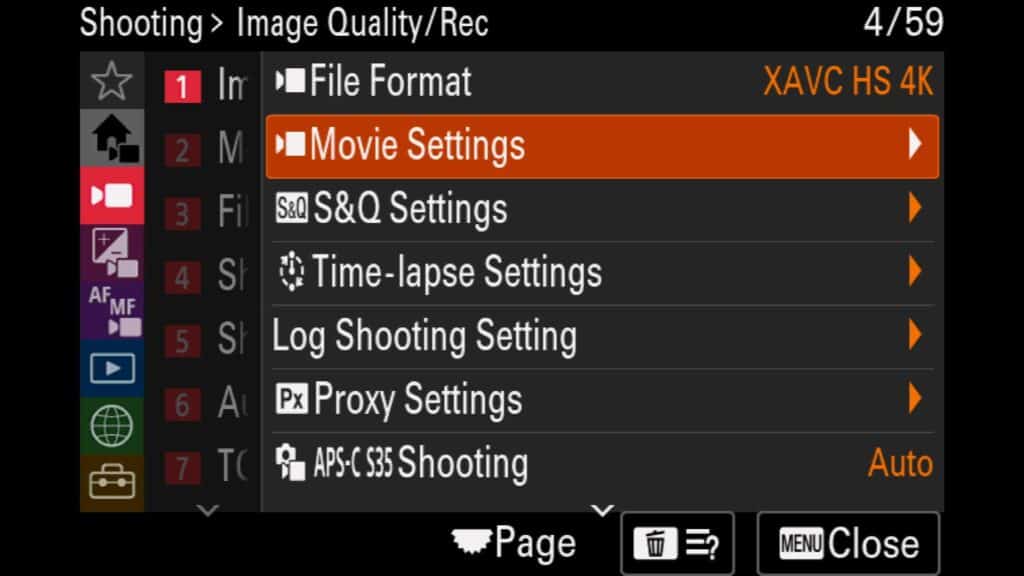
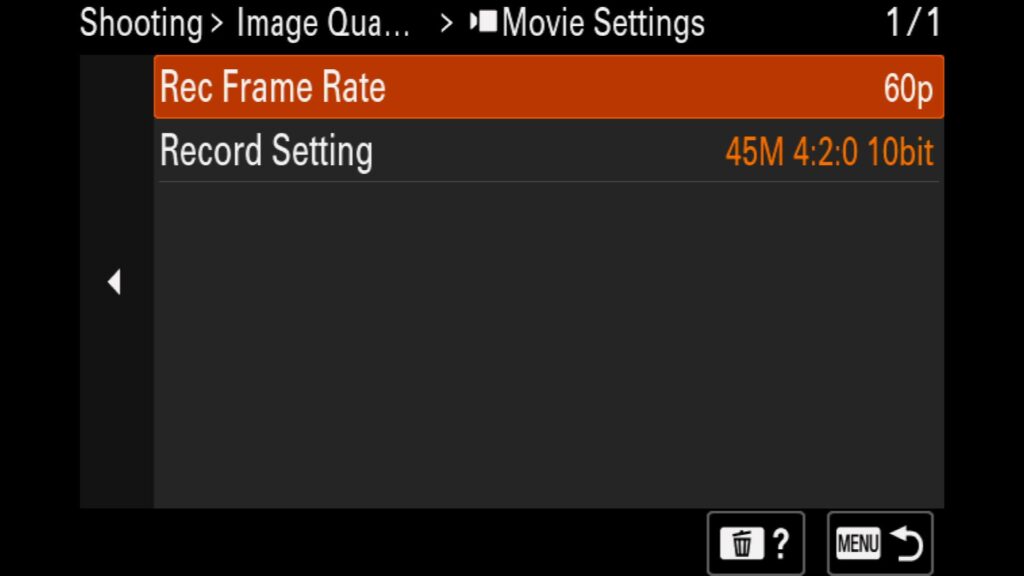
Next, you have to dive into the “Record Settings” menu. Here, you get to pick the quality, bitrate, and color options for any videos you shoot. It is important to remember that the larger the bitrate, color pallet, and quality, the larger the video file size.
To better understand, let’s look at an option found in the Sony a1 II: 200M 4:2:2 10bit:
200M – This represents the bit rate. The higher the rate, the better the quality of the video and the larger the file size.
4:2:2 – This represents the chroma subsampling (color information). The higher the numbers, the more color information is recorded, so 4:2:2 is better than 4:2:0.
10bit – This represents bit-depth. With the a1 II you have 8bit and 10bit. A 10-bit video can display 1.07 billion colors, whereas an 8-bit video is limited to 16.7 million.
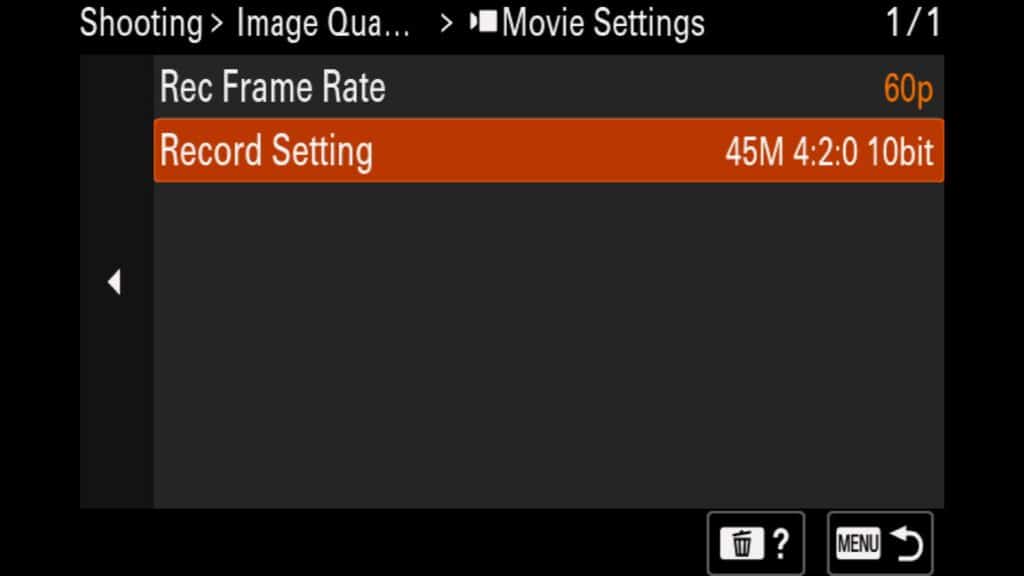
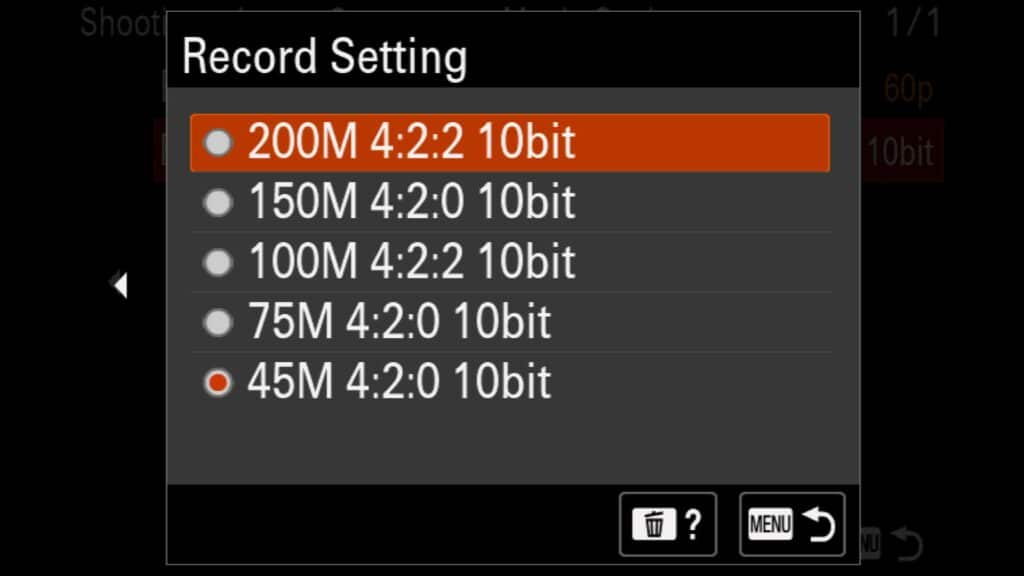
These settings are in the “Shooting” menu under “Image Quality/Rec.” and “Movie Settings. There, you will find “Rec Frame rate” and “Record Settings.” You must be in the “Movie” camera mode to see these settings in the menu.
What is S&Q Movie Mode?
S&Q stands for “Slow & Quick,” which accurately represents this video mode found in all Sony mirrorless cameras. In the regular video mode, you can shoot a video with a high FPS (such as 60p or 120p) and then slow down that footage once you return to your computer using video editing software. With the S&Q mode, the video file that gets created is already set in slow motion, so there is no extra work to do. The only downside is that you do not keep the video footage at regular speed like you do with the standard video recording mode on the camera.
Settings up the S&Q feature is pretty straightforward if you have any experience shooting video, but we can review things just in case. Ultimately, you have three settings to adjust:
S&Q Rec Frame Rate – Here, you want to choose the frame rate at which the video will be recorded. Your options are: 24p, 30p, 60p or 12op. For a more cinematic look, I recommend 24p.
S&Q Frame Rate – Here, you choose how many frames are shot per second, determining how much the video can be slowed down. So if you are shooting a 24p video from the last step but choose 120p for the Frame Rate, the video will be 5x slower (120/24). If you choose 60p here, it will be 2x slower (60/24) than a video at normal speed.
S&Q Record Settings – Depending on the choices for the previous two settings, you will now have to choose the Bit Rate, quality, and color depth of the video, such as “50M. 4:2:2. 10 Bit”. See the previous setting in this guide for more explanation. Your options here are more limited than in the standard video mode.
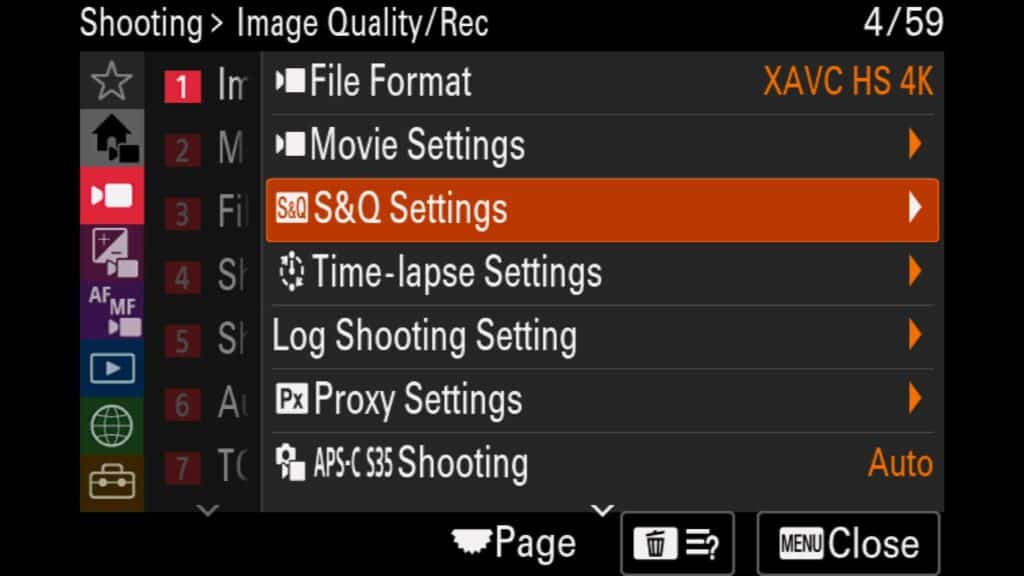
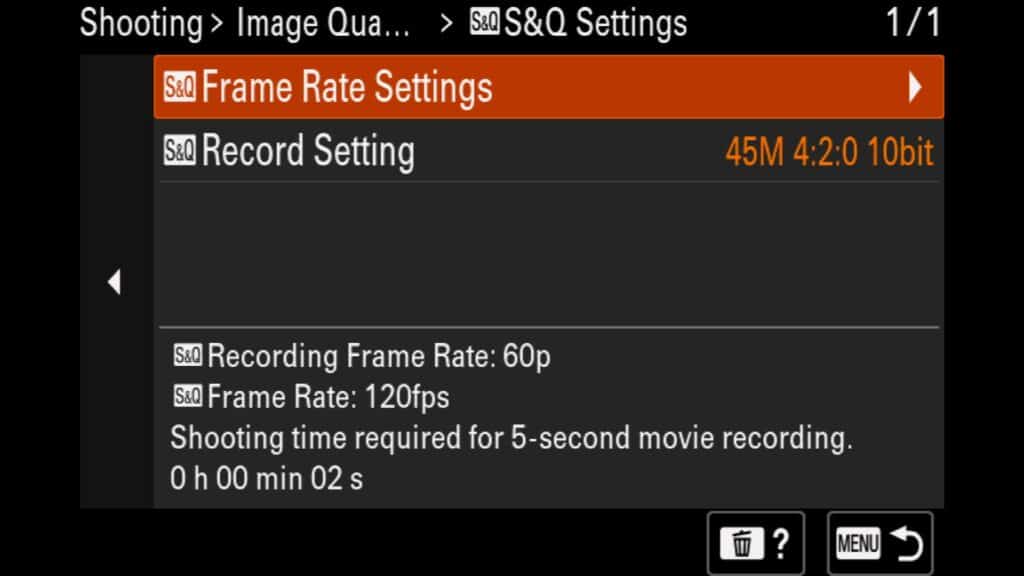
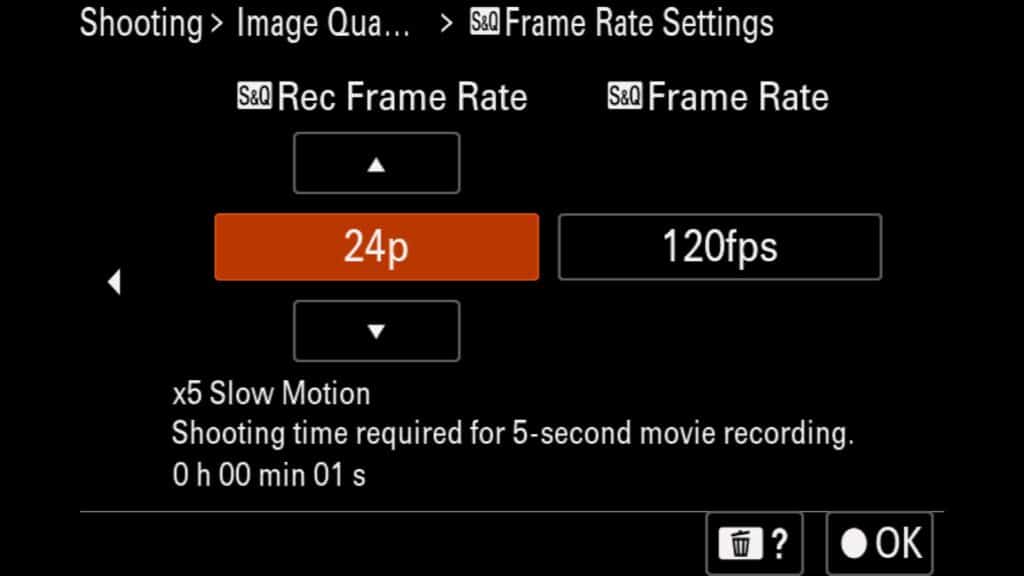
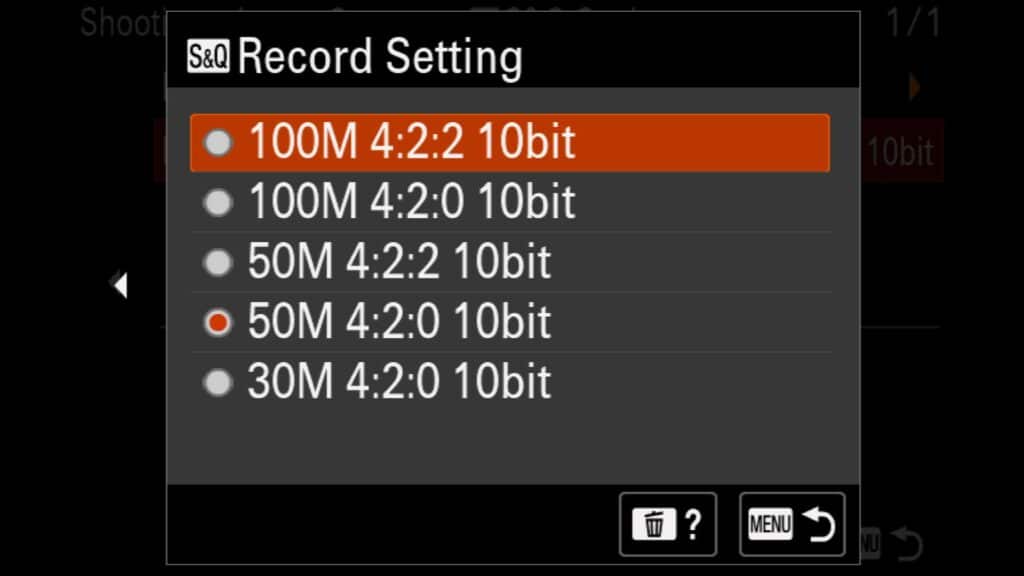
These settings are in the “Shooting” menu under “Image Quality/Rec.” and “S&Q Settings”. You will find “Frame Rate Settings” and “Record Settings” for S&Q.
Time-Lapse Video Mode (New to the Sony a1 II)
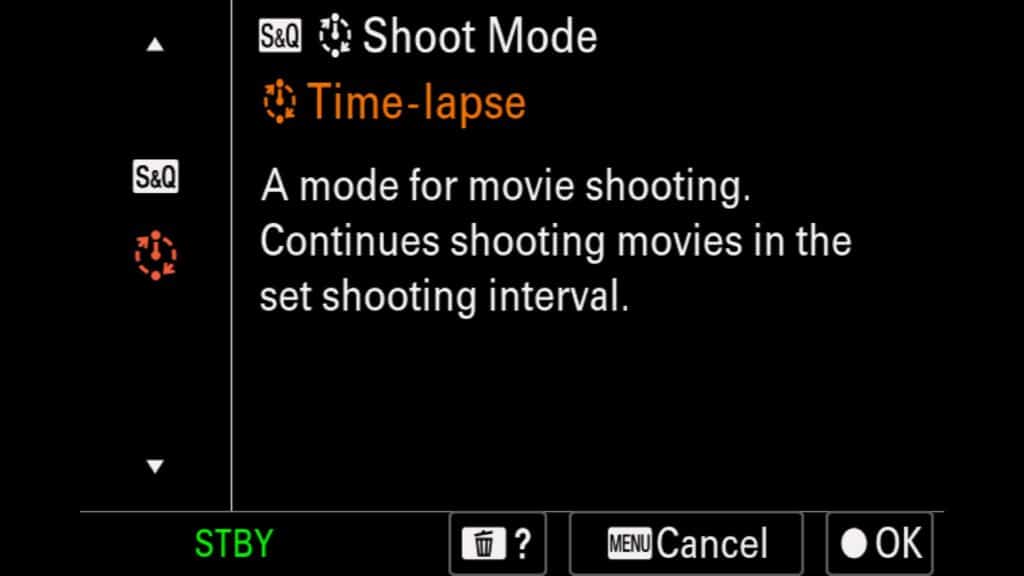
Another new feature of the a1 II is the ability to shoot Time-Lapse movies. Unlike the built-in Intovelometer (Interval Shoot Func) that helps you take all of the still images needed to create your own time-lapse video, this mode outputs a Timelapse video (but no still photos). To access this feature, you must move the camera function dial to S&Q. Once there, you can jump into S&Q or Time-lapse modes. Once you have selected “Time-Lapse,” you can adjust any of the exposure settings needed just as if you were taking a photo (ISO, Shutter Speed, Aperture) as well as decide if you want to shoot in Manual mode, Shutter Priority, Aperture Priority, Program mode or Auto (I recommend Manual or Aperture Priority).
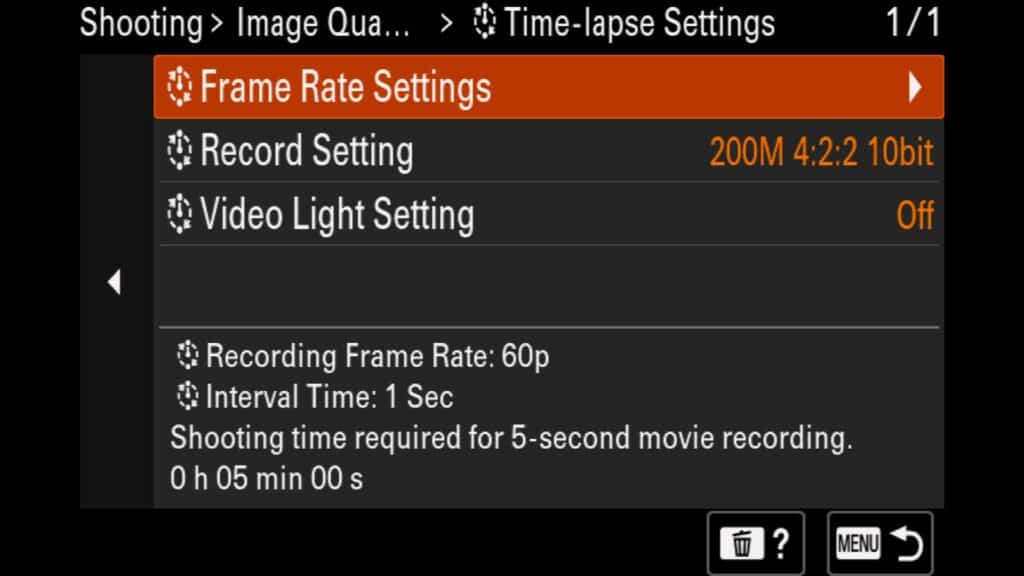
However, if you want to change the time-lapse video settings, you will go to the “Shooting” menu and find “Image Quality/Rec.” There, “Time-lapse Settings” appear if you are already in the video or S&Q camera modes. There, you can adjust the following:
- Frame Rate Settings – Adjust the Rec Frame Rate to either 24p (for a cinematic look) or 60p (for something more akin to a cell phone video)
- Record Settings – You can adjust the Bit rate, color options, and video quality depending on your shooting resolution.
- Video Light Settings – Sets the video light illumination setting during the time-lapse
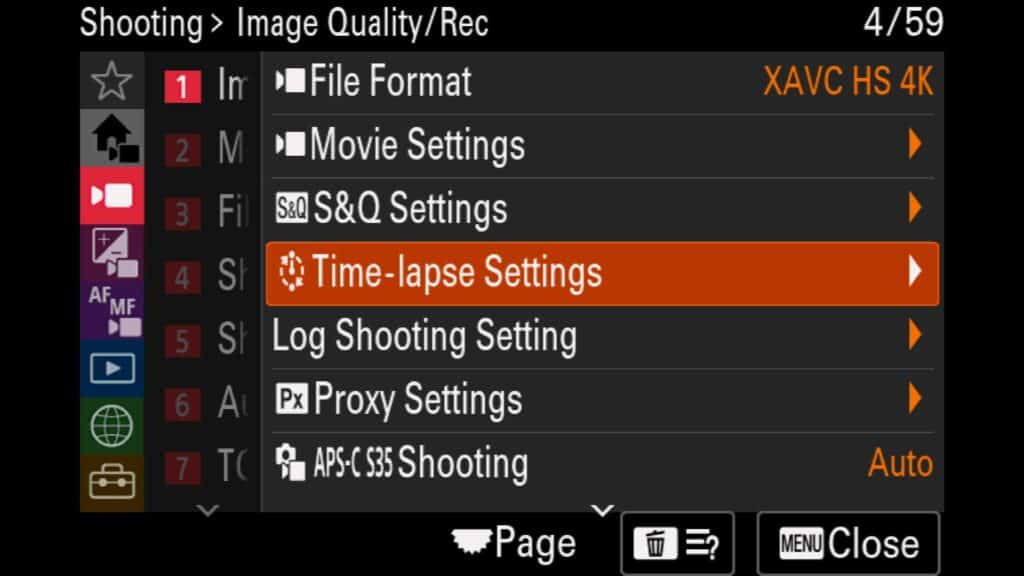
Proxy Settings
If you are familiar with shooting videos, you are undoubtedly aware of proxy videos. Essentially, this records a second copy of your video at a lower resolution and bit rate, often making it much easier to edit with a less powerful computer. While you can create Proxy versions of your video via your computer, for some, it can be handy to have them ready to go from the start. For example, this is a convenient feature if you want to shoot an 8k video but don’t feel your computer can handle processing that large of a file. Creating a Proxy copy will make editing and processing that video much easier, especially with an older computer.
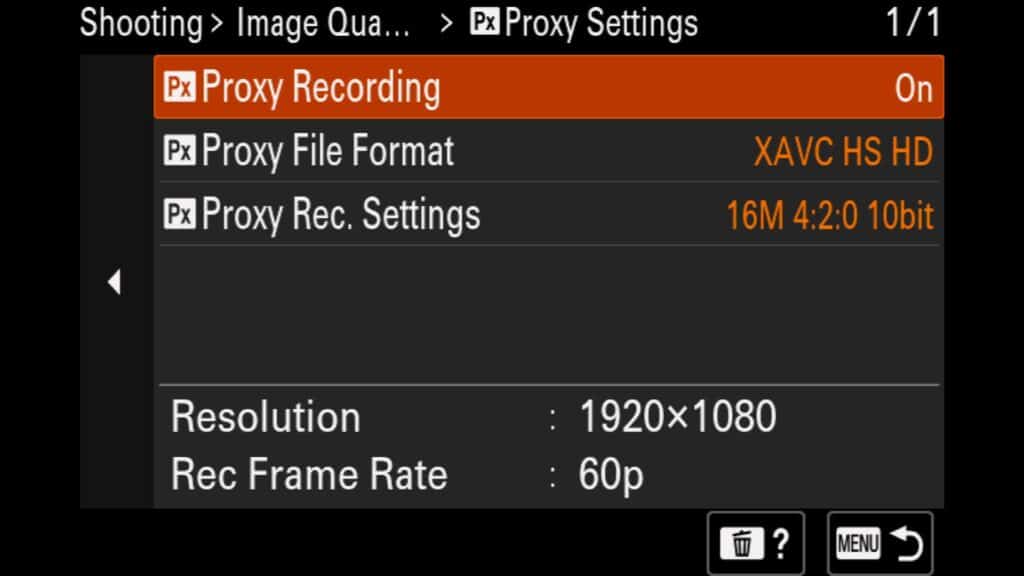
With the Sony a1 II you have the ability to change the following settings:
- Proxy Recording – Turn Proxy video recording on or off.
- Proxy File Format – Choose to shoot in XAVC HS HD (1920×1080) or XAVC S HD (1280×720).
- Proxy Rec. Settings – These settings will vary depending on the above settings plus what Rec. Frame Rate you are shooting at.
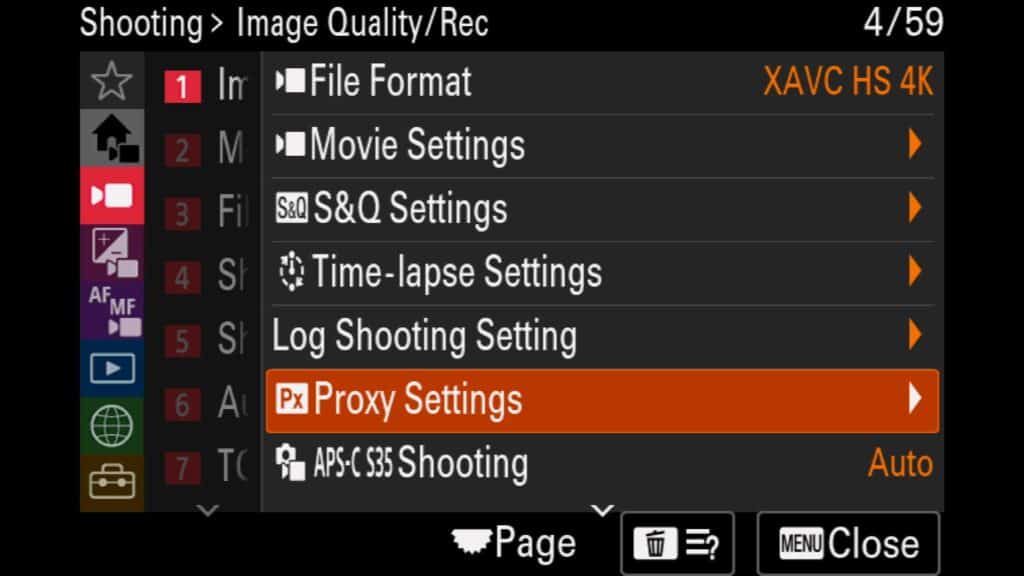
These settings are in the “Shooting” menu under “Image Quality/Rec.” and “Proxy Settings”.
Using Picture Profiles, LOG, & LUTS (New to the Sony a1 II)
One of the most essential choices when recording a video is to think about color grading. Why? Because it can make a huge difference in your footage’s final look and feel. While some photographers will never want to process their videos, others wish for more flexibility to push their editing and color grading as far as possible. With the Sony a1 II, you have three options to contend with:
Picture Profiles:
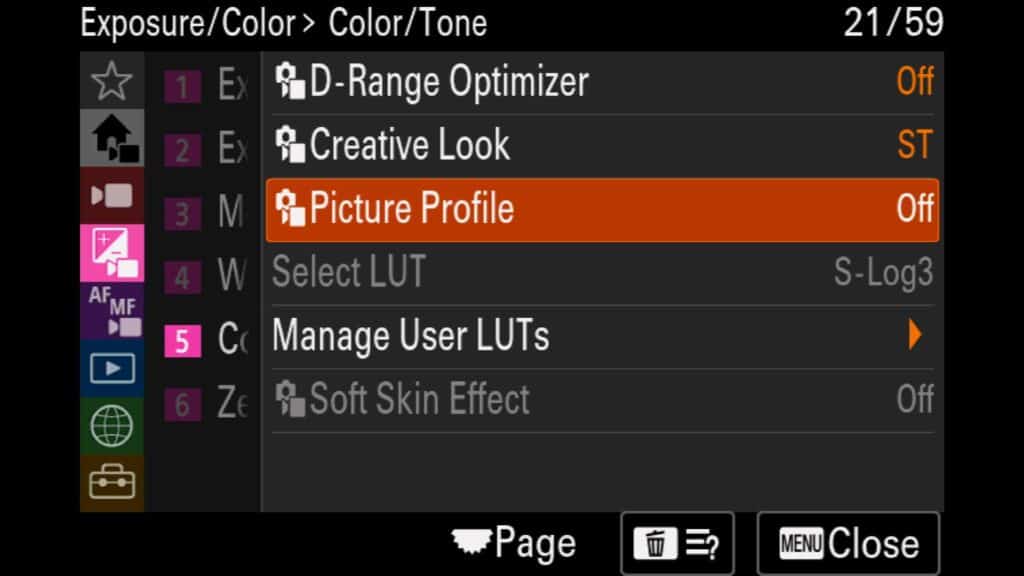
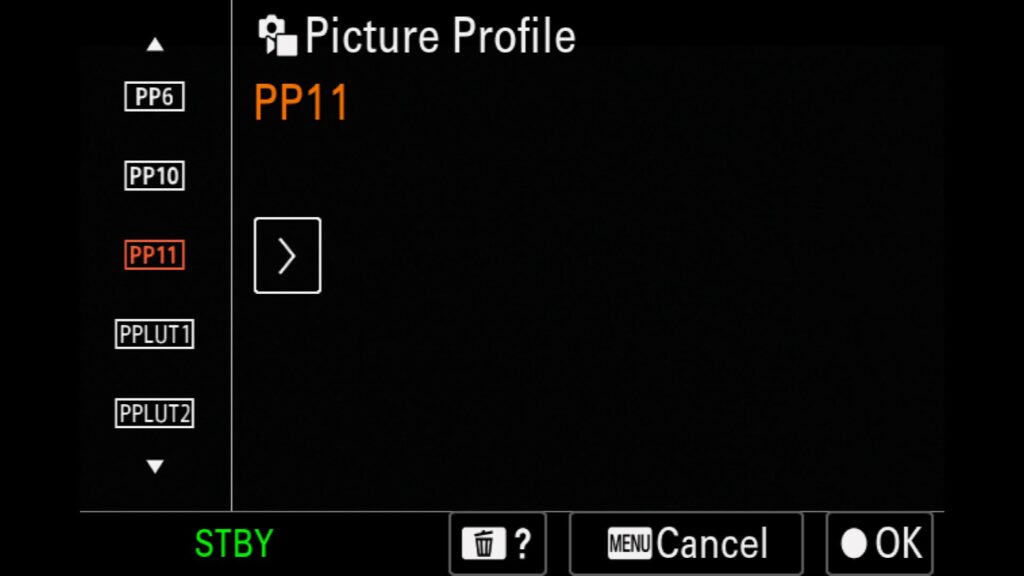
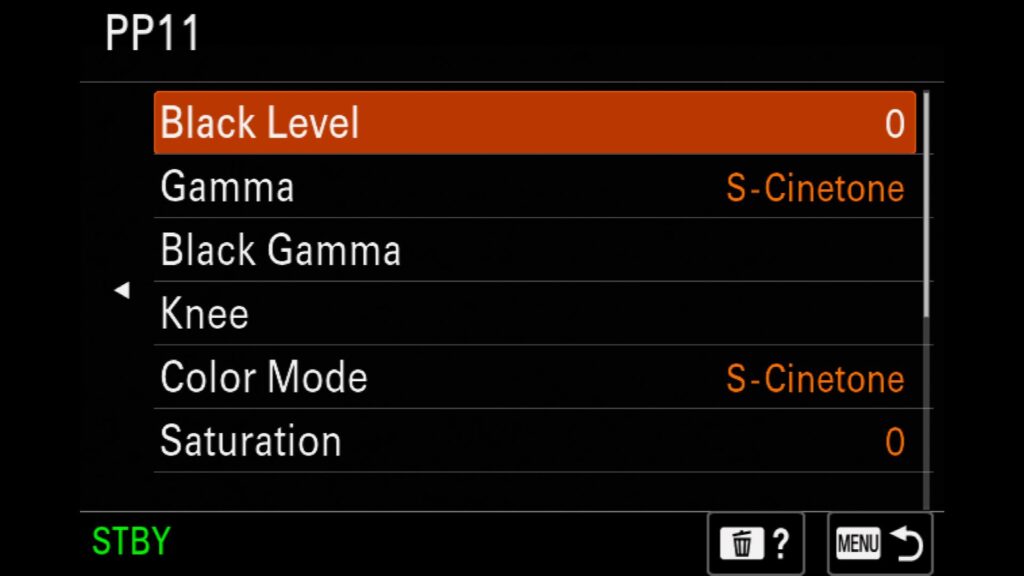
Picture profiles let you change parameters like contrast, color tone, gradation, coloring, and image edges of a video. If you don’t want to spend time processing your videos, I highly recommend you shoot in S-Cinetone. Picture Profiles are in the “Exposure/Color” menu under “5: Color/Tone”. There you will find “Picture Profile”.
PP Off – The default option with no Picture Profile selected
PP10 – HLG2 gamma and BT.2020 color mode
PP11 – S-Cinetone gamma & color mode. This is great for those who want to avoid color grading but still want beautiful results.
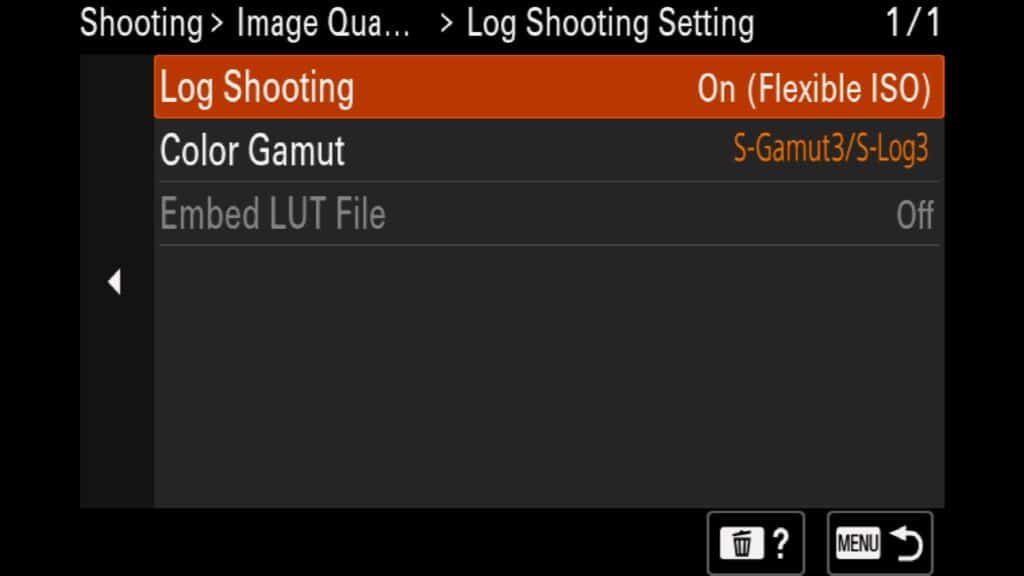
Shooting in LOG (*New):
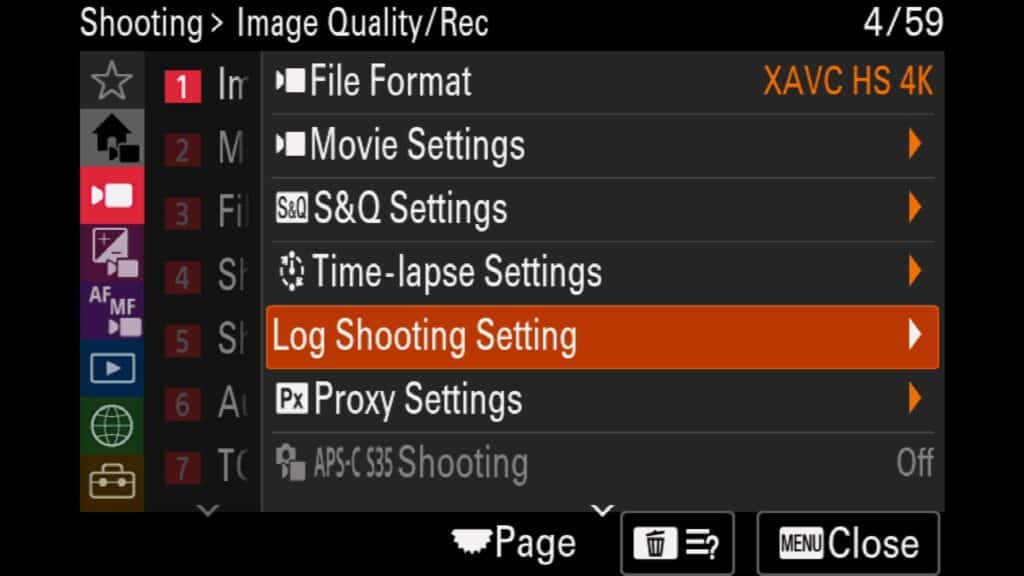
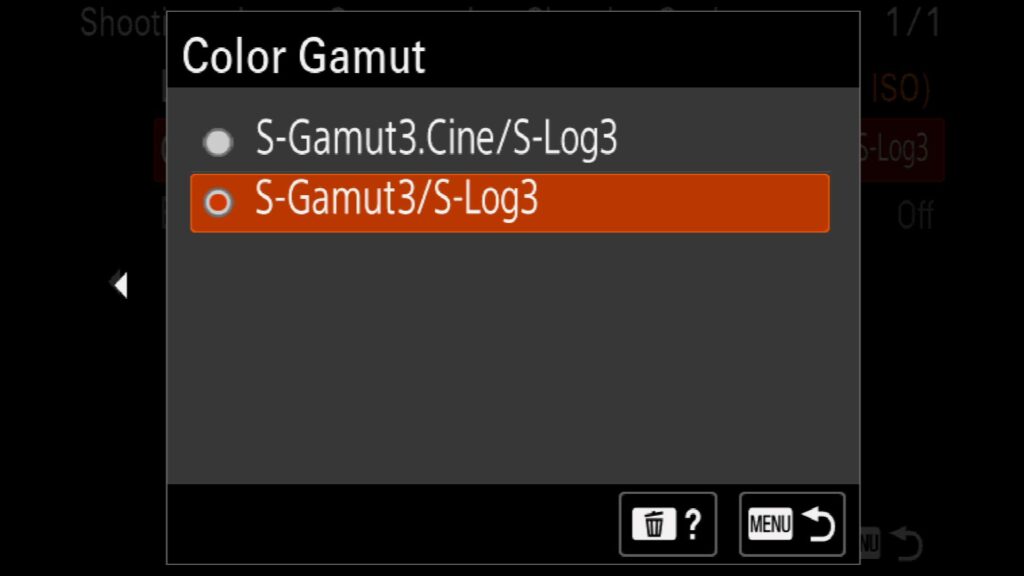
Otherwise known as “S-Log,” this feature allows you to have a significant amount of leeway when adjusting and enhancing both the dynamic range of your videos and the quality of the colors displayed. Once you turn on this feature, it will turn off any Picture Profiles you have selected. On the a1 II, you can shoot in S-Log3.
The Log settings can be found in the “Shooting” menu in Video mode under “Image Quality/Rec.” There, you will find the “Log Shooting Setting”.
LUTs (*New):
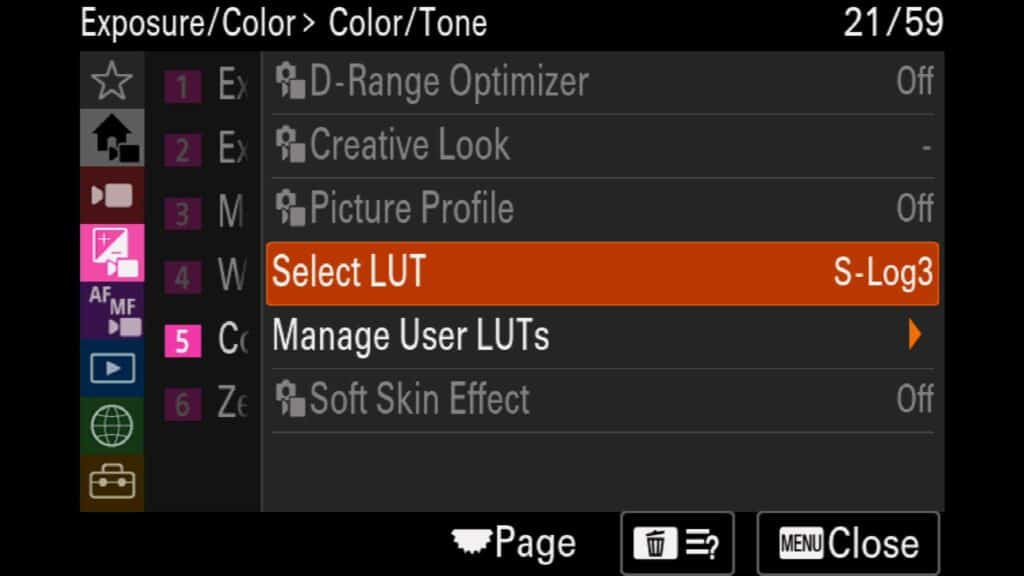
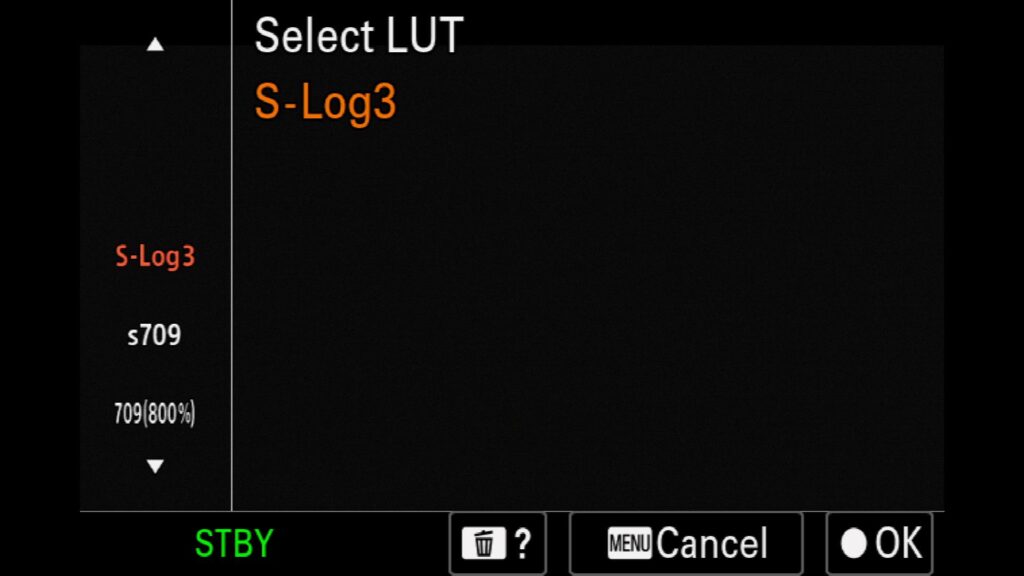
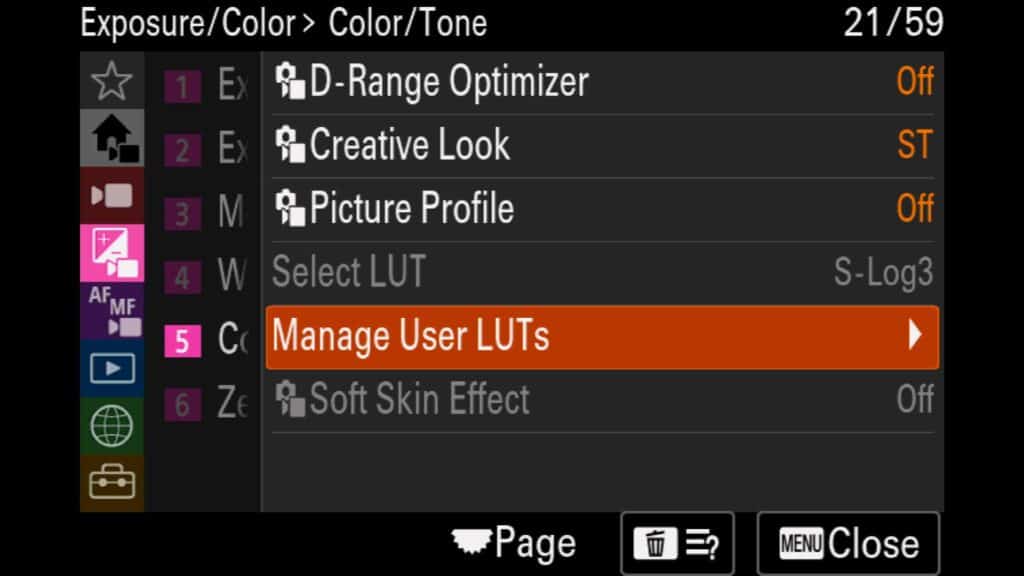
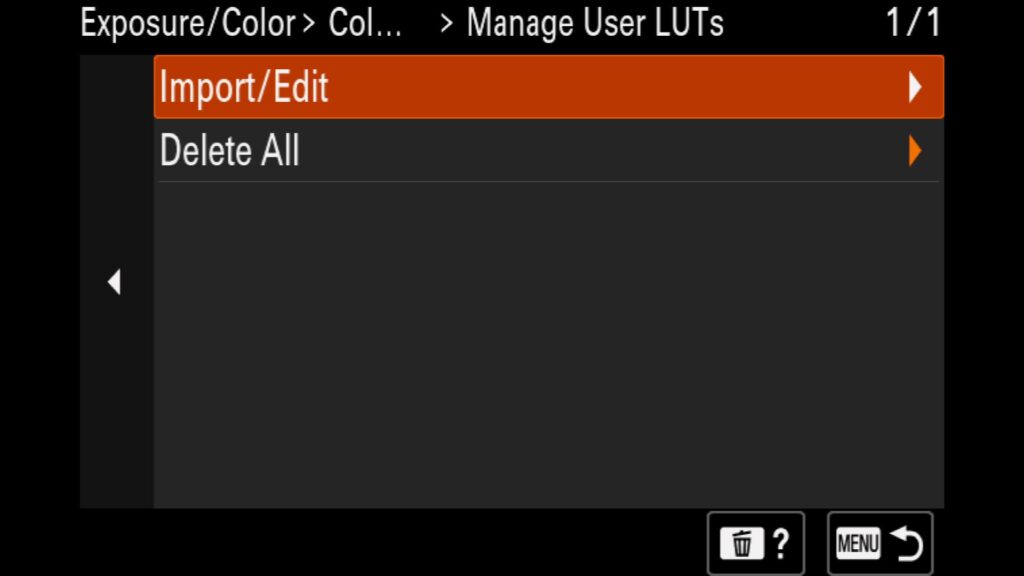
LUTs (Lookup Tables) are a color filter you use to alter the colors in your image or video. They can be used temporarily to give you a feel for the look of a video, or you can embed them into the file itself. With the a1 II, you have three preset LUTs (S-Log3, s709, and 709(800%), but you also can import your LUTs into the a1 II and apply them to your videos. * To use a LUT, you need to be shooting in S-Log3.
All of the settings for Luts can be found in the “Exposure/Color” menu under “5: Color/Tone”. There you will find both “Select Lut” and “Manage User LUTs.”
Join the Photography Workshop Waitlist to learn more about any upcoming adventures...
Join the Workshop Waitlist to learn more about any upcoming adventures...
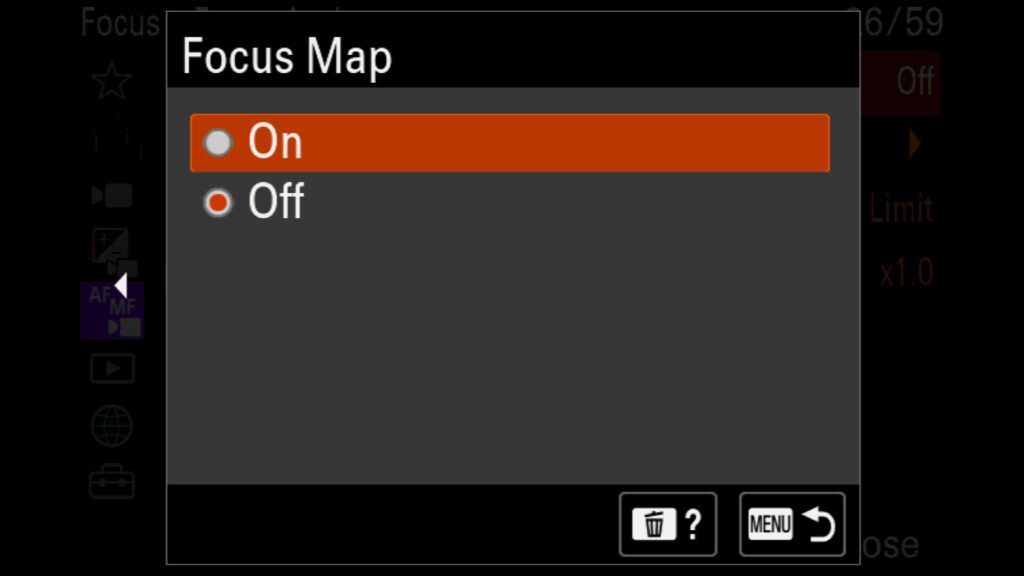
Using the new Focus Map with Video (New to the Sony a1 II)
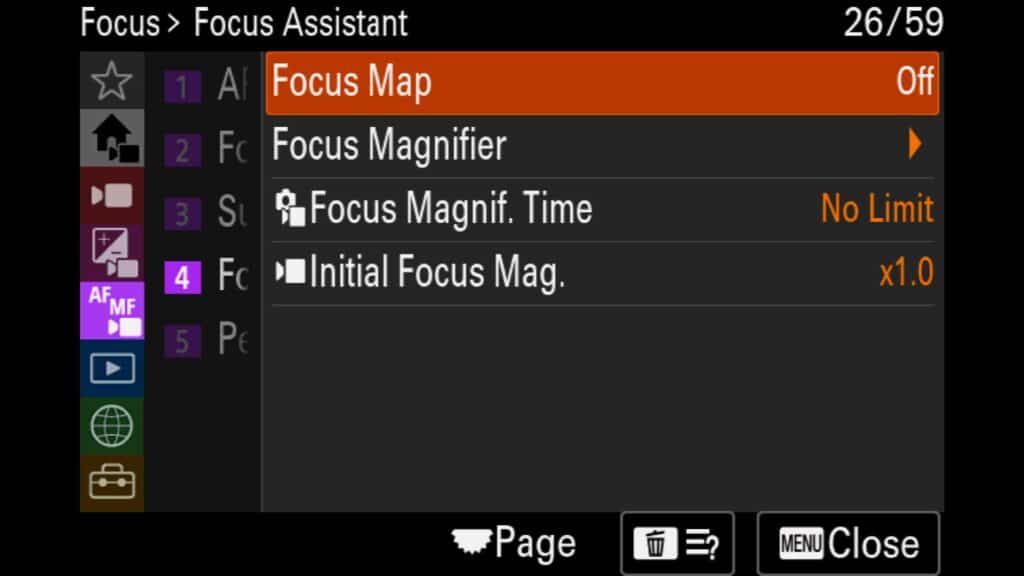
Another new feature to the a1 II is the Focus Map for shooting video. When turned on, it allows you to have a color overlay on top of the video to get a real-time idea of what is in and out of focus. So how does it work?
No Color – Represents what is in focus.
Blue/Light Blue – What is behind the focal plane (behind the focal point)
Red/Orange – What is the front of the focal plane (foreground)
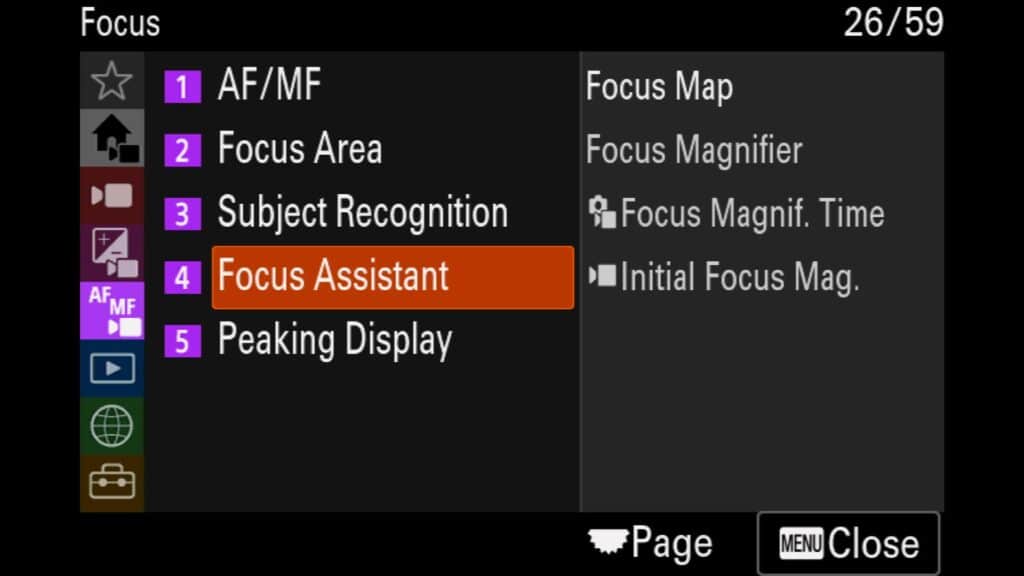
These settings are in the “Focus” menu under “4: Focus Assistant”. There you will find the “Focus Map” feature.
SteadyShot for Video (New to the Sony a1 II)
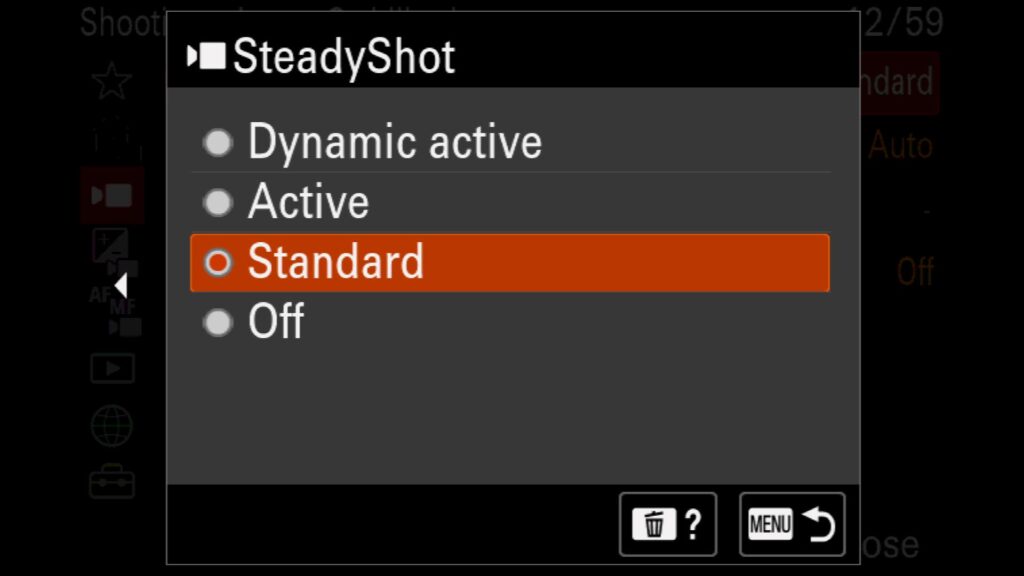
While video stabilization is not new to the a1 series of cameras, the “Dynamic active” mode is a welcome addition. Video stabilization works by slightly cropping into the frame of your video to isolate and stabilize the frame from shakes and movement. The more movement you are experiencing in the video, the more aggressive the crop/video stabilization you will need. With the a1 II you have 4 SteadyShot (stabilization) options:
- Dynamic Active – New to the a1 II. It includes a more aggressive crop to stabilize the video. Good for highly active scenes, such as walking with the camera while following a subject.
- Active – An increased amount of stabilization that requires a small crop into the frame. Good for small amounts of movement.
- Standard – A small amount of of stabilization with no crop. Good for micro movements, such as shooting from a tripod or stabilizer.
- Off – No stabilization applied to your video
These settings can be found in the “Shooting” menu under “Image Stabilization” when in video mode. There you will see “SteadyShot”.
Framing Stabilizer vs Auto Framing (New to the Sony a1 II)
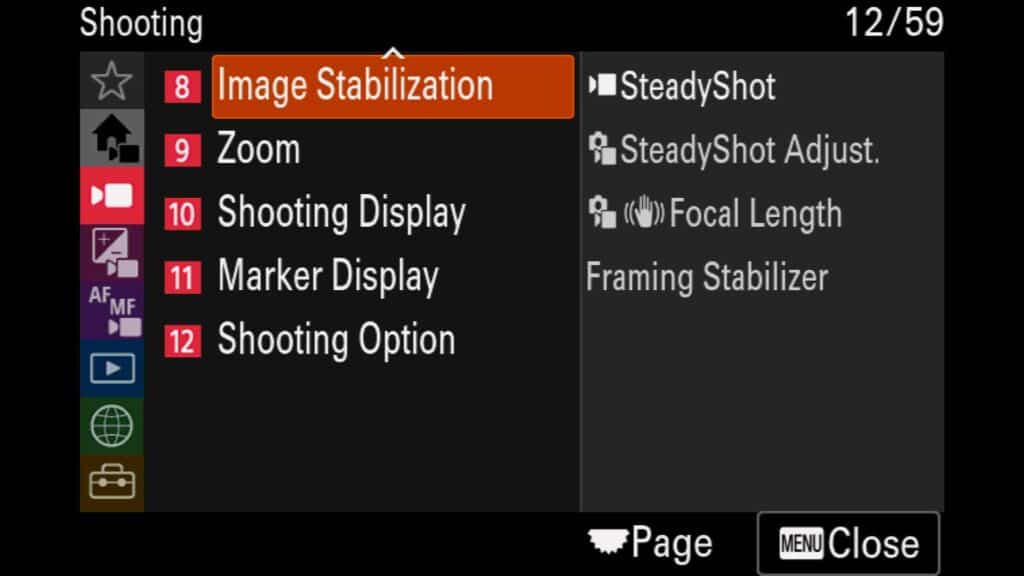
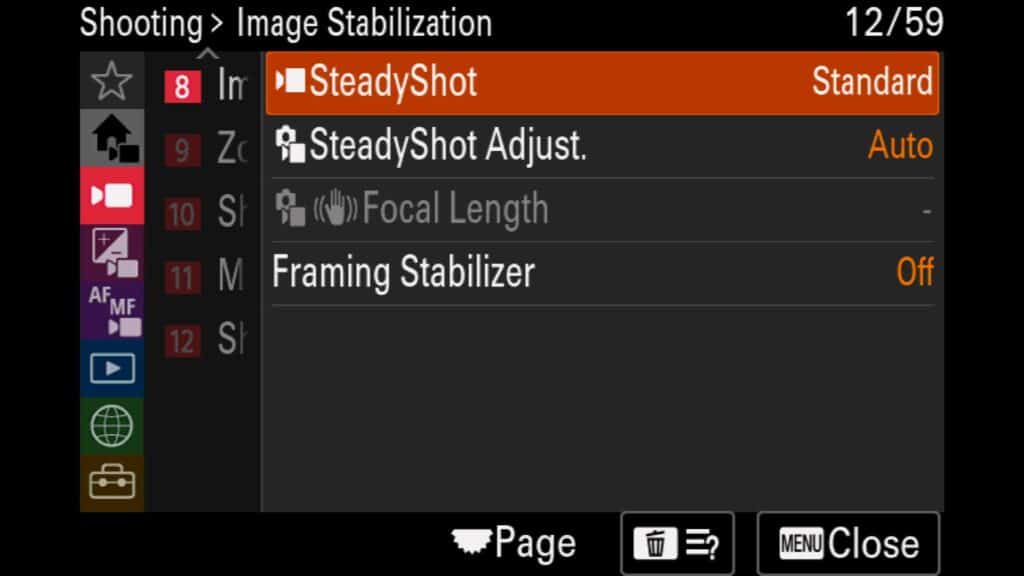
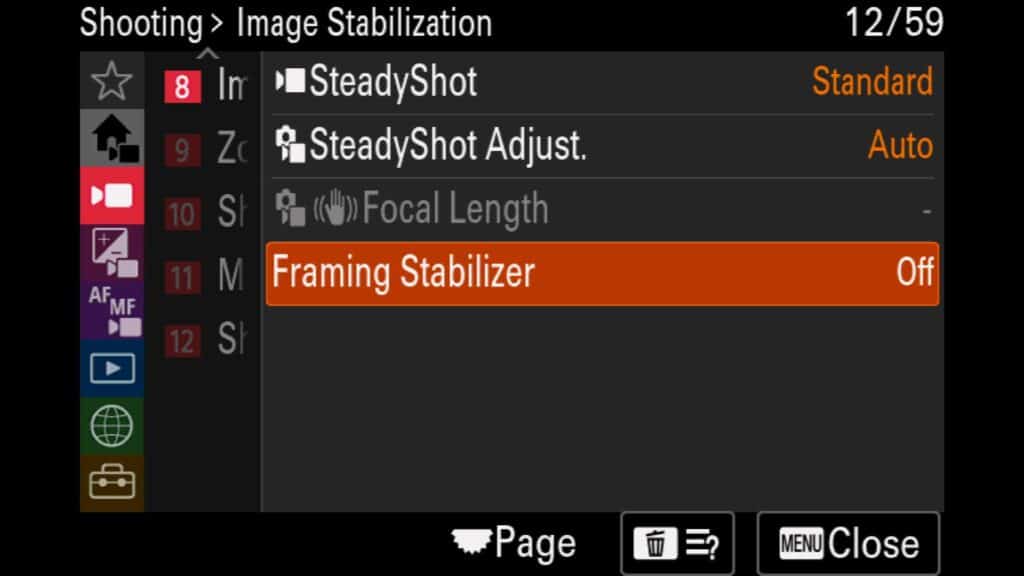
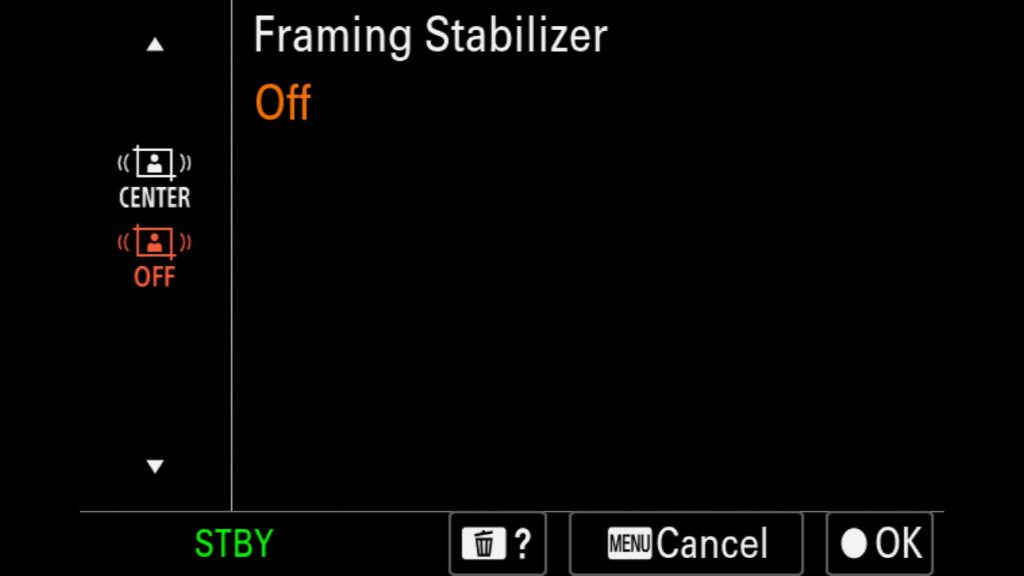
Two new video features to the Sony a1 II are Framing Stabilizer and Auto Framing. Both have to do with helping you keep your subjects in your frame, but they have different functions and cannot be used simultaneously.
Framing Stabilizer
This feature automatically keeps the subject in the same portion of the frame (either the center or a custom set location). It uses AI-based subject recognition and the Dynamic Active Steadyshot mode to keep the subject in frame. It was designed to be used when the camera moves along with the subject, such as following along with an animal as it moves through your frame.
These settings are in the “Shooting” menu under “8: Image Stabilization”. There you will find “Framing Stabilizer”.
Auto Framing
This feature automatically crops and recomposes your video to track recognized subjects. It works best when the camera is mounted to a tripod, but the subject of the video moves throughout the initial composition. It can work great when you are filming yourself, for example.
Under the “Auto Framing Settings” you have a variety of settings to adjust:
Auto Framing – Turning the feature On or Off.
Framing Oper. Mode – Helps you decide when to engage the feature
Crop Level – Large, Medium or Small crop into your subject as it moves around the frame.
Framing Tracking Speed – Adjusts the speed your subject is tracked. 1 for Slow to 5 for Fast.
Move Rec/Streaming – Sets whether to crop videos being recorded to the camera or via streaming using the a1 II.
HDMI Output – Sets whether to crop the videos being output to HDMI for external recording with the a1 II with Auto Framing turned on.
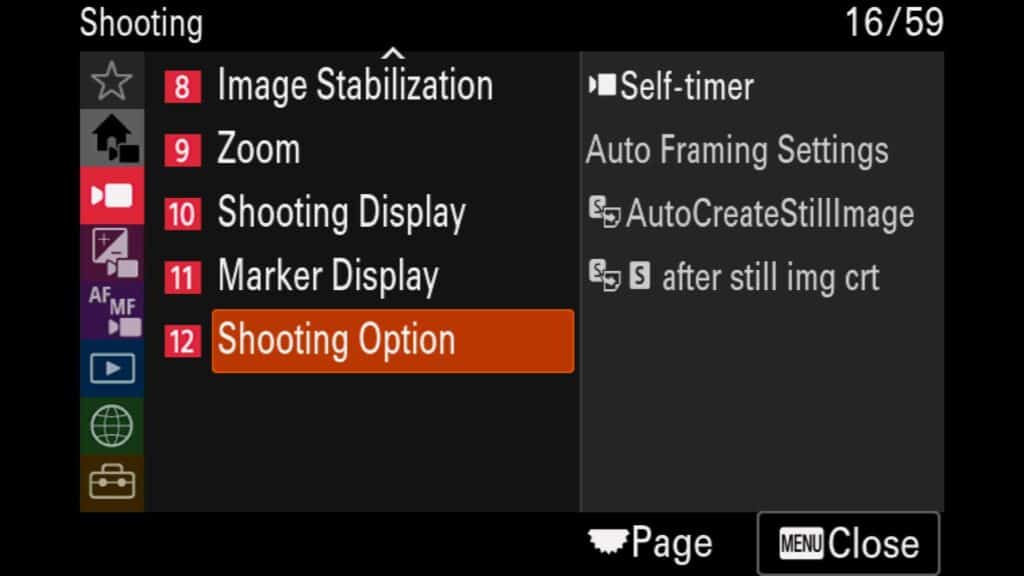
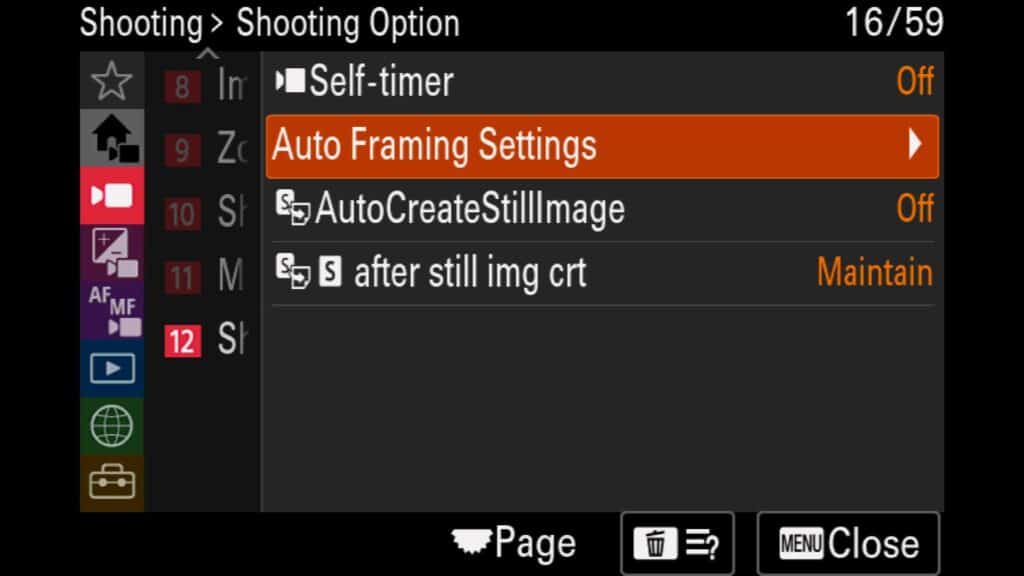
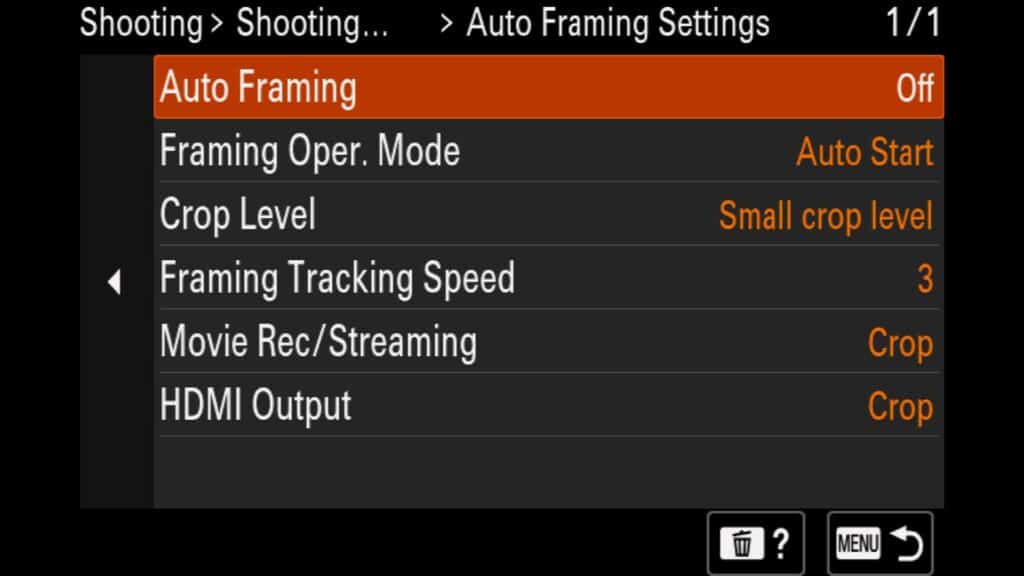
These settings can be found in the “Shooting” menu under “10: Shooting Option”. There you will find “Auto Framing Settings.”
Animal Eye AF Tracking in Video (New to the Sony a1 II)
Another significant upgrade over the original Sony a1 is the Eye AF tracking when filming birds and wildlife. This highly requested feature is finally here, and it works very well with the a1 II. If you have “Subject Recognition in AF” turned on and either Animal or Bird is selected as your target, this will work automatically. You will see a small white box appear over the subject’s system, giving you an indicator that tracking is engaged in your video.
However, if you hit the back AF button or press the shutter release button halfway to engage focus as if you were shooting a still image, the camera will stop tracking the eyes of the subject while it engages stabilization (Steadyshot) for your video. You CAN NOT use both stabilization and AF tracking at the same time.
Depending on the size of your subject, I find that the Zone AF Area works best for me regarding using Animal Eye AF in video. This way, I can always try to keep my subject’s head within the AF zone box and, therefore, in a similar location within the frame/composition of my video.
Lastly, if Touch Focus Tracking is turned on for your a1 II (See Touch Focus section), you can tap on your subject via the rear LCD screen to begin tracking your subject using the AF system. You will see a small tracking box appear, and it should follow your subject around the frame as it moves.
Customizing Your Sony a1 II
One of the best things you can do to get the most out of your Sony a1 II is to customize your camera fully. Did you know you can customize nearly every button and dial on the camera, let alone the Fn and My Menus systems too? Don’t like what a button does on the back of the camera, reassign it. Want quicker access to make the camera shoot in truly silent mode, or want to change Eye AF from Animal to Insect? Nearly every button and menu on your a1 can and should be customized.
The three main ways you can customize your a1 II are through the custom buttons/dials, the Fn Menu, or the My Menu option.
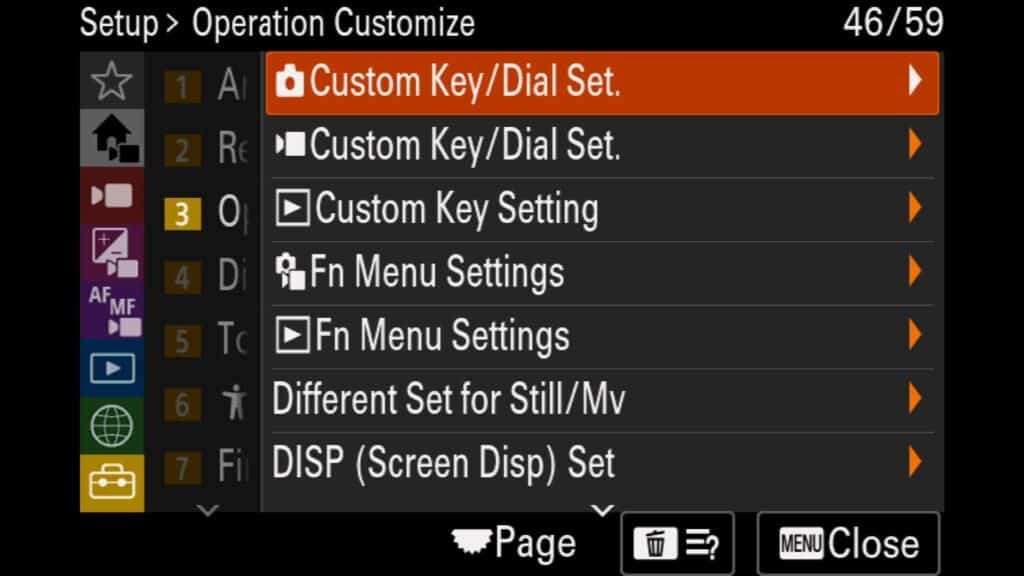
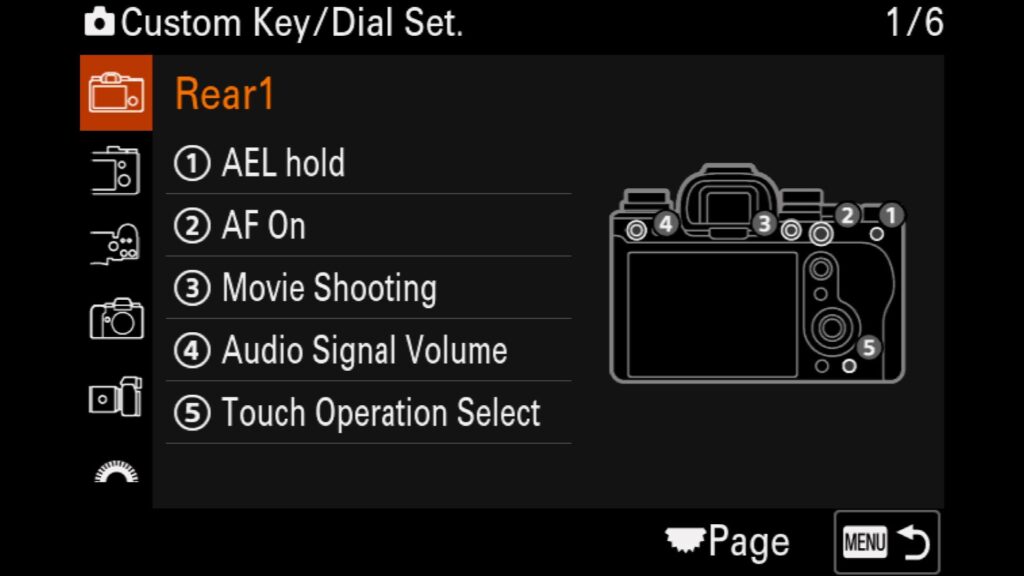
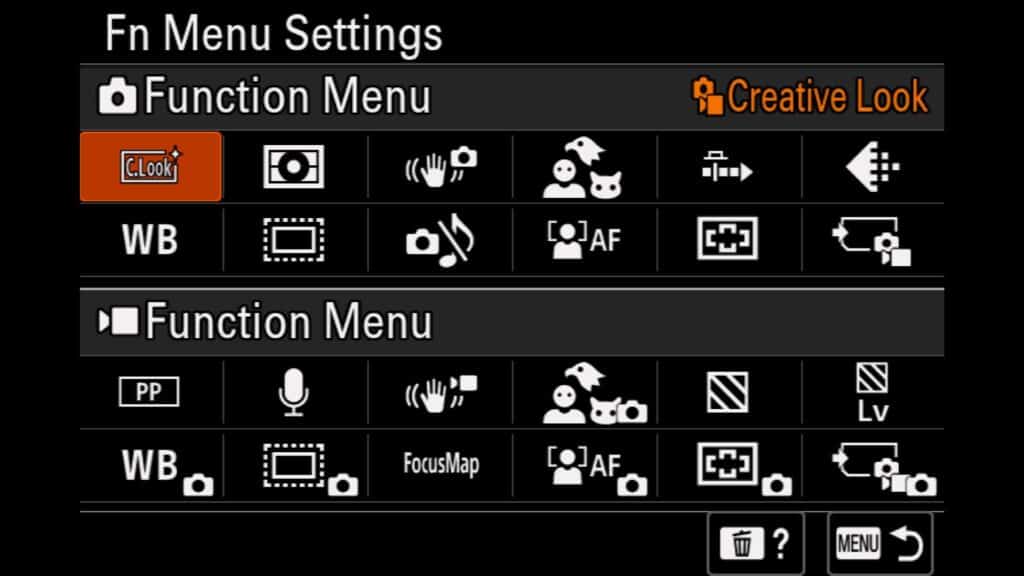
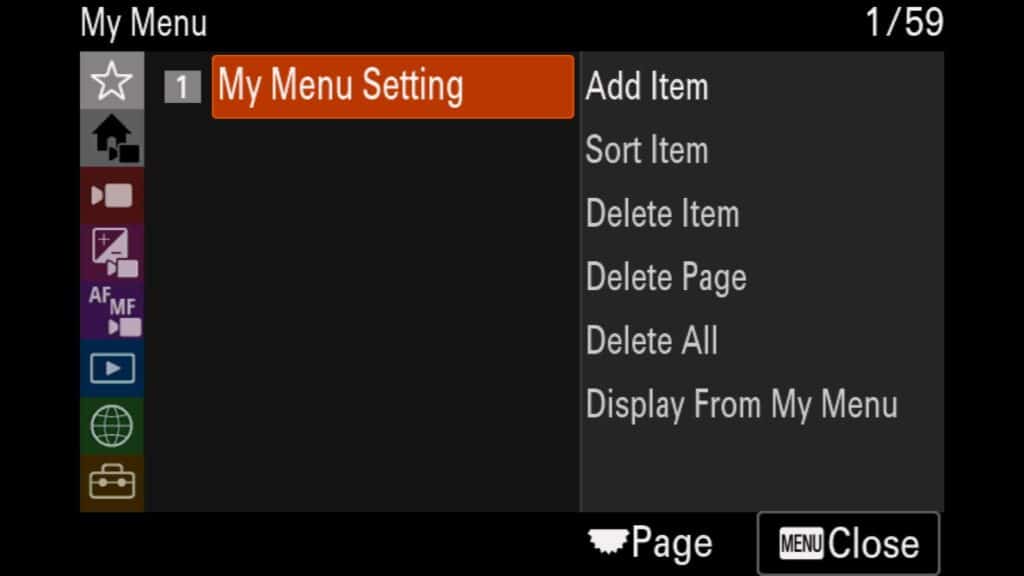
While customizing a camera is a very personal thing, I do understand just how time-consuming it can be. That is why I have written a second blog post, Customizing Your Sony a1 II, which solely focuses on how I have personally customized my Sony a1 IIs (I own two of them). You can see how I customize my camera and why I made those choices there. On top of that, I will also give away my personal settings file that you can load on your a1 II to speed things up. The only catch is that you must sign up for my newsletter to get the download link.
Recommended Accessories for the Sony a1 II
Now that you have purchased your Sony a1 II, here is a small list of some of my favorite accessories that make using the a1 II that much better. Many of these links are Affiliate Links.
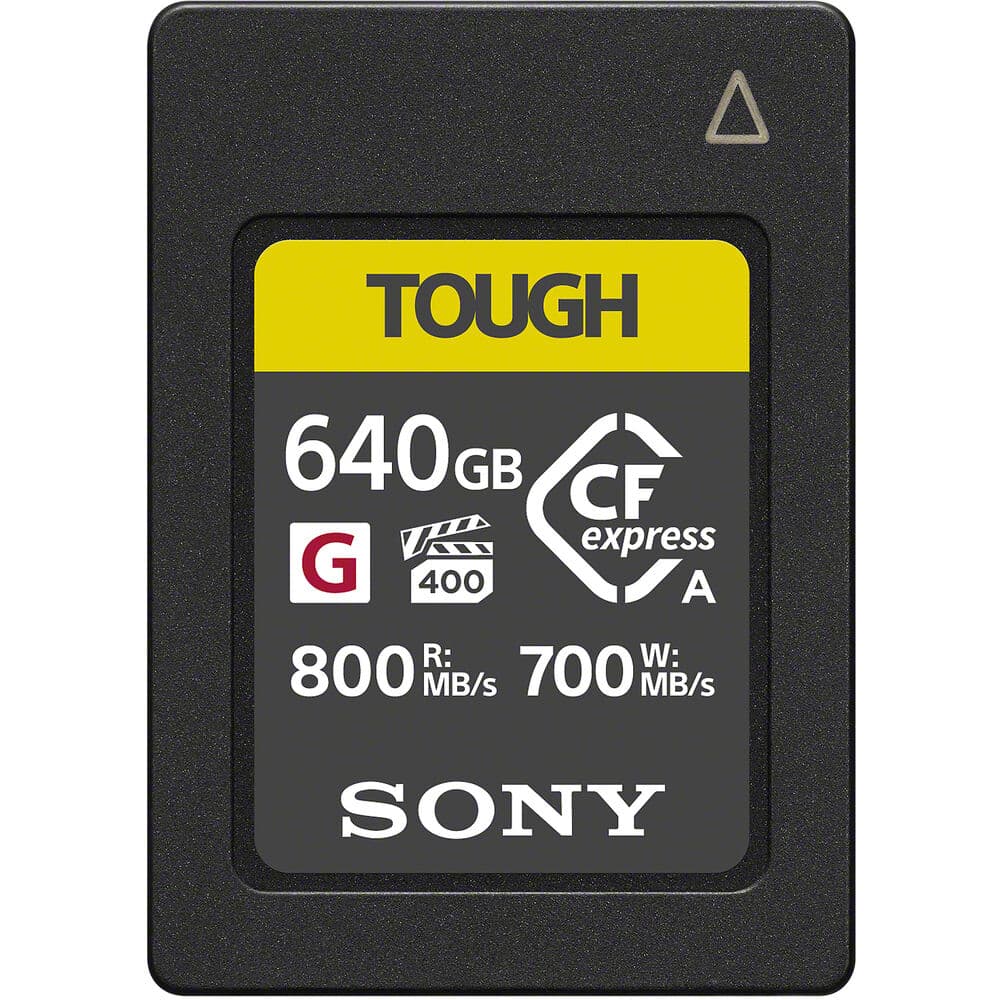
CF Express Type A Cards
To take full advantage of the speed of the Sony a1 II, I HIGHLY recommend that you pick up a couple of CF-Express Type A cards instead of the older and slower SD cards. The benefits of the faster CF-Express cards will be felt in how quickly your buffer clears when shooting in high FPS modes and how quickly your images and videos are off-loaded from your memory cards to your computer.
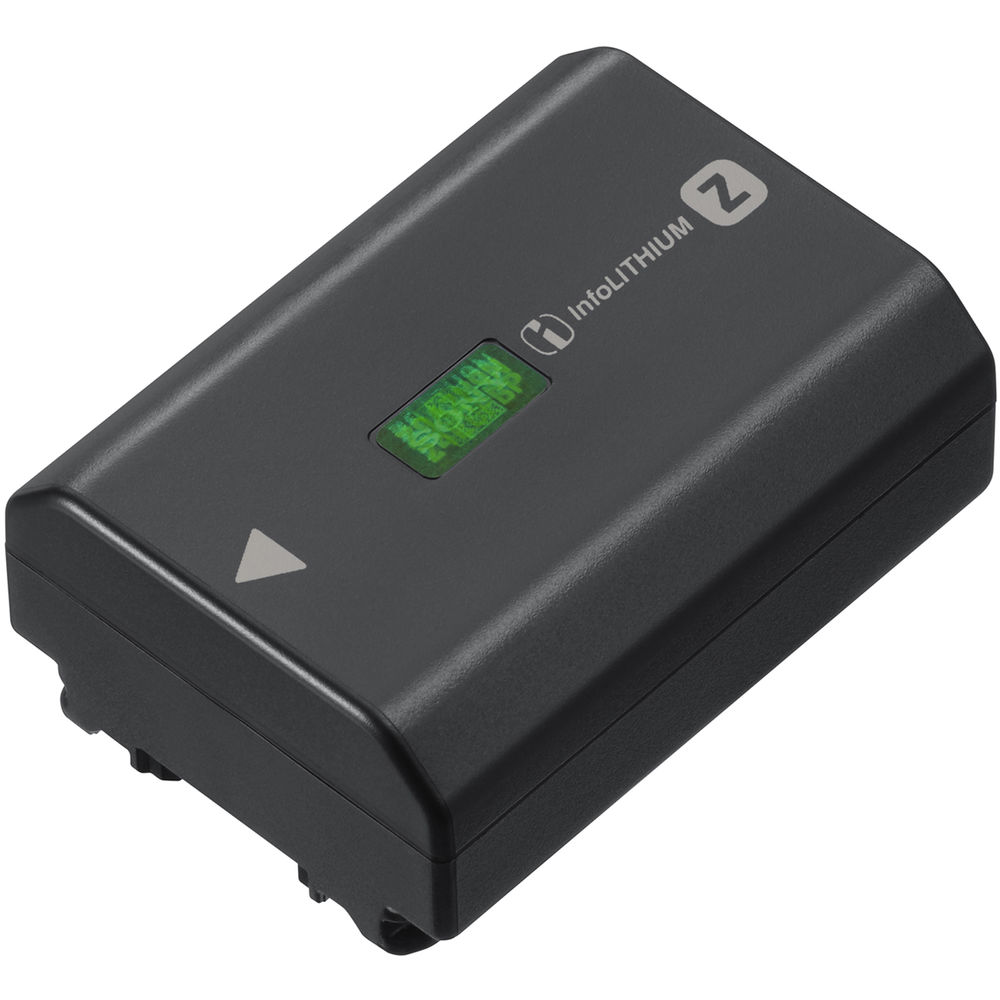
Extra Sony z100 Batteries
Like all digital mirrorless cameras, the Sony a1 II, if used extensively (or left on), will drain its battery reasonably quickly compared to the older DSLRs. To combat this, I recommend carrying a few Sony z100 batteries with you at any time. While you can look to some more affordable 3rd party battery options, I don’t recommend them as you never know if they were built to the exact specifications that Sony lays out for its cameras. A faulty 3rd party battery could damage your camera, so to me, it isn’t worth the risk, even if the risk is small.
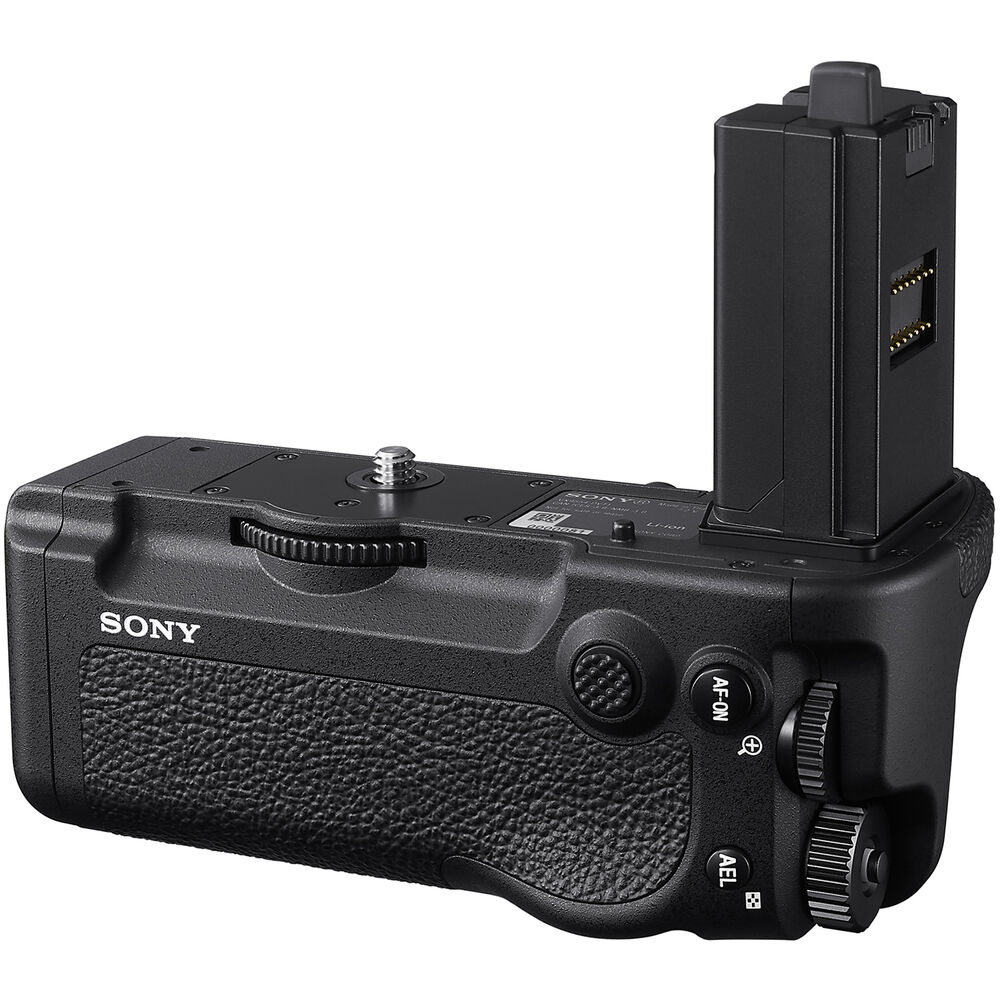
The Sony VG-C5 Vertical Battery Grip
While Sony prides itself on its smaller and portable (but extremely powerful) mirrorless cameras, there are times when a vertical battery grip can make a big difference. You get to use two batteries at once (doubling the amount of camera power you can use), and you can quickly move from horizontal to vertical shots while having access to all the same buttons and functionality. In addition, a battery grip on the Sony a1 II can help you balance the carrying weight of the larger telephoto lenses when shooting subjects handheld.
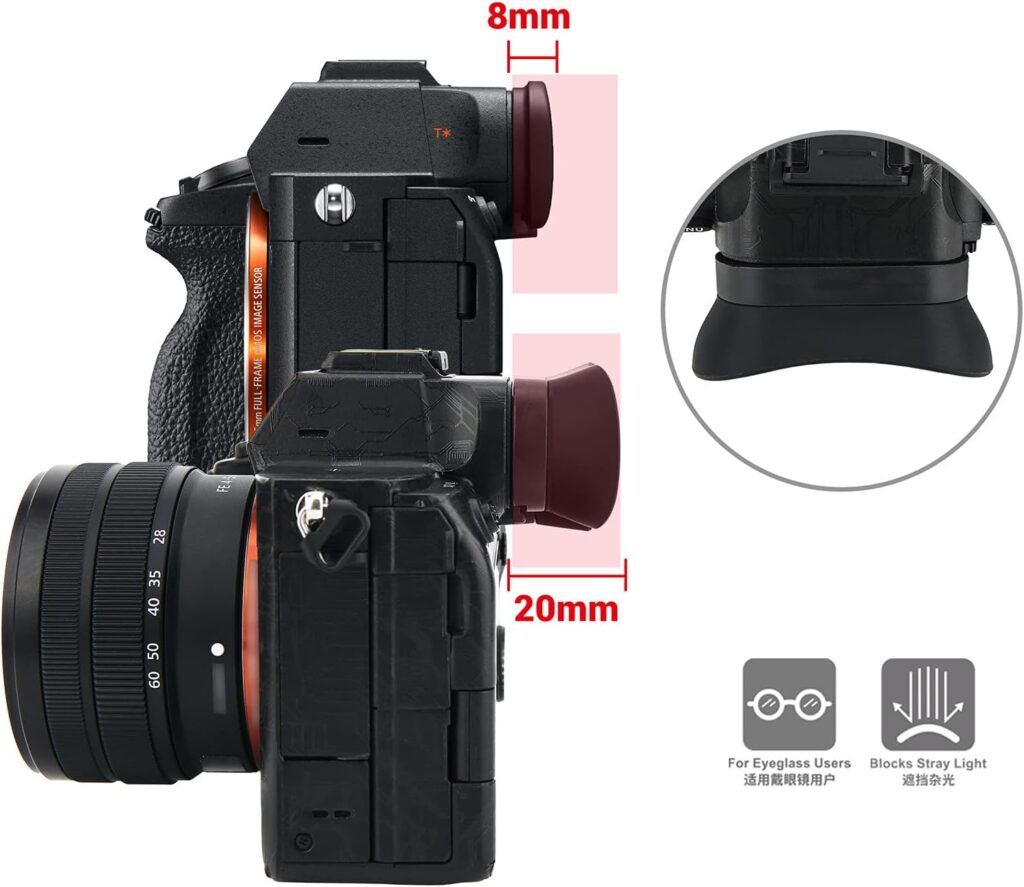
Extended Eye Cup
Easily one of my favorite accessories for any Sony camera, getting an Extended Eye Cup for the a1 II will help when shooting in bright situations, such as the middle of the day. The extended eye cup protrudes much further out from the camera itself, making it easier to block any light that might interfere with you looking through the viewfinder. This inexpensive accessory is a MUST, in my opinion!
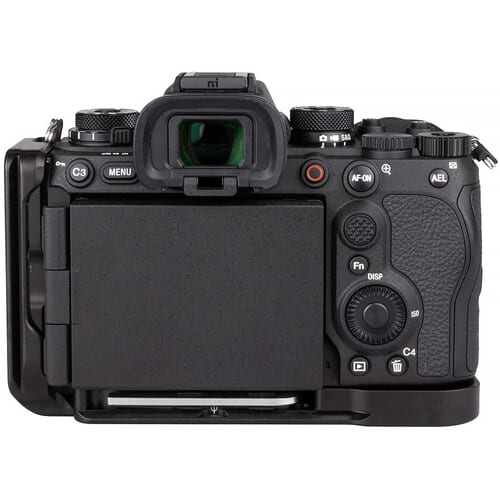
L Bracket for the Sony a1 II
If you are a landscape or studio photographer who often shoots from a tripod, an L-Bracket is necessary for any camera you own. With the a1 II having a nearly identical body to the Sony a9 III, you can pick up an L Bracket that fits either camera. Here are a few that I recommend:
Really Right Stuff (Pre-Order)
BH Photo
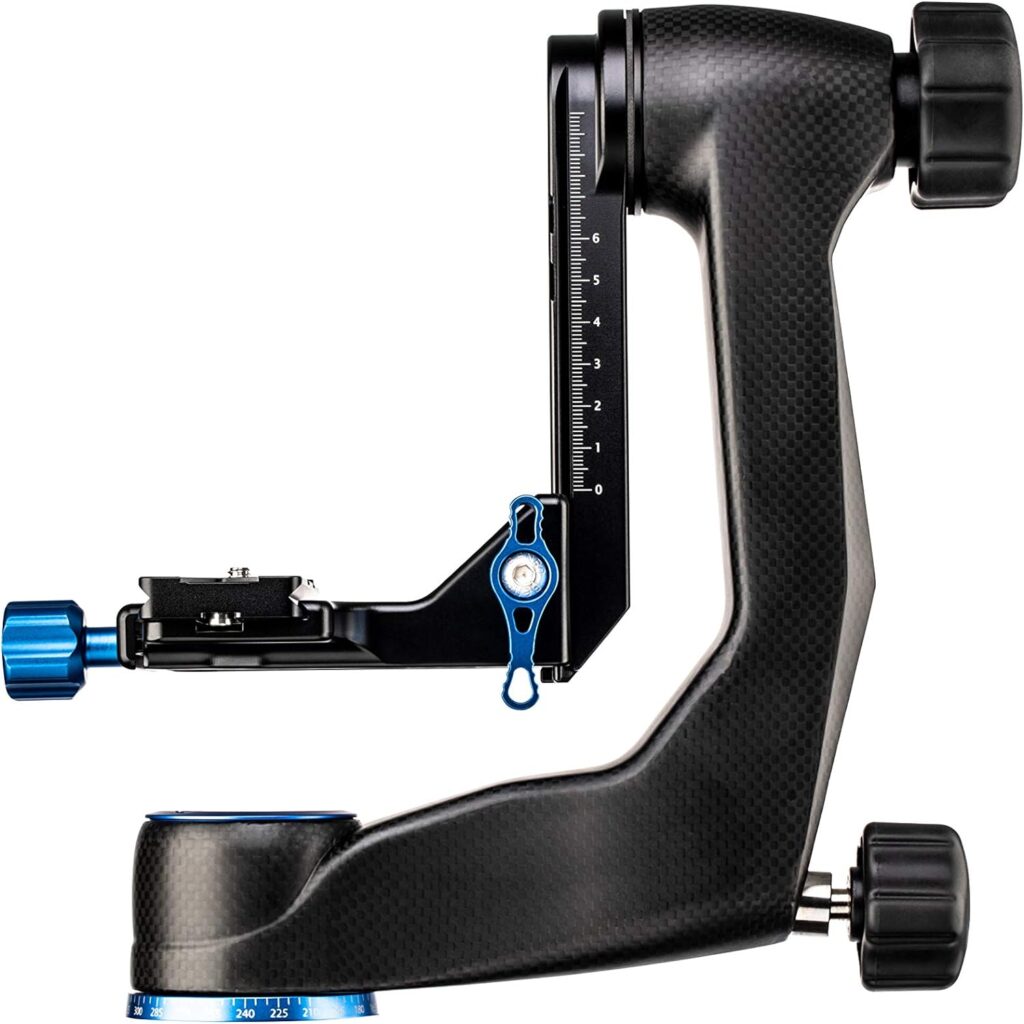
Gimbal Head for the Sony a1 II
Many wildlife photographers, especially my bird-focused photographers, can only live with a flexible gimbal head. A good gimbal will give you the freedom and stability to move in the X, Y, and Z motions to easily track a moving subject, such as a bird in flight. Here are a few of my favorite gimbal heads.
Benro GH5C Carbon Fiber Gimbal Head: Amazon | BH Photo
Leofoto PG-1 Gimbal Head: Amazon | BH Photo
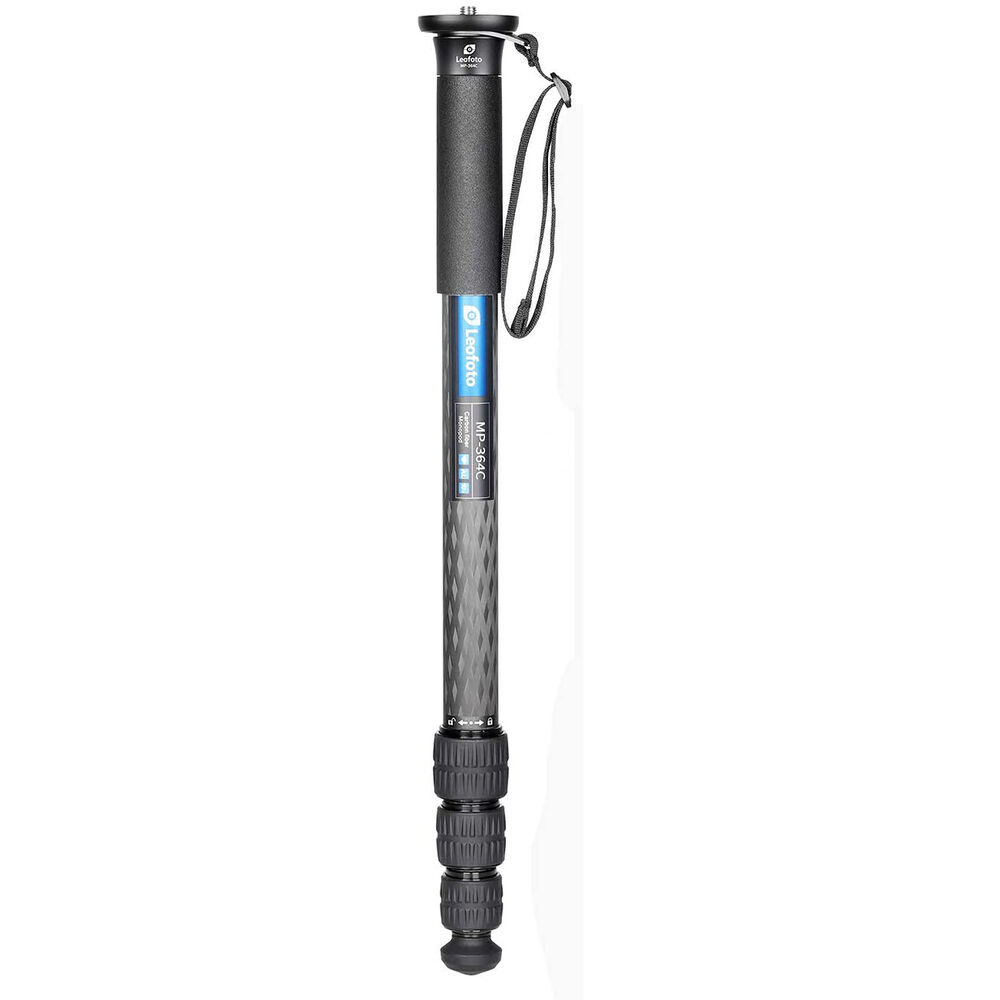
Monopod System for the Sony a1 II
With many Sony a1 II users interested in sports and wildlife photography, we should discuss the importance of picking up a quality Monopod for your a1 II. A monopod is a fantastic accessory for any photographer looking for more stability in their images when using longer and heavier telephoto lenses. My current favorite setup uses a two-part system of a Benro or Lefoto monopod and a Wimberly monopod head. The combination gives much of the flexibility of using a full gimbal to track moving subjects, such as birds in flight, without needing the weight of a heavy tripod and gimbal system.
Leofoto MP-364C Monopod: BH Photo
Monopod Head – Wimberly MH – 100: Amazon | BH Photo
Wireless Remote Control
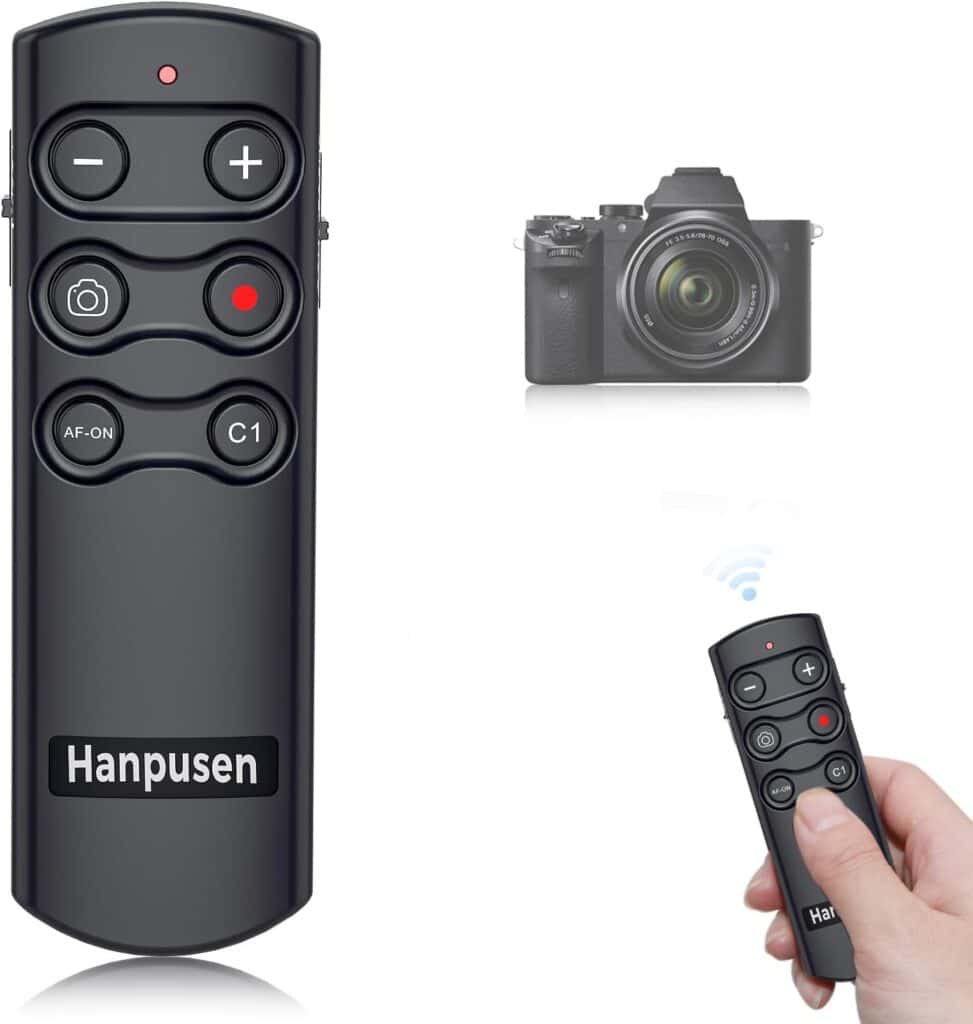
For some photographers, capturing an image or starting a video without touching their camera is essential. While you could always connect to your Sony a1 II using the Sony Creator’s App and use the remote function, this option does tend to drain the camera (and your phone’s battery) faster. You will want to pick up a wireless remote control to avoid this. While Sony does offer their wireless remote control, it is expensive. Instead, I recommend that you check out this 3rd party option, as it is much more affordable.
Fast External HD for Travel
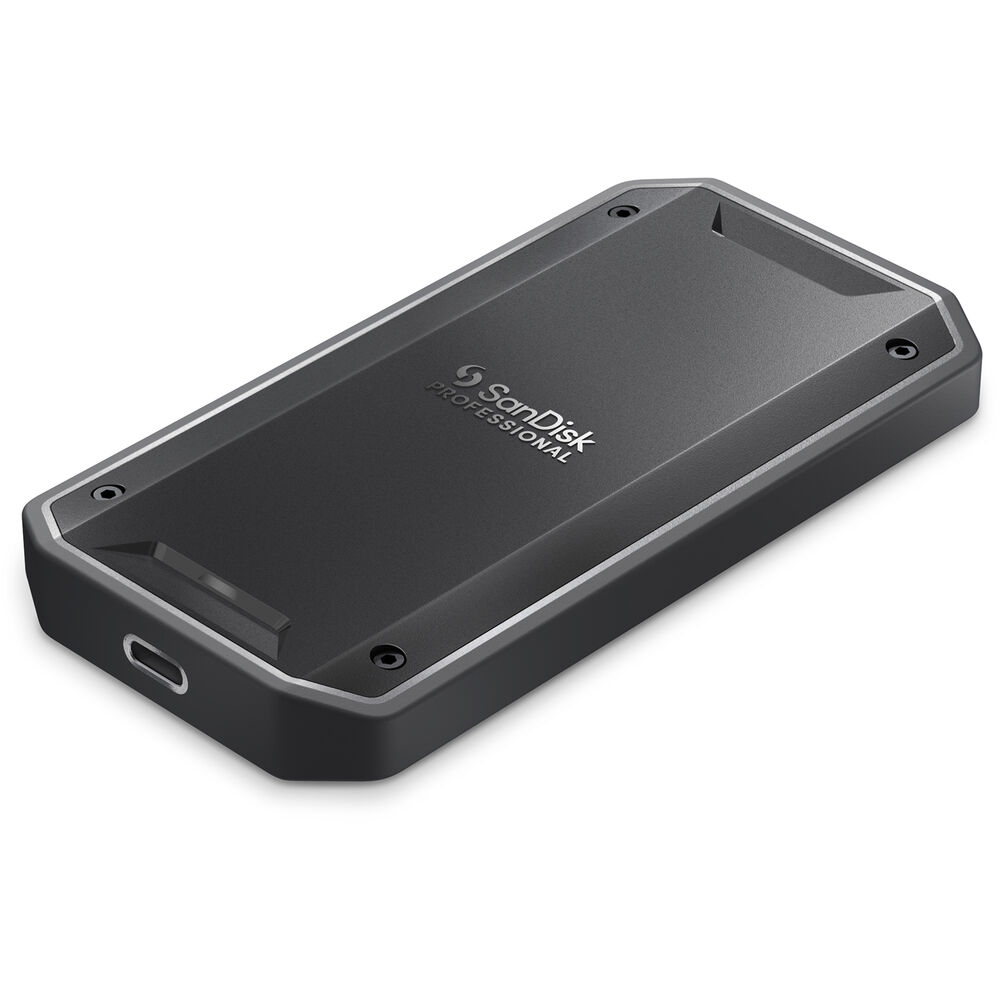
With the Sony a1 II shooting 50mp images and having the ability to shoot video up to 8k, you will want to look into picking up a fast and dependable travel hard drive. My favorite travel HD is the Sandisk Professional G40, which comes in 1TB, 2TB, and 4TB options. Why do I like this HD? It is not only tiny and portable but also speedy. I carry two 4TB drives on nearly all of my photo trips, and I regularly get 2500 mb/s read and 2700 mb/s write speeds when using a TB3 cable and the G40 with my Apple m3 Max Macbook Pro.
What Questions Do You Have?
As I mentioned at the start of this guide, I am happy to try to directly answer any questions you have about setting up your Sony a1 II. Did I miss something that should be added to this guide? Did you need more clarification on something? Let me know in the comments below!

