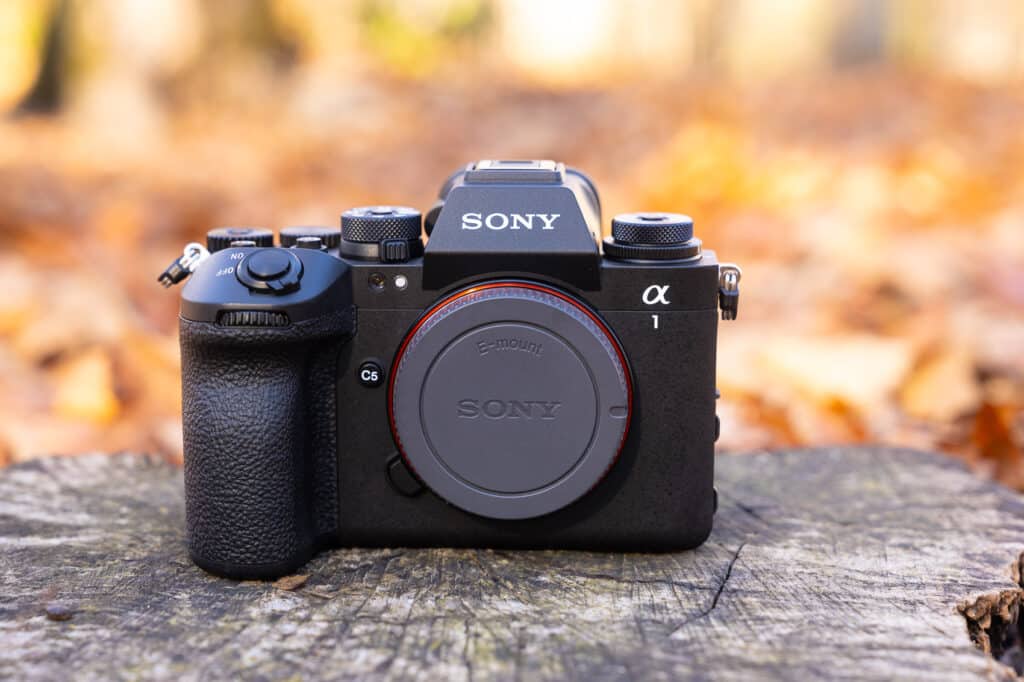
One of my favorite things to do with every new Sony camera I purchase is to customize the HELL out of it!
Many photographers don’t realize that nearly every button and dial on the a1 II can be customized, but it doesn’t stop there. The “Fn. Menu” and the “My Menu” features can also be adjusted. The way I look at it is this. Any feature or setting I want quick access to while shooting should be one button click away. Other things I can tuck away into the Fn. Menu, if I don’t mind, two button clicks to access them, and for anything in the camera menu that I want to find quickly, that should sit in my camera’s “My Menu” section. No one should fumble with their camera in the field to change a setting, turn on a feature, and miss a shot.
That is why I wrote this guide to Customizing Your Sony a1 II! I want to not only give you an idea of what is possible but also share with you how I choose to customize my cameras as a wildlife and travel photographer. To help with this, I will share my saved Settings file with you at the end of this blog article so you can load up all of my customizations in less than 30 seconds. While this guide is invaluable in helping you customize your own a1 II, it doesn’t break down every setting and menu item in the camera. For that, you will want to check out The Complete Setup Guide to the Sony a1 II. But for everyone else still sticking around, we have much to cover, so let’s get started!
If you are here by accident because you have the original Sony a1 and not the a1 II, check out my two setup & customization guides for that camera: The Complete Setup Guide to the Sony a1 & Customizing Your Sony a1.
*Any feature that is new to the a1 II that wasn’t in the original a1 will have a “*New” indicator next to it
Customizing the Buttons & Dials for Photo & Video
The first and most important thing to customize on your Sony a1 II should be the buttons and dials on the camera’s body. Why? Because anything you want to have immediate access to while shooting should go into these customizations. When I look through my viewfinder, I want to quickly change my AF area, adjust my ISO, or turn Pre-Capture on/off. On the Sony a1 II, 17 buttons and dials can be configured for each camera mode separately: photo, video, or image playback. I would find it very confusing to drastically change the functionality of every button for those three modes. Still, I will make a few notable changes, which you will see below.
It is also essential to know that not every setting can be set as a custom button or dial. The same can be said for the Fn Menu. The bottom line is that there are some limitations because of this, but for the most part, I have been able to setup my a1 II to fit my needs nearly perfectly.
To make changes to your own buttons and dials on the a1 II, head to the “Setup” menu and look for “3: Operational Customize”. There you will see “Custom Key/Dial Set” for Photo, Video and Playback.
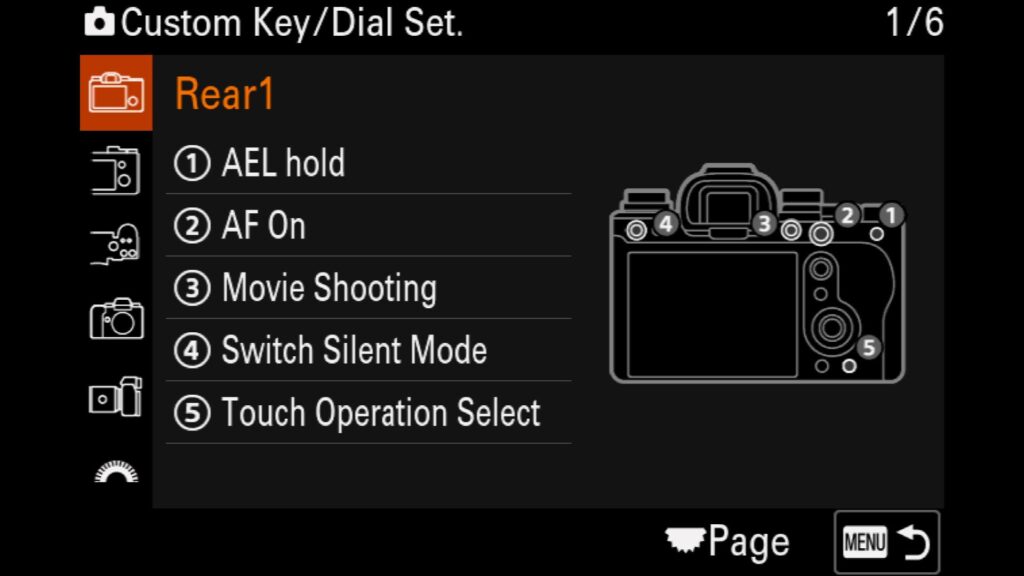
Rear 1
- AEL hold – While I don’t often use the “Priority” camera modes, I find the ability to lock in the exposure while in those modes helpful. AEL stands for “Auto Exposure Lock” and will keep the camera from changing your exposure in those priority modes.
- AF On – I am an old-school shooter and prefer to use back-button AF on my Sony a1 II. By default, the camera is set up for this.
- Movie Shooting – By default, you can start taking a movie by pressing this button, no matter your camera mode. Some photographers prefer to turn off this button or change its functionality in “Photo” mode so they do not accidentally start recording a video, but I like to leave it on. Sometimes, something incredible is happening before your eyes, and you want to start recording right away.
- Switch Silent Mode – While I mostly shoot in “Silent” mode with the a1 II, there are times when I need to quickly jump into the Mechanical Shutter (such as when on safari and we are using LED lights to light up subjects for a night drive). In that situation, I must jump out of “Silent” mode before changing from Electronic Shutter to Mechanical.
- Touch Operation Select – Allows you to turn “Touch Support” for the rear LCD screen on and off quickly. While I often use Touch focus/tracking with my a1 II, I sometimes find my nose accidentally taps the screen when I look through the viewfinder to take a photo. I can quickly turn the setting off when it isn’t needed.
* In video mode, I changed the C3 (number 4 above) to Breathing Compensation as it is a better tool to use when shooting video.
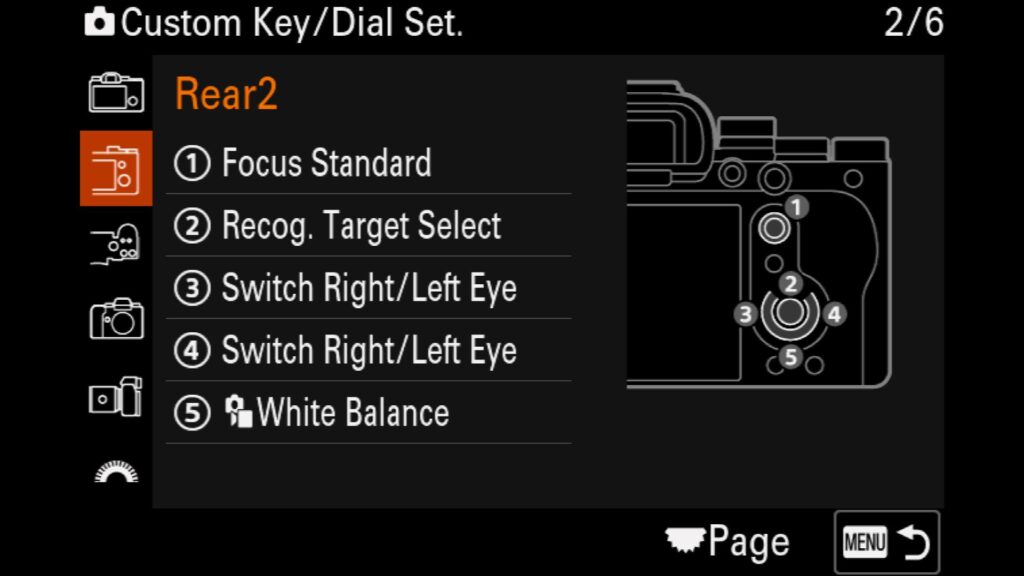
Rear 2
- Focus Standard – This is left as the default “Focus Standard.” The joystick itself will allow you to move your AF area around the scene, and if you press the button down, it resets the AF area box to the center.
- Recog. Target Select – I press the center button on the rear control wheel to switch between different subject types. I can quickly move between Human, Animal/Bird, Bird, and Insect. When you select this customization in the menu, it allows you to pick and choose which subject types you want to be able to rotate between. I pick the subjects I tend to photograph to most.
- Switch Right/Left Eye – With the significant advances in AI Eye AF with the a1 II, I want to be able to choose which eye I want to focus on quickly. So I don’t get confused, I apply this to the left and right buttons on the rear wheel.
- Switch Right/Left Eye – With the significant advances in AI Eye AF with the a1 II, I want to be able to choose which eye I want to focus on quickly. So I don’t get confused, I apply this to the left and right buttons on the rear wheel.
- White Balance – If I want to change the White Balance of an image, I press down on the rear wheel. Even though I shoot in RAW, I find it helpful to get a feel for the tone of an image by adjusting the white balance on the fly.
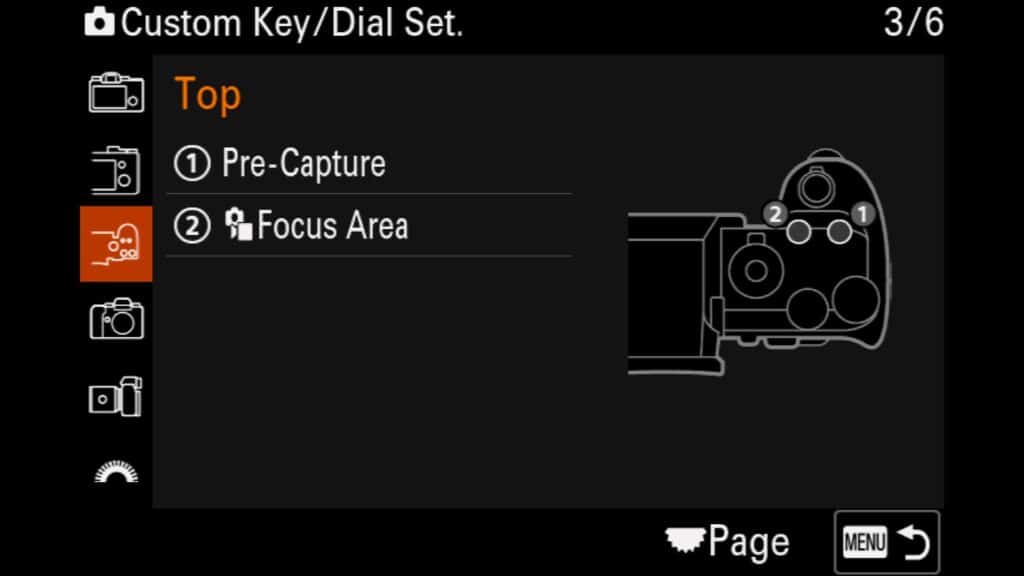
Top
- Pre-Capture (*New) – One of my favorite new features on the a1 II is RAW Pre-Capture, especially for birds and other wildlife that make sudden movements. However, I don’t always want this feature turned on because some of my subjects are static don’t move often. Having the ability to quickly turn it on or off depending on the scene I am looking at will save me a TON of time when it comes to culling through my images after a shoot.
- Focus Area – One setting I find myself changing most often is my AF Area mode. Sometimes, I need to quickly change from a Zone to a Flexible Spot to Wide Tracking, depending on the subjects I am trying to photograph. With this button, I can do just that, although I go into my menu system and limit the number of choices I have to the ones I use most. That way, I don’t have to shift through 15 different choices every time I press this button, but just the 5 or 6 options I use the most.
* In video mode, I changed the C1 button (#1 above) to “Steadyshot” settings. This way, I can quickly change between the different Steadyshot modes for video on the fly.
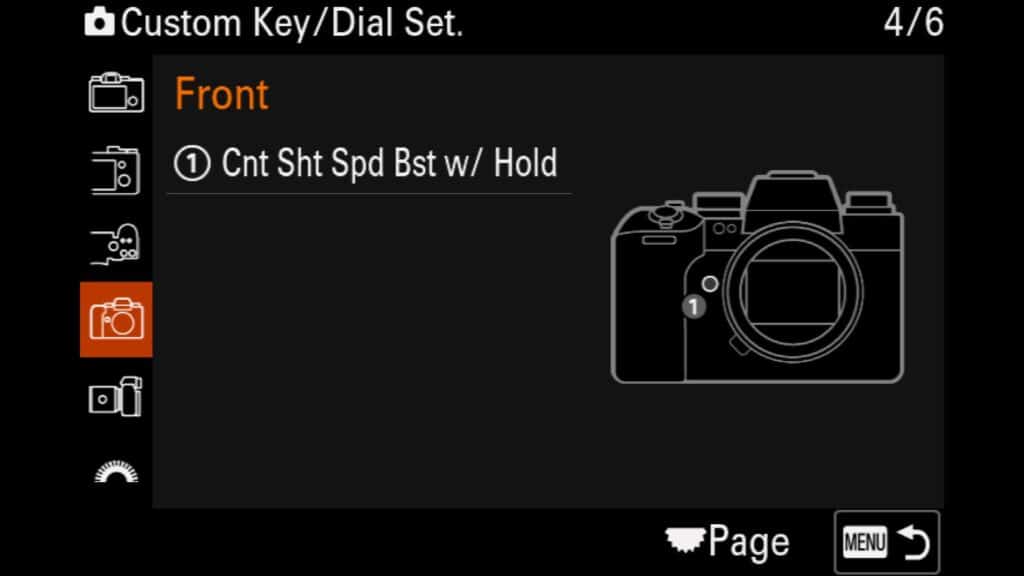
Front
- Control Shift Speed Boost w/ Hold (*New) – Pressing this button allows you to quickly shift the FPS you are shooting at to a specific preset number. By default, this is set to 30fps in the menu system, but I have changed it to 10fps. Why? When I shoot at 20fps or 30 fps with a moving subject, it is sometimes followed by another subject that is perched or sitting still. I don’t need 300 images of a static subject, so I can press this button to down-shift my FPS to 10fps and have something more manageable to work with. You can configure your setup this way or in reverse if you shoot more static subjects more often.
Lens
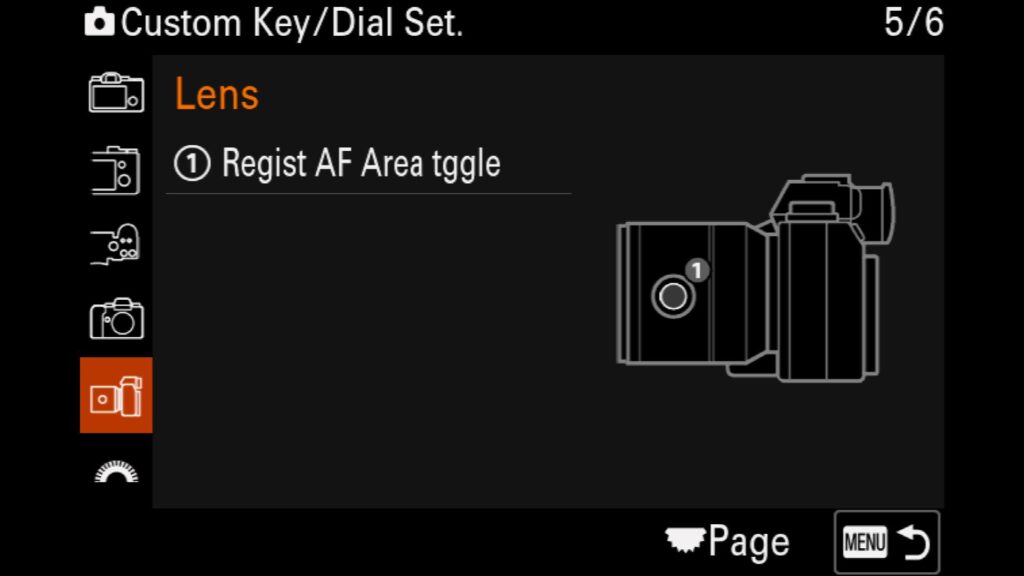
- Register AF Area Toggle – One of my favorite features as a wildlife photographer is having the ability to instantly change my AF Area to a preset (or pre-registered) type. Why? I often shoot in Zone or Zone Tracking modes, but occasionally, I am working with a tiny subject, and the AF system needs some help to know exactly what I want to focus on. I can instantly recall the Medium Adjustable Spot I registered with the camera by pressing this button. If I press it again, it returns to the Zone AF area I was in previously. I don’t have to go into the menu or fumble around a scrolling list of options. I instantly press the button and change my AF area to the one I need.
Dial/Wheel
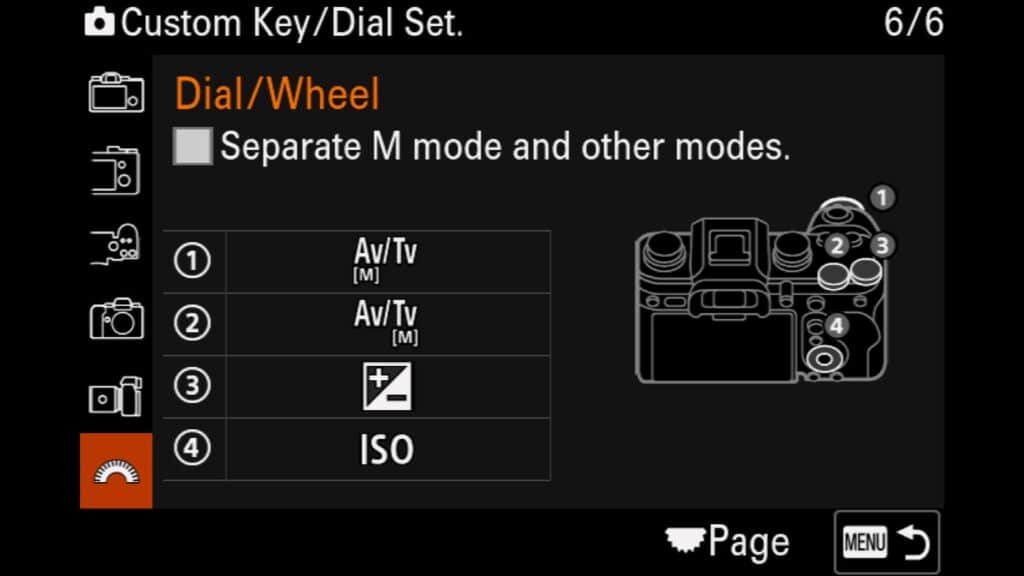
- Aperture Dial – I leave this at the default setting to control aperture
- Shutter Speed Dial – I leave this at the default setting to control shutter speed.
- Exposure Compensation Dial – Allows you to adjust the exposure of an image or video when you are shooting in either one of the Priority Modes (A – Aperture Priority or S – Shutter Speed Priority) or if you are using AUTO ISO. Turn the dial to the left to decrease the exposure and to the right to increase the exposure.
- ISO – I set the rear wheel to adjust ISO quickly and easily. By default, you need first press the right button on the rear wheel and then change the ISO, but I prefer quick access to this feature. If I spin the wheel, the ISO is adjusted up or down. Some people dislike having it set up like this because they accidentally hit the wheel and change their ISO. I have been using this method for years, so this rarely, if ever, happens to me anymore.
Custom Buttons for Playback Mode
When reviewing your images and video, it is essential to understand the tools and features you have at your disposal. I don’t make any sweeping customizations to the functions of these buttons, but I make a few changes from the default settings.
Rear
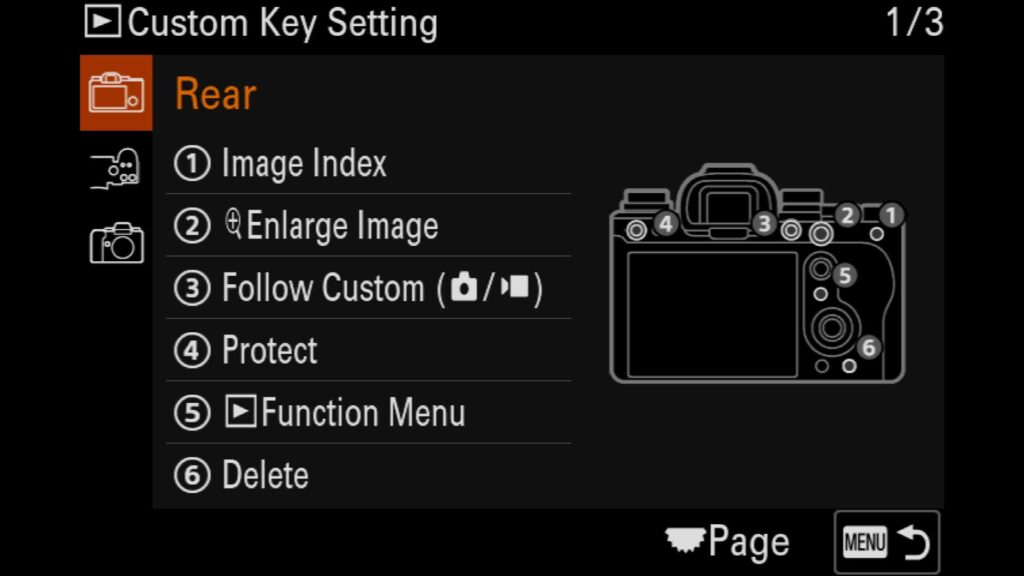
- Image Index – Brings up an Index viewed (zoomed out with thumbnails) that shows all of the photos and videos on the memory card inside the a1 II). This is a handy feature when you are looking for a particular image.
- Enlarge Image – When you want to check the sharpness of an image, you will want to hit this button. The first press of this button zooms in beyond 100% into the photo. Every additional press of the button zooms in further a much smaller amount. Hit the “Menu” button to go back to the full-sized view of the photo.
- Follow Custom (from Photo/Video) – By default, this is set to start a video recording.
- Protect – A convenient tool to help make sure you don’t accidentally delete an image or video. Any image that has been “protected” can not be deleted, but it can still be removed if you format the memory card. I often use this feature with the a1 II to protect a handful of images from a large burst of photogs, such as a bird in flight that I shot at 30 fps. I might have 100 pictures or more in the burst. With the “Display as Group” feature turned on, I can quickly look at all the images in the stack/burst and single out my favorites by hitting this button and “protecting” them. Once I have selected all my favorites, I delete the group/stack of images, and the only thing left are the photos I had “Protected” using this button. This is a great way to help me cull through some of my image bursts while still in the field.
- Function Menu – Opens up the Fn Menu, which you can fully customize. I leave my Fn menu for “Playback” on default as it already has all the tools/settings I want access to.
- Delete – This is self-explanatory, but pressing this button will delete the photo(s) or video you are looking at.
Top
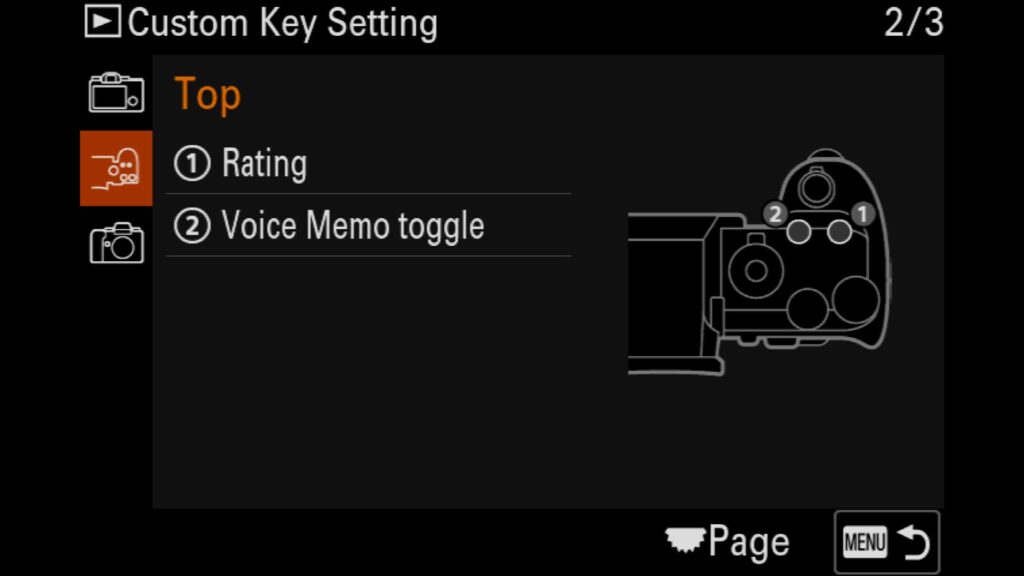
- Rating – Embed a star rating (1-5) for any image that will be carried over to Lightroom/Bridge. This way, you can digitally mark your favorite photos you know you want to look at first by giving it a quick star. Once I import these images into Lightroom, I sort them by star rating, making it very easy to spot the photos I had marked to take a closer look at.
- Voice Memo Toggle – Press this button once to start recording a voice memo attached to the current image you view on the back of the camera. This handy feature/tool makes recalling certain information about an image, such as the species name, effortless while in the field. When I return to my laptop, I play the voice memo to recall the notes I recorded for the image.
Join the Photography Workshop Waitlist to learn more about any upcoming adventures...
Join the Workshop Waitlist to learn more about any upcoming adventures...
Setting Up the Fn Menu
The next best feature to customize is the “Fn Menu,” which you can find by pressing the “Fn” button on the back of your Sony a1 II. Here, you can choose up to 12 different settings to access, but just like with the customized buttons, you can set up an entirely different Fn menu for shooting in the various camera modes. Theoretically, you could configure up to 24 settings to appear in your Fn. Menu when switching between shooting photos and video with the a1 II. This is precisely what I do because the settings I want access to when capturing images or shooting videos are often so distinct from one another.
To change your Fn Menu, head to the “Setup” menu and find “3: Operation Customize”. There, you will see “Fn Menu Settings.”
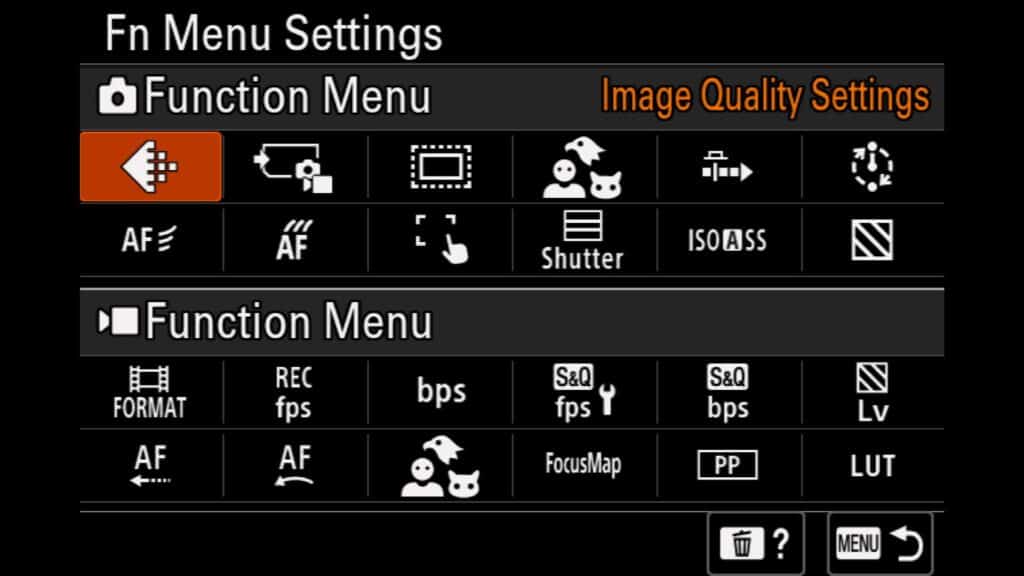
Photo Fn Menu - Upper Row from Left to Right
- Image Quality Settings – To quickly change the file format of your still images. I can easily change my RAW file type from Lossless Compress (L) to Compressed, for example.
- Rec. Media Settings – To easily change where my photos and videos are being written via the two available card slots.
- APS-C Mode – While I rarely use this feature, forcing the camera into “APS-C” mode is occasionally useful, as it mimics shooting on a crop sensor camera. The a1 II will artificially crop into your image, outputting a 20.1 MP image in the process. I don’t use this feature much because there is no difference between using this mode and just cropping into the image when editing on a computer.
- Recognition Target – This allows me to quickly change between the different subject targets for the AI-based AF System (Such as human, animal, bird, insect, etc.). It also acts as a reminder to let me know which target I currently have selected.
- Pre-Capture (*New) – This allows me to turn pre-capture on and off quickly. While I already have this setting configured to my C1 button on the top of the camera, it acts as a reminder to let me know if I have it engaged.
- Interval Shooting – This setting lets me turn Interval Shooting on or off. I enjoy shooting time-lapses and prefer to have access to the RAW files this mode provides over the new “Time-lapse Video Mode” found on the a1 II that solely creates the timelapse video for you. Regardless, I still need to jump into the “Interval Shooting” settings in the camera’s menu to adjust the settings of my time-lapse before I can begin shooting.
Photo Fn Menu - Lower Row from Left to Right
- AF Level for Crossing – This setting allows me to change the sensitivity or “stickiness” of the AF system as other objects cross in front of my subject as I am tracking it.
- AF Tracking for Speed Change – This allows me to change how fast I want the AF system to react to the movement of my subject.
- Touch Function in Shooting – Adjust the functionality of the Touch support for the rear LCD screen. I can change from “Touch Focus” to “Touch Tracking” to “Touch Shutter” very quickly.
- Shutter Type – This setting lets me jump from shooting with the Electronic Shutter to a Mechanical shutter.
- ISO Auto Minimum Shutter Speed – Sets the minimum shutter speed I want to maintain when using AUTO ISO in Aperture Priority mode. This feature is popular with many wildlife photographers who enjoy shooting in Aperture Priority mode to maintain a shutter speed that is fast enough to photograph their subjects.
- Zebra Display – Turn on and off the Zebra display with the a1 II. I have my Zebra set to a custom lower limit of 107+, unique to the a1 and a1 II, to help me not blow out the highlights in my images. I share more info about this in my Setup Guide for the a1 II.
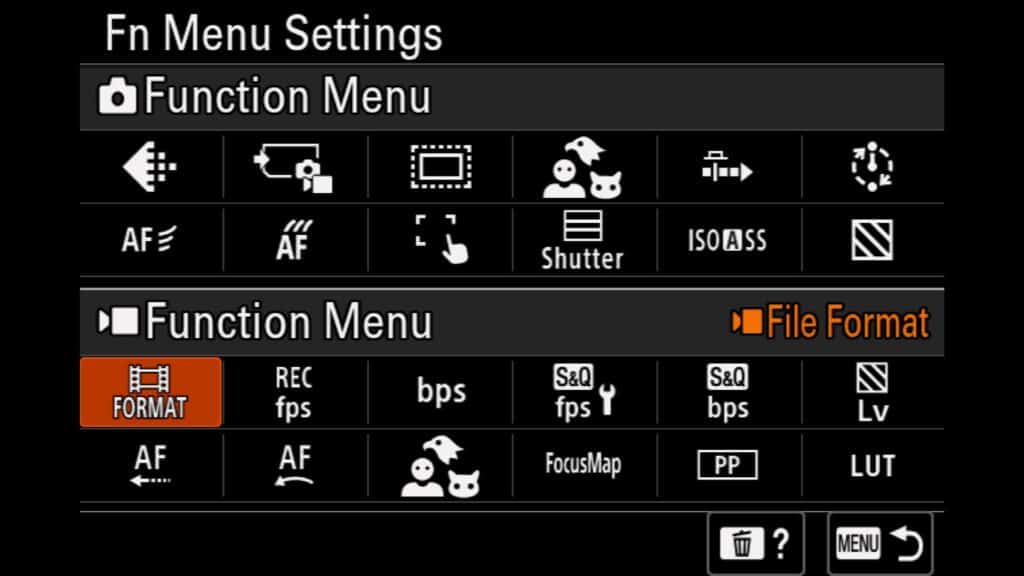
Video Fn Menu - Upper Row from Left to Right
- File Format – This allows me to change the resolution of my videos from 8k to 1080p and everything in between.
- Record Frame Rate – This allows me to change my video frame rate from 24p, 60p, and 120p. If you are shooting in PAL, you will see slightly different options in the EU.
- Record Setting – I can quickly change the bitrate and color depth of my videos. This can drastically affect the size of the videos that are created.
- S&Q Frame Rate Setting – This allows me to change the recorded frame rate and the actual frame rate of the video, determining how much slow motion is applied to an S&Q video.
- S&Q Record Setting – This allows me to quickly adjust the bitrate and color depth of an S&Q video.
- Zebra Level – This allows me to adjust the Zebra level for any videos I shoot. Because I set a custom zebra level for my still images (of 107+), I need to change this back to the industry standard of 70 when doing any serious video work.
Video Fn Menu - Lower Row from Left to Right
- AF Transition Speed – Sets the speed of the AF system as it moves to a new subject to focus on in video mode.
- AF Subject Shift Sensitivity – Sets the sensitivity or “stickiness” of the AF system once the AF system has locked onto a subject.
- Recognition Target – This allows me to quickly change the subject target for the AI AF system for humans, animals, birds, and insects. With Eye AF tracking in video, it is important to have this setting set in the right mode for your subject.
- Focus Map – Turns the focus map on/off when shooting videos. This overlay makes it easier to see which part of my frame is in focus and determine where my foreground and background are regarding my focal plane.
- Picture Profile – This allows me to change the Picture Profile of my video. With the a1 II, this is best used to move from no PP to PP11, otherwise known as S-Cinetone. I cover this more in-depth in my Complete Setup Guide to the a1 II.
- Select LUT (*New) – This allows me to select a specific LUT when shooting in S-Log3 with the a1 II. I can choose from several preset options or import my own via a memory card.
Diving Into the My Menu System
Lastly, we have the My Menu System. Here, you can customize a part of the a1 II’s menu system to show you the settings you are interested in or want access to. The settings I put in here are those that I can’t customize to a button, dial, or the Fn menu, but I still want to be able to find them quickly. There is no reason you should ever have to dig through the main menu system of the a1 II to find a setting you use frequently. Add anything you might want access to to your “My Menu.” and be done with it.
To make changes to your own My Menu system, navigate to the “Star” menu at the top of the main menu and find “My Menu Setting.” There, you can add, delete, and sort any settings you wish to different custom My Menus that you create.
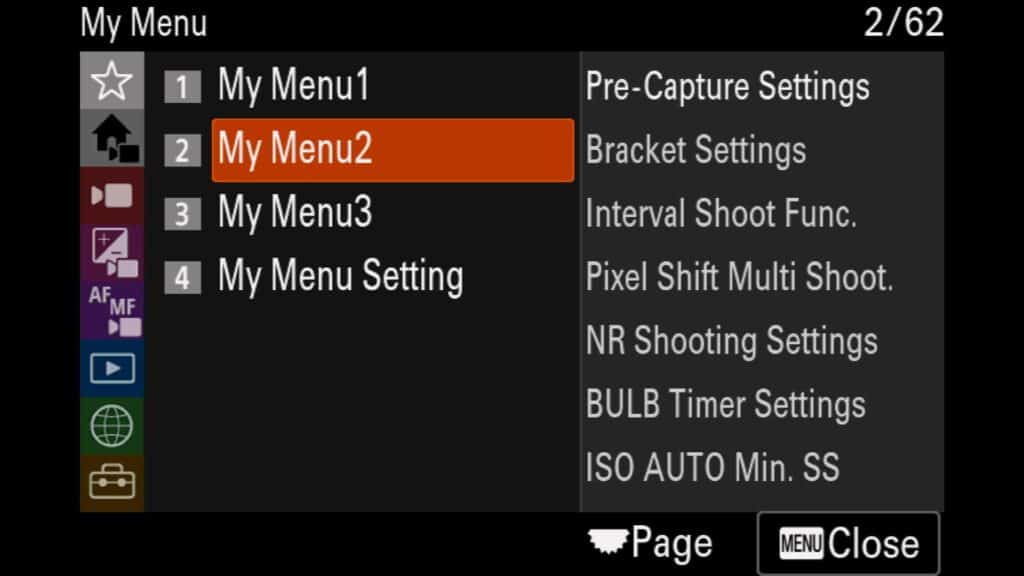
I have three customized “My Menu” pages focusing on different groups of settings, but you can create more if needed.
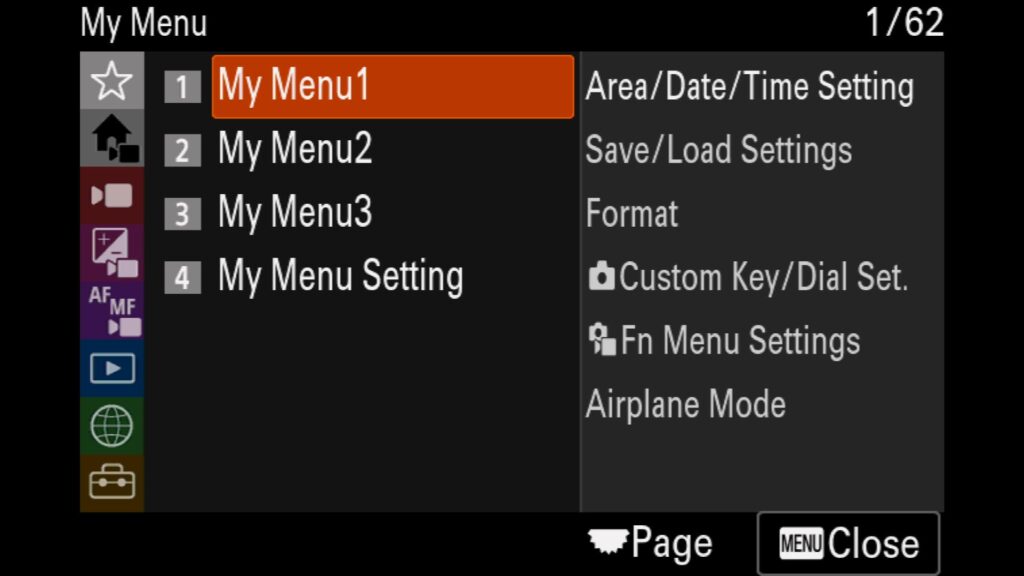
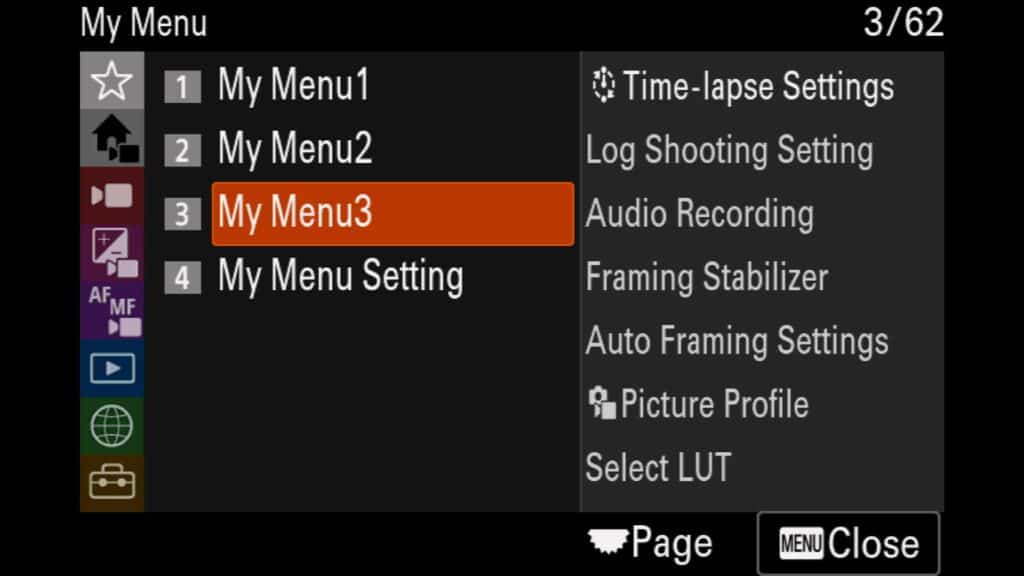
My Menu1 - General Settings
- Area/Date/Time Setting – Change your camera’s time zone, date, and time. It can be helpful to synchronize multiple camera bodies on a shoot so that all your images line up chronologically in Lightroom.
- Save/Load Settings – Quickly save or load a settings file for your Sony a1 II, such as my personal settings file for my a1 II, which I will share with you in the next section of this guide.
- Format – Format your SD or CF Express Type A card
- Custom Key/Dial Set – Quickly adjust the buttons or dials you have customized on your camera.
- Fn Menu Settings – Jump into the Fn Menu to make any necessary changes or updates to the settings you want accessible.
- Airplane Mode – To save battery with the a1 II, you can put it in airplane mode to turn off the Bluetooth and wifi features of the camera.
My Menu2 - Photo Related Settings
- Pre-Capture Settings (*New) – Turn pre-capture on/off, set the pre-record timing and how to engage the feature.
- Bracket Settings – Change the type of bracket (exposure, focus, white balance), set the self-timer during bracket, change the bracket order, and adjust the focus bracketing settings.
- Interval Shoot Function – Turn Interval Shooting on/off, Adjust the start time for the time-lapse, change the shooting interval, the number of photos to shoot, adjust the Auto Exposure tracking sensitivity, and more.
- Pixel Shift Multi Shoot – Turn Pixel Shift on/off, adjust the settings for 4 short PS, and adjust the settings for 16 PS.
- Noise Reduction Shooting Settings (*New) – Turn Noise Reduction Shooting on, select the RAW file type and choose the number of shots.
- BULB Timer Settings (*New) – Turn on the BULB timer and set the exposure time between 2 seconds and 900 seconds.
- ISO AUTO Min. Shutter Speed – Choose the minimum shutter speed for shooting in Aperture Priority mode with AUTO ISO turned on.
My Menu3 - Video Related Settings
- Time-lapse Settings for Video (*New) – Adjust the Frame Rate Settings, Interval, Video bitrate + Color depth, and adjust the Video Light Setting of the Time-lapse video in this new mode for the a1 II.
- Log Shooting Setting (*New) – Turns on Log shooting, allowing you to shoot in S-Log3, adjust the color gamut of the Log, and choose to embed the LUT file with the video or not.
- Audio Recording – Turns audio recording on/off when shooting videos.
- Framing Stabilizer (*New) – Allows you to turn on Framing Stabilizer and adjust the subject’s position in your frame. This feature is built to help you keep your subject in the frame of your shot while the camera is also moving to track the subject.
- Auto Framing Settings (*New) – Allows you to turn on Auto Framing, tell the feature when to start, adjust the crop level, frame tacking speed, and move recording and HDMI output crops. This feature was built to keep the frame of your video centered on the subject by auto-copping into the frame. It is best used when the camera is on a tripod but the subject is moving.
- Picture Profile – Allows for you to pick a picture profile to shoot in, including the popular S-Cinetone PP that does not require extra color grading in post like S-Log3 does.
- Select LUT (*New) – Select the LUT for your video shoot in S-Log3. Choose between a small set of preset LUTs or import your own and use them while shooting a video.
Additional Customizations
While we have covered the core systems of the Sony a1 II that can be customized, there are a few more customizable features worth mentioning that you will find if you download my a1 II Settings file that I list below.
Custom AF Areas (*New)
Brand new to the Sony a1 II is the ability to set custom AF Areas for the new AI-based AF system. You are no longer limited to the options found on my cameras (such as wide, zone, and small adjustable spots). This is very helpful, especially for wildlife/sports photographers, as you might encounter scenes where you want to place a moving subject in a particular portion of your frame, but the default boxes don’t cover enough of the subject. What is great about this feature is that these new custom Focus Areas will work in normal and tracking AF modes.
To customize an AF point, head into the Focus Area menu (C2 if you followed my customized buttons above) and scroll down to C1. Hit the “Delete” key to enter the customization mode. Now, you can use the rear joystick, rear control wheel, and aperture and shutter speed dials to change your new Focus Area box’s shape, size, and location.
I have three custom Focus Areas set:
C1 – A Long rectangular box for vertical shooting (mostly) that covers most of the middle of the frame but leaves the edges out. I plan on using this for situations such as a diving Kingfisher or a vertical shot of a bird leaving a perch.
C2 – Similar to the Zone Focus Area, but slightly larger.
C3 – A large rectangle box that covers half the frame. This is great for situations where you know you want your subject on the left or right of your frame, but the Zone Focus Area just didn’t cut it.


Custom Camera Set. Memory
While this feature has been around for several generations with Sony cameras, I don’t feel it ever gets enough attention. What you can do with this feature is save all of your camera settings to the 1, 2, and 3 camera modes found on the top dial of your camera, not just ISO, Shutter Speed, and Aperture. You can drastically change menu items, picture profiles, FPS, etc. You can even save all of these settings in photo or video modes. The bottom line is that there are a few limitations to what you can do when saving and recalling these custom camera modes.
To save your own Custom Camera Modes, once you have all the settings you want changed, head to the “Shooting” menu and look for the “4: Shooting Mode” sub-menu. There you will find “Camera Set. Memory”. Once inside this feature, move to 1, 2, or 3 and hit the Ok Button (Center of the rear control wheel). M1, M2, M3, and M4 are also options, but those are saved on the memory card in your a1 II, which means they will be deleted if you format the card.
* Note that Camera modes 1, 2, and 3 will save separately depending on whether you are in Photo, Video mode or S&Q mode. So, in theory, you could have Camera Mode 1 store a set of settings for shooting photos and a completely different set of settings when you switch to video mode and S&Q mode. This allows you to save nine different stored settings on the camera (3 for photo, 3 for video, and 3 for the S&Q mode), all within the custom camera modes 1, 2, and 3.
My Custom Camera Modes:
I currently only have one Custom Mode, but I will update this guide section as I add more.
1 Wildlife Video Mode –
For this custom camera mode, I am shooting video at 4k-120FPS, using the PP11 picture profile for S-Cinetone, and I have adjusted my general exposure to 1/250 | f/4 | ISO 400 as a baseline for slowing down the 120FPS footage in post. I have reset the custom Zebra setting I use for images to 70, the industry standard for video work. I also selected my C2 custom AF area and slightly adjusted my AF tracking speed in the video to get the best results.
Downloading My Settings File for the a1 II
As promised, I also wanted to offer you the ability to download and use my Sony a1 II Settings file to help speed up the setup/customization of your camera. This will include everything I discussed and all the changes I mentioned in my other article, The Complete Setup Guide to the Sony a1 II. I only ask that you sign up for my newsletter below. If you are already a subscriber, fill it out once more, and you will be directed to the download and installation instructions to get the file working on your Sony a1 II.
Did I Miss Something?
Do you think I missed something or do you need more clarification with something, please let me know in the comments below!

